#Finest groups and methods for Spiral Abyss Flooring 12 in Genshin Influence 4.5
Table of Contents
Finest groups and methods for Spiral Abyss Flooring 12 in Genshin Influence 4.5
The wrestle typically will get the very best of us sticl grinding for the previous couple of stars in Genshin Influence’s Spiral Abyss. For those who’re working low on time and wish some fast sources, we’ve received you lined. Listed below are the very best groups and methods for the present Spiral Abyss Flooring 12 in Genshin Influence.
Present Abyss cycle ends on:
April 15
Finest groups and methods
Steered groups for first half:
The primary two chambers function a number of waves of mobs. The smaller mobs are all susceptible to crowd-control, so I like to recommend Venti, Kazuha, or Sucrose in case you have them constructed. I additionally advocate a powerful healer, since lots of the enemies within the first half can hit fairly onerous and the Husks punish you for having a protect.
Steered groups for second half:
- Navia – Zhongli/Albedo/Chiori – Bennett – Xiangling
- Yoimiya/Hu Tao – Xingqiu/Yelan – Zhongli – Bennett
- Tighnari – Fischl/Yae – Nahida/Dendro Traveler – Zhongli
- Noelle – Gorou – Yun Jin – Furina
The second half consists of boss chambers, encouraging groups with excessive single-target injury. The third chamber requires both blunt assaults or Geo injury to deplete a Geo protect, so Geo characters like Zhongli are strongly inspired.
Blessing of the Gravel Moon
After coping with three situations of Geo injury, the character will achieve a 50% Geo DMG bonus. That is nice for all Geo groups, whether or not they scale with ATK (Navia, Ningguang), DEF (Albedo, Noelle, Itto), or each (Chiori). Not like most Abyss blessings, this one is definitely a major buff. You may nonetheless brute pressure your approach via this Abyss with non-Geo groups, however I extremely advocate making an attempt a Geo group in case you have one, particularly within the second half.
Flooring 12 Chamber 1

First Half
Wave 1: 2x Massive Dendro Breacher Primuses, 1x Pyro Abyss Mage
Wave 2: 2x Fatui Operatives
Second Half
Wave 1: Jadeplume Terrorshroom
Ideas
The Breacher Primuses can simply kill you if you happen to don’t have a powerful shielder or healer. It’s additionally simple to by accident take self-damage from Burning, particularly if each Primuses handle to encompass you. I might attempt to keep away from Pyro and convey a powerful defensive teammate. The Operatives can apply a Bond of Life with sure assaults, stopping you from receiving therapeutic. They’re each Venti-able although, so you possibly can carry Venti or any crowd-controller to push them round.
The Jadeplume Terrorshroom has excessive Dendro RES, however it’s attainable to brute-force your approach via with a really well-invested Dendro DPS. Pyro assaults will trigger it to summon minions, whereas Electro assaults will trigger it to go berserk earlier than beautiful itself. You don’t must carry Pyro or Electro although; simply use no matter highest-DPS group you will have.
Flooring 12 Chamber 2
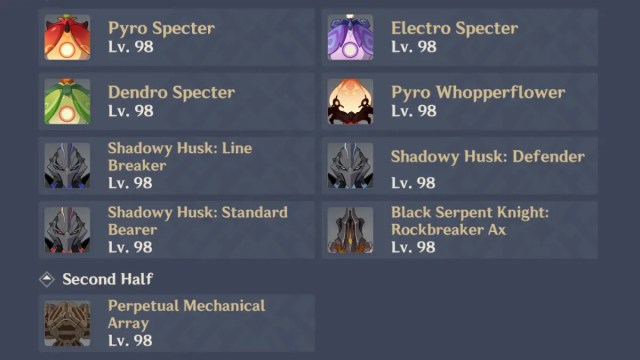
First Half
Wave 1: 2x Pyro Specters, 2x Electro Specters, 2x Dendro Specters
Wave 2: 3x Pyro Whopperflowers
Wave 3: 3x Shadowy Husks, 1x Rockbreaker Serpent Knight
Second Half
Wave 1: Perpetual Mechanical Array
Ideas
Crowd-control is essential within the first half. The Specters and Whopperflowers are all susceptible to crowd-control. Venti, Kazuha, or Sucrose will assist maintain them grouped collectively. All the Husks in Wave 3 have a mechanic that punishes shield-wearers, and the Rockbreaker will attempt to protect its pals. Attempt to carry a healer fairly than a shielder, and maintain everybody grouped collectively. Freeze groups work nice right here.
The Perpetual Mechanical Array will change into invulnerable at low well being, summoning a number of break machines because it tries to get well. Discover the one break machine with a hoop of golden symbols round it, and defeat that one to stun the principle boss. The primary machine core will then change into susceptible, letting you deal injury to it with no matter group you discover most snug.
Flooring 12 Chamber 3
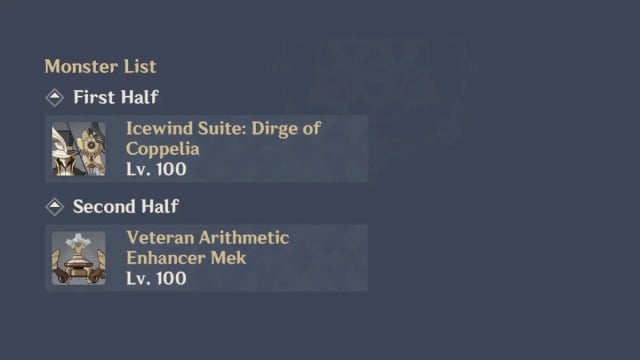
First Half
Wave 1: Icewind Suite: Coppelia
Second Half
Wave 1: Arithmetic Enhancer Mek
Ideas
If you begin Coppelia’s combat, her associate, Coppelius, will transfer to the surface of the world and ship waves of Cryo injury in the direction of you. Each meks are able to important injury, so attempt to carry a powerful shielder or healer and keep watch over the place Coppelius is. This boss resists each Anemo and Cryo.
The second half is a souped-up model of the Native Legend Arithmetic Enhancer Mek within the open world. Use Geo injury or blunt assaults to interrupt its Geo protect, then deal injury with any ingredient whereas the protect is down. Geo groups or Claymore customers are nice right here.