
Table of Contents
New York Mysteries 4: The Outbreak continues your adventures in Nineteen Sixties New York, the place our major character, Laura, is investigating a illness spreading across the metropolis. The story takes place over a number of areas, requiring you to unravel dozens of puzzles to be taught extra concerning the world’s circumstances.
Let’s dive proper into an entire walkthrough of New York Mysteries 4: The Outbreak, together with each merchandise you could discover to progress via every half.
Full New York Mysteries 4: The Outbreak walkthrough
You’ll initially begin your playthrough by listening to the narrator, Laura, describe the occasions main as much as the current day. Seems, she’s been kidnapped, and it’s as much as us to get her out so she will be able to discover town. These occasions lead as much as the sport’s tutorial throughout the first space.
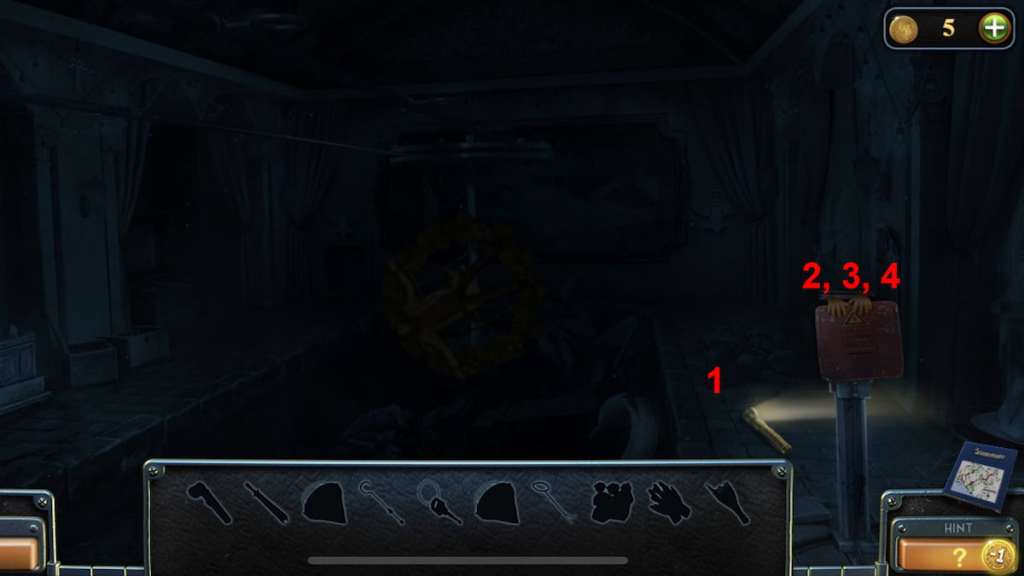
Tutorial room
After you get up in a mysterious social gathering room, you’ll resolve whether or not to start out an elective tutorial. This tutorial will information you thru learn how to exit the room, however in case you skipped it, we’ll briefly clarify learn how to full it.

Right here’s an entire step-by-step to leaving the tutorial room:
- Faucet on the desk subsequent to the door.
- Sift via its drawers till you discover a key and pliers.
- Go away the go away and faucet on the blue handkerchief desk. Take its ring.
- Open the wardrobe within the again nook of the room.
- Clear away the garments till you receive a hanger.
- Faucet on the hanger in your stock and use the pliers on it to acquire a skinny tube.
- Use the skinny tube on the door to flee.
Congratulations, you’re now out of the tutorial room and into the remainder of the map. It’s time for the actual problem to start. Earlier than leaving, although, pay attention to the Masks puzzle subsequent to the wardrobe. You don’t have to do something with this but, however we will likely be returning to it later.
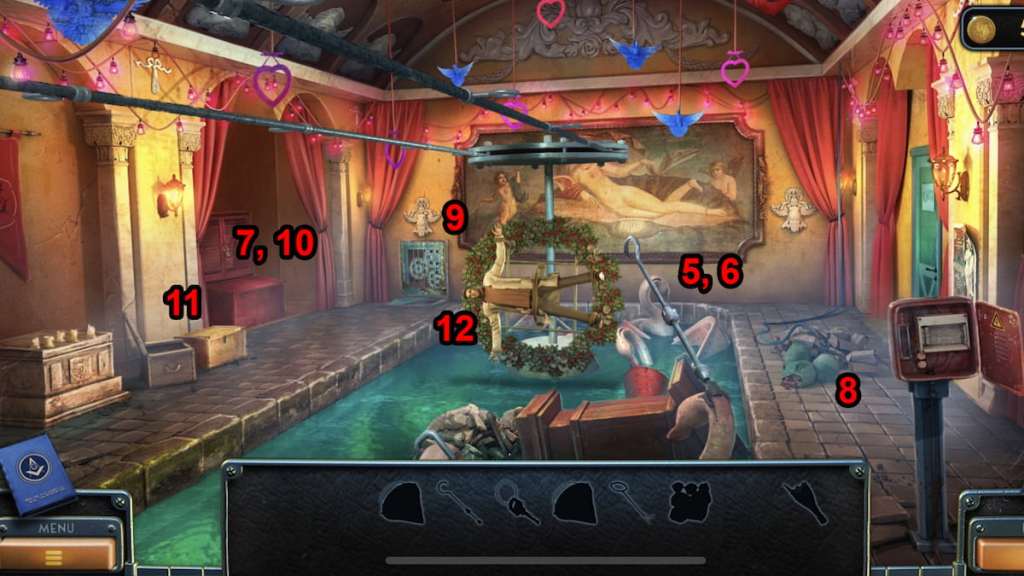
Park walkthrough
The primary a part of New York Mysteries 4’s beginning space begins instantly after leaving the tutorial and getting into an deserted carnival zone. You’ll have a number of spots to work together with, together with a again gate main out of the park and a river to the appropriate.
First, we’ll begin within the space to the appropriate. Faucet the appropriate aspect of your display to enter an space with a river and a swan boat. From right here, we are able to remedy the primary set of puzzles utilizing the steps under:
- Faucet on the swan boat and clear all the pieces away to acquire a crochet and a flashlight.
- Choose the pile of papers to the appropriate of the swan boat to uncover a magnet.
- Faucet on one other pile of papers on the pier. Clear away its paper to uncover a masks.
- Use the crochet on the masks to acquire one among 5 masks tokens.

Now that we’ve got a number of useful gadgets from this primary area, it’s time to move to the alternative aspect of the area. Return to the carnival space earlier than clearing away some balloons to disclose a aspect gate. From right here, take the next steps to uncover extra secrets and techniques:
- Choose the automotive and faucet on the solar visor to find your first recreation piece.
- Faucet on the inexperienced recreation piece on the automotive’s seat.
- Choose the pink deal with below the steering wheel to open the automotive’s trunk.
- Faucet the open trunk and gather the wrench on high of the field.
- Go away this window and enter the archway. Choose up the recreation piece on the bottom. Bear in mind the bag within the water for later.
You’ll additionally spot a file on the bottom close to a bench and your first morphing object atop the metallic fence.

Now that we’ve got a number of useful gadgets from these areas, we’re secure to return to the unique carnival space. Use the arrow on the backside of your display to return right here earlier than taking the next steps to unravel the subsequent set of puzzles:
- Faucet on the brown coat on the carousel. Choose its pocket to acquire one other Masks token and a recreation piece.
- Enter the code 413 on the bag to assert a automotive key.
- Faucet on the damaged carousel horse. Use the magnet to acquire a key.
- Use the important thing to unlock the wood door above the carousel horse.
- Faucet on the hat to search out one other recreation piece.
- Choose the silver and gold grate to discover a ball puzzle.

Though the puzzles up to now have been tough, that is the primary one you may very simply get caught on. By urgent the 2 arrow buttons on the left and proper sides of the circle, you’ll rotate it, permitting the balls to roll via its paths. Under is the sequence you could remedy this puzzle:
- Left, proper, left, proper, proper, left, proper, proper, left, proper, proper, left, proper, left, proper, proper

That’s fairly the mouthful. Total, your purpose is to steer the orange balls into lifeless ends so the silver ball can easily roll throughout the trail. When you full the puzzle, you’ll receive a Hook-and-loop to make use of later.
By now, it’s best to have all 5 recreation items, two tokens, and 5 different objects from earlier steps. You now have the means to unravel the puzzle field within the automotive’s trunk. Interacting with this may start a coloured practice puzzle, which you full by tapping every practice to ship it alongside a straight path. Right here’s an entire checklist of which trains to pick out for the primary sequence:
- Yellow
- Purple
- Teal
- Yellow
- Purple
- Inexperienced
- Blue
- Purple
Afterwards, you’re met with a second sequence. Right here’s an inventory of which trains to pick out for this one:
- Purple
- Teal
- Blue
- Inexperienced
- Yellow
- Teal
- Blue
- Inexperienced
- Yellow
- Purple
- Teal
- Blue
- Teal
It’s not over but, although. There’s one other sequence you’ll want to finish. Under is the precise resolution:
- Blue
- Yellow
- Teal
- Blue
- Yellow
- Purple
- Inexperienced
- Yellow
Finishing this puzzle will reward you with a deal with for the automotive’s glove compartment. Utilizing the deal with on the glove compartment gives you a masks token, bringing your whole as much as three of the 5 we’d like.
When you’re within the automotive, use the automotive key to activate its lights. You’ll now see a rusted metallic field with a latch you may open. Open it earlier than utilizing the wrench to unscrew its bolts, revealing a screwdriver inside.

It’s time to return to the tutorial room. Use the screwdriver on the music field within the room’s heart to acquire a battery, which you’ll then mix with the flashlight earlier than returning to the swan boat. Utilizing the Hook-and-loop will provoke a cutscene, letting you begin the second half of this story part.
We’re now inside a sewer, with a number of hidden objects to search out. Right here’s an entire step-by-step to fixing this space:
- Choose up the flashlight on the bottom.
- Use the flashlight on {the electrical} field earlier than grabbing the gloves and energy breaker.
- Use the ability breaker on the field and the gloves on the wires.
- Join every wire to mild up the realm.
- Choose up the Hook-and-loop.
- Choose the damaged swan boat behind Travis and use the Hook-and-loop to obtain a bucket.
- Faucet the pink field on the left aspect of the realm, open it, and scoop up some sand with the bucket.
- Extinguish the fireplace on the appropriate aspect of the display earlier than selecting up the stones and a key.
- Choose the gray field subsequent to the pink one. Open it and toss the stones inside.
- Faucet on the pink field once more to make use of the important thing on its padlock. Choose up the pole hook right here.
- Go to the wood field subsequent to the pink one. Use the pole hook to open it and declare a damaged bottle.
- Use the damaged bottle on Travis.
After speaking to Travis, you’ll now deal with crossing the river and wrapping up this space. Specifically, you’ll spot a damaged statue within the water on the appropriate aspect of the display. Choose the statue to assert a metallic rod.

Now, you will have all the pieces you want for 2 totally different goals. Right here’s a breakdown of every step from right here:
- Head to the carousel space, faucet on the seesaw, and use the metallic rod on it.
- Hit the rod with the close by brick. Declare the lengthy wood board.
- Return to the automotive space, enter the archway, and use the pole hook on the bag within the water.
- Open the bag to obtain a coin and machine oil.
- Use the oil on the rusty field’s gears. Press the button to activate them.
- Return to the Swan space. Faucet on the file above the damaged statue’s location.
- Use the wood plank on the pier.
- Faucet on the field subsequent to the center gate. Use the crochet on it to assert a masks token.
- Choose the hammer minigame on the alternative aspect of the gate. Use the center hammer to assert the ultimate masks token.

With all 5 masks tokens readily available, return to the tutorial room and activate the masks field from earlier. Use the 5 tokens to start a minigame. Your purpose is to rearrange them so there’s no repeating feelings or colour in every row and column. The picture under exhibits the precise resolution.

You’ll obtain a token upon finishing the puzzle and opening its field. One among two issues can occur from right here: both you’ll mechanically provoke a cutscene, otherwise you’ll be caught on this room.
In the event you’re caught within the room, head to the earlier space, insert the token into the fortune-telling machine in entrance of the carousel, and open its prize to acquire a gear. Convey this gear to the automotive space’s rusty field and activate its equipment to open the gate, letting you progress into the subsequent space.
With that out of the way in which, we’re now formally accomplished with what we are able to contemplate the sport’s first chapter. Let’s head into New York Mysteries 4’s second of many elements.
Cathedral walkthrough
The start of this second chapter has Laura and Travis touring to a cathedral. Right here’s a step-by-step to beginning on this new space:
- Faucet on the plaque on the left aspect of your display. Insert your ring into it.
- Faucet on the four-leaf clover above this plaque to search out one other collectible.
- Choose the bike in entrance of your automotive to seize a button.
- Faucet the newspaper merchandising machine subsequent to the cathedral’s door. Insert your coin to obtain a newspaper.
- Clear away the paper on the bottom subsequent to the newspaper machine to search out one other button.
- Faucet on the window above the cathedral door to acquire a morphing object collectible.
- Choose the tent subsequent to the newspaper merchandising machine.
- Flip over one of many round materials to discover a key. Use it to unlock the door.

Whereas most of the early steps result in you discovering puzzles, you gained’t be capable to remedy them but. As a substitute, you’ll want to start out with the door we simply unlocked, the place you’ll discover St. Patrick’s Day-themed gadgets. Right here’s an entire checklist of objects you’ll have to receive:
- Hairpin: Inside a beer mug on the counter.
- Spectacles: Atop a typewriter.
- Inexperienced hat: On the counter.
- Blue clover: Contained in the inexperienced hat on the counter.
- Key: Underneath the inexperienced hat. Use the hairpin to seize it.
- Lever: Inside a wood field on a shelf. Use the important thing to unlock the field.
- Typewriter code: Inside a e-book on the counter.
- Inexperienced clover: Contained in the typewriter. Use the lever on it and sort in “4726,” the e-book’s code.
- Yellow clover: Above the typewriter.
- Beard: Subsequent to the leprechaun on one of many cabinets.
- Purple clover: Contained in the leprechaun’s pot. Place the hat, beard, and spectacles on the leprechaun to open this container.

Now that you’ve got all 4 clovers, choose the statue encased in glass and place all 4 of their respective slots. You’ll obtain the Figurine of St. Patrick, which now you can use to unravel a puzzle contained in the cathedral.
When you’re prepared, enter the cathedral to discover a wall of statues with one empty slot. Place the Figurine of St. Patrick and the 2 buttons you discovered beforehand to start the puzzle. From right here, you may put the newspaper on the left wall to point out you the proper order. Under is the finished figurine wall:

When you remedy this puzzle, the cathedral will open, permitting you to enterprise inside and examine additional. Under is a step-by-step to revealing extra puzzles throughout the cathedral:
- Faucet on the morphing object to the appropriate of the steps.
- Open the door that’s to the left of the morphing object. Choose up the lens on the bench.
- Staying on this room, choose the wood panel subsequent to the bench. Open it to assert an Atlas Statue figurine and a drawing with keys. Bear in mind the quantity panel for later.
- Choose the telescope within the heart of the room. Seize the second lens right here.
- Go to the candle altar behind the room. Faucet on the back and front row candle holders till you decide up two extra lenses.
- Faucet on the statue subsequent to the piano to acquire one other collectible.
- Choose the piano to discover a fifth lens and a clip on some music sheets.

Earlier than you may receive your sixth lens, you’ll want to make use of the drawing with keys on the piano. From right here, comply with the sequence by sliding your finger, mouse, or stylus throughout the highest and backside keys within the course the picture exhibits. Doing so unlocks a cabinet containing one other lens.

The seventh and closing lens is outdoors of the cathedral, contained in the bicycle. Choose it and use the clip to open its pouch, letting you receive the lens and a wrench to make use of later. Alongside the way in which, return to the plaque from earlier than and insert the Atlus Statue figurine inside. We gained’t be tackling this simply but, however preserve it in thoughts for later.
Earlier than you may activate the telescope, you’ll want a battery to energy it. Head contained in the automotive, open it, and disconnect the wires. Now, you should use the wrench on it to acquire a battery. Convey it and your seven lenses contained in the cathedral to activate the telescope.

Upon activating the telescope, you’ll discover a rainbow ring and, initially, the cathedral’s wall. Faucet on the rings till you discover a constellation display with three brilliant stars. Your purpose is to create constellations containing solely these stars, ensuring to not embody any which are off to the aspect of your display.
To unravel this, faucet on each colour besides yellow, pink, and magenta. These will create three constellations, rewarding you with a map of the starry sky.

Now that you’ve got the map, you will have all the pieces you could remedy the plaque puzzle from the earlier steps. Head outdoors, choose the plaque, and use the map on the middle circle. Now, you will have it readily available as a reference.
There are three elements to this puzzle:
- Transferring the circle (pink deal with)
- Rotating the constellations (orange wheel)
- Zooming out and in (slider on top-left nook of your display)
Utilizing these three controls, transfer the constellation’s display round so it matches the map. Upon finishing it, you’ll obtain the reply to the quantity pad puzzle contained in the cathedral: 573353.

Now that you’ve got one other set of numbers, head again contained in the room with the bench. Use all six numbers on the numpad contained in the wood panel to provoke a cutscene.
Order walkthrough
Your subsequent goal after getting into the Order is to discover a technique to entry the laboratory. Listed here are some steps you should use to start out this course of:
- Faucet on the feather on the desk to acquire a collectible.
- Choose the umbrella stand in entrance of the desk to get the primary of ten keys.
- Faucet on the pink cushion to discover a lighter. Preserve the miscolored patch in thoughts for later.
- Open the desk and work together with the highest two drawers. You’ll discover a key, precision screwdriver, and a candle.
- Choose the desk on the appropriate aspect of the display to gather a Medallion of the Order.

Because you want two candles for every candlestick, we’ll ignore this half for now. Within the meantime, head into the blue doorway to find a library. Listed here are some steps to uncover its gadgets:
- Acquire the file between the 2 proper bookshelves.
- Acquire the morphing object close to the highest of the bookshelves straight above the wood door.
- Faucet on the umbrella on the bookshelves on the appropriate aspect of the room.
- Choose the desk behind the room. Acquire the dry wick, compass figurine, and small piece of paper from atop the desk and the inexperienced key from the drawer.
- Choose the drawers to the left of the desk chair. Acquire the “elements of the scheme” paper from below the sheet. Additionally, you will discover one other key below a e-book.
- Faucet on the glass field. Use the ring on its metallic latch to acquire a pink snake key.

Though there’s extra to do on this room, we first have to depart the realm and return to the principle lobby. Earlier than leaving, use the compass figurine on the Medallion of the Order to insert it into place. Though this doesn’t full the puzzle, it’ll provide help to filter your merchandise checklist barely.
By now, it’s best to have the next gadgets:
- Ring
- Lighter
- Medallion of the Order
- 4 coloured keys
- Precision screwdriver
- One candle
- Umbrella
- Dry wick
- Paper
- Purple Snake Key
- One among three “Elements of the Scheme”
In the principle lobby, use the umbrella on the dinosaur skeleton to acquire one other key. You’ll additionally achieve a sharp tooth, which you should use to chop open the miscolored cushion from earlier. Do that to assert a second “elements of the scheme” paper and a cotton ball.

Now that we’ve got some further gadgets, return to the library and return to the taped e-book on the desk. Use the sharp tooth to chop it open, letting you declare a a part of the mosaic merchandise. We are able to now return to the principle lobby as soon as extra for one more puzzle.
Extra particularly, you need to work together with the candle desk from earlier than. Now that we’ve got a part of the mosaic, we are able to place it contained in the desk and full a miniature puzzle. The best technique to full that is to maneuver every curved piece into its respective corners earlier than connecting the traces with the remaining parts so that they create a token-like circle. Finishing this puzzle will reward you with a second candle.

Now that you’ve got each candles, place them inside each candlesticks on this desk. Your subsequent purpose is to align every candle in order that the peak of every aspect matches.
Beginning with the left candlestick, organize them within the following order, ranging from left to proper:
- Second-tallest candle
- Shortest candle
- Tallest candle
- Second-shortest candle
Subsequent, we’ve got the appropriate candlestick. Prepare every candle within the order under, ranging from left to proper:
- Second-shortest candle
- Shortest candle
- Tallest candle
- Second-tallest candle

Ending each puzzles will open a compartment within the desk, revealing a touch to a different puzzle. With this trace readily available, faucet on the wood field subsequent to the desk and use the paper on its show as a reference. The secret is counting every clover leaf for the reply.
Counting every gives you a solution of 6245 in case you start from the top-left dial and transfer clockwise. Inputting this code will allow you to open the field, permitting you to gather a shotshell, a sixth key from throughout the pink drawers, and tweezers from inside one other wood drawer. Use the paper you picked up beforehand on the shotshell to obtain paper with powder.

It’s time to swap again to the library as soon as extra. With the tweezers readily available, return to the desk and toss each the dry wick and cotton ball contained in the kerosene flask. Choose each up utilizing your tweezers to obtain cotton soaked in gas and a wick. Use the fuel-soaked cotton on the lighter in your stock.
In the end, we’re able to blow up and unlock the lab’s door. Use your paper with powder, wick, and lighter on it to unlock the door, letting you enter the Order’s lab and meet your subsequent character.
Order: Laboratory walkthrough
After discovering Bishop and speaking to Travis extra concerning the present state of affairs, you’ll formally be able to discover the laboratory in hopes of creating a therapeutic serum for the at the moment ongoing epidemic as a part of New York Mysteries 4’s storyline.
Listed here are some preliminary steps you may take on this new room:
- Faucet on the file below the particles to Travis’ left.
- Choose the white lab coat subsequent to Travis. Seize the inexperienced key out of its pocket.
- Choose the desk’s drawer that Travis is at. Use the scalpel to open it, revealing a letter, an orange key, and a UV lamp.
- Faucet on the sink above the place you discovered the file. Acquire the purple key, a scalpel, the third Elements of the Scheme, and the picture improvement liquid.
- On the sink, faucet on the grey tray to set it contained in the sink. Activate the taps to fill it with water earlier than gathering it as a picture tray.

Now that we’ve got all three elements of the Scheme, you may work together with it in your stock to piece it again collectively. Place the Scheme contained in the picture tray earlier than utilizing the picture improvement liquid on it. You’ll restore the web page’s colours as a part of a later puzzle.
By now, it’s best to have the next gadgets in your stock:
- Ring
- Medallion of the Order with the Compass Figurine inserted inside
- 9 keys
- Purple Snake Key
- Scalpel
- Scheme
- UV Lamp
Inside the lab, you’ll discover a inexperienced locked door above Bishop. Go away the room and return to the library earlier than utilizing your scalpel on the globe. Doing this reveals a door key inside it, which you should use to open this door and entry a storage room.
As you open the room, you’ll have an inventory of 15 gadgets to gather. Under is each merchandise and their areas:
- Mannequin of a molecule: Atop the fridge
- Tweezers: Contained in the white field on the wall subsequent to the fridge.
- Bromine: Contained in the white field the place you discovered the tweezers. Remedy the puzzle to disclose “Br,” the image for Bromine.
- Set of weights: Work together with the desk. Open the drawer for the primary weight and a deal with. Connect the deal with to the second drawer and open it to gather the fourth weight and full the set.
- Iron: Work together with the desk’s magnifying glass and discover “Fe” on the periodic desk.
- Salt: Learn the e-book atop the desk. Open the fridge and transfer the flasks round till you discover two labeled “Na” and “Cl.” Pour each into the beaker to gather some salt.
- Syringe: Contained in the fridge.
- Metronome: Atop the bottle cabinets above the desk.
- Atom: Faucet on the bottle shelf above the desk to discover a image of an atom.
- Dartboard: Straight above the metronome and atom on the wall.
- Mortar: On the metallic desk to the left of the fridge. Transfer the big inexperienced bottle beside the hamster cage to disclose the mortar and pestle.
- Microscope: On the identical metallic desk because the mortar.
- Scale: Straight above the place you discovered the mortar.
- UV Lamp: Subsequent to the size.
- Gloves: The primary is above the range hood inside a vent fan. The second is contained in the suitcase on the ground.

As soon as you discover all 15 gadgets, you’ll obtain a UV mild bulb to make use of on the lamp in your stock. Open the glass cupboard within the heart of the lab and shine the UV lamp on its bottles. Transfer the lamp to the bottom-left and middle-right cabinets to make two bottles glow, permitting you to gather two chemical brokers.
Give what it’s a must to Travis to provoke a cutscene. He’ll provide the tenth and closing key you want for one more puzzle. Go away the lab and work together with the ornate wood door to the lab’s proper. You’ll spot ten empty slots, which you should use your keys on to activate. Now, use your Scheme to formally start.
The target of this puzzle is to maneuver every key alongside the paths utilizing every blue button. For instance, urgent the leftmost button will swap the orange and inexperienced keys, as these are the 2 linked to the vertical line.

The most effective technique to make use of for this puzzle is to deal with one key at a time, ranging from both the left or proper aspect. Because the pink-red secret is on the finish of the trail, transfer it alongside utilizing the button till it reaches its bottom-left slot to match the Scheme. Repeat this with purple, yellow, inexperienced, and the remaining that comply with till you attain the top. As soon as they’re in the appropriate spots, faucet on each till their arrow’s course matches that on the Scheme.
When you full the puzzle, one other door will unlock, revealing a large storage room with a “G” that matches your Medallion. Faucet on the glass show on the far finish of the room and use your ring on its lock. You’ll unlock the show, letting you receive Elbaite for Travis. A number of cutscenes will ensue, revealing some necessary details about New York Mysteries 4’s story.
Order: Safety and mail room walkthrough
With that plot twist out of the way in which, Bishop will instantly inform us our first goal: get via the Order’s vent system to entry the safety room. Faucet on the crowbar on the ground in entrance of the dais earlier than deciding on the vent to the appropriate of the “G.” Faucet on the bins to stack them earlier than utilizing the crowbar on the vent.

Upon getting into the vent, you’ll have a number of branching paths, with most of them resulting in lifeless ends. Right here’s the precise path you’ll have to take to succeed in the top:
After reaching the top, you’ll discover a second vent with a wire connected to it. Seize it earlier than tapping on the latches alongside the vent’s corners to unlock it, letting you entry the safety room.

Contained in the safety room, you’ll have one other set of things to acquire, with darkish outlines being your solely trace for what to search out. Under is an inventory of each merchandise and its areas:
- Umbrella: Leaning in opposition to a half-wall subsequent to a plant.
- Ruler: On the desk subsequent to the typewriter.
- “7″ Key: Inside a fan on the high of the room. Use the umbrella and ruler to cease the fan’s blades and retrieve the important thing.
- Paper clip: Contained in the “7” mail slot. Use the 7 key on the slot to open it and seize the paper clip from the envelope.
- Coin: Contained in the “1” mail slot. You don’t want a key to open it.
- Key: Faucet on the digicam screens on the left aspect of the room. Use the coin on the speaker to unscrew its bolts, letting you seize the important thing from beneath.
- “5″ Key: Contained in the drawer on the desk. Use the important thing from above to open it.
- Cellphone speaker: Faucet on the phone on the desk. Take it aside to acquire “speaker from a phone.”
- Calendar: Contained in the “5” mail slot. Use the 5 key on the slot to open it and declare the calendar.
- Key card: Use the cellphone speaker on the damaged digicam speaker. Connect the wires to the cellphone earlier than urgent the pink button. Bishop will inform you the important thing card is below the typewriter, letting you utilize your paper clip to entry it.

By the top of all of it, it’s best to have the important thing card and calendar readily available. Faucet on the keycard reader subsequent to the door to start out your subsequent set of puzzles. By wanting on the calendar, search for 4 numbers circled in pink ink somewhat than blue. These 4 digits, 1458, are the passcode you could punch into the keypad earlier than swiping the keycard.
Inserting this code will reveal a second puzzle. Your purpose is to show off each chip on the show by tapping on every mild. When you choose one, it’ll activate or off whereas activating these straight adjoining to it. Faucet on the next lights to complete the puzzle:
- Second row, first column
- Second row, fifth column
- Fourth row, first column
- Fourth row, fifth column
- Fourth row, third column
- Fifth row, fifth column

After urgent all six buttons and tapping the pink button, you’ll go away the storage room and reunite with Bishop. After a short dialog, he’ll offer you a inexperienced snake key. For now, although, we’ll deal with the storage space we have been simply in.
Inside the storage room, you’ll discover a number of cardboard bins within the bottom-left nook of the room, on to the appropriate of some pallets. Transfer the bins to search out some rubber gloves. Now, by deciding on the hook close to the room’s ceiling, you may open its panel and use your gloves to connect the wire. The hook is now operational, permitting you to maneuver heavy objects with it.

After deciding on the hook once more and activating its directional arrows, transfer it proper earlier than letting it descend. It’ll seize a metallic cart, which you’ll tilt as much as reveal a curler. Seize it earlier than returning to the Order’s library. Use the curler on the ladder to maneuver it, letting you entry a peculiar snake chest.
Fortuitously, we’ve got the 2 keys wanted for this chest. Use them to open it, letting you learn a e-book and gather a key. Open the library’s door with the important thing to entry a mailroom.
Listed here are some steps to take after getting into the mailroom:
- Faucet on the appropriate wall of the mail slots. Choose field 42 and sift via the envelopes till you discover a videotape and a door deal with.
- Choose the desk and chair behind the room. Choose up the taking part in playing cards and a portrait. Bear in mind the time on the pocket watch, 3:55.
- Choose the wood boards in entrance of the door. Choose up the lock pin.
- Faucet on the closed door behind the room. Connect the door deal with to it.

Earlier than heading into this newly unlocked room, enter the one subsequent to it. Right here, you’ll discover a presentation room that homes the next gadgets:
- Glue on a chair’s armrest.
- Dry rag on the easel.
- Pointer subsequent to the easel.
- Curler contained in the pink field. Use the taking part in playing cards to unlock the field’s door.
- Feather collectible on an armrest.
- Morphing object beneath the chairs.

We’ll be returning to this room a couple of instances. For now, with these new gadgets readily available, it’s time to enter the second room. You’ll discover all types of kit that you just’d count on in a movie show. Listed here are some further gadgets to select up inside it:
- Seize the four-leaf clover collectible on the high of the room, above the big wood wardrobe.
- Faucet on the morphing object within the rolls of cloth on the appropriate aspect of the room.
- Choose up the sliding ladder from the middle of the room.
- Choose the film projector to discover a hammer and a visible information for fixing the projector. Placing some gadgets in right here now could be elective.
- On the film projector display, open the wood board on the wall to discover a mild bulb.
- Faucet on the lamp close to the place you discovered the sliding ladder. Take out its bulb and substitute it with the one you simply discovered.
- Choose the realm that’s now lit up by the lamp. Faucet on the puzzle field on the appropriate aspect of the display.
- Take the portrait out of your stock and place it contained in the empty circle.

It’s time for one more puzzle. Utilizing any of the three portraits on the board, your purpose is to maneuver one among them onto the golden circle close to the highest of the display. Right here’s an entire step-by-step to doing so:
- Beginning with the bottom-right portrait, transfer it up and proper in order that its diagonal is the golden circle. You’ll discover this indicated with the blue arrow.
- Subsequent, take the top-left portrait and transfer it proper, up, proper, and down. You’ll discover this indicated with the pink arrow.
- With the third portrait, transfer it up, proper, up, and proper so all three are in a straight, vertical line. You’ll discover this indicated with the inexperienced arrow.
- Transfer the center portrait to the left.
- Slide the highest portrait down one sq..
- Slide the leftmost portrait to the appropriate so it lands on the golden circle.

You’ll discover a minute hand inside that you should use on one other puzzle within the mailroom. Reserve it for later, although, as we’ll knock out the complete puzzle as soon as we receive each trace for it. As a substitute, use the hammer you discovered within the earlier room to detach the damaged floorboards, which can will let you entry one other room.
Very similar to the science lab, you’ll want to search out 15 objects inside this room. Under is each merchandise and their areas:
- Medallion: Beneath the hat on the chair.
- Smoking Pipe: Inside a cardboard field. Faucet on the desk, open its proper drawer, and use the knife on the cardboard field to search out the pipe.
- Feather Pen: Inside a e-book on the desk.
- Vinyl File: Underneath the file participant’s high.
- Idol: Contained in the desk’s proper drawer.
- Monocle: Inside the center drawer on the desk. Open the e-book above it to discover a key, which you should use to open the drawer.
- Inkwell: Atop the desk.
- Binoculars: Above the desk, atop the windowsill.
- Statuette: On the scroll shelf.
- Compass: Beneath an abacus on the desk.
- Spyglass: Beneath the desk.
- Stethoscope: On the scroll shelf.
- Brass Pipe: Beneath a plant on the top-left nook of the display.
- Envelope: Behind a portray above the desk.
- Soccer: Inside a blue field on the shelf subsequent to the scroll shelf.

As soon as you discover each merchandise, you’ll obtain a projector lens, which you’ll want for the damaged projector in one of many earlier rooms. Earlier than returning right here, although, head again to the science lab, open the sink, and use the dry rag on it.
With a moist rag readily available, head again to the movie show room and mix your lockpin and sliding ladder. Now you can entry a window, which you’ll want to wash off together with your moist rag. You’ll discover one other clock puzzle trace, 2:55.

You’ll then encounter your third and closing clock trace by heading again into the projector room. Faucet on the desk the place you discovered the portrait puzzle and clear the espresso stain with the moist rag to discover a clock with 12:40 as its time.

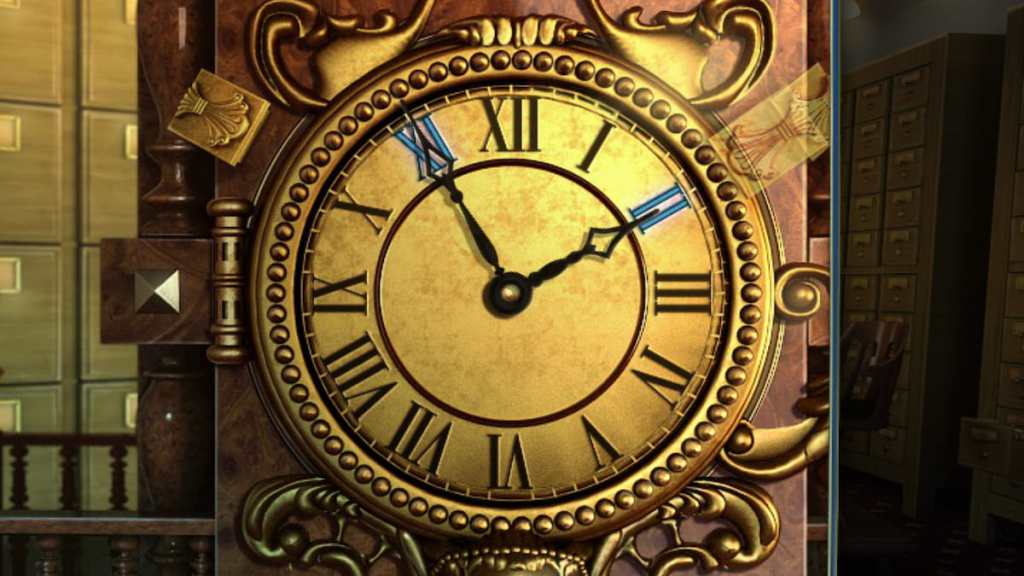
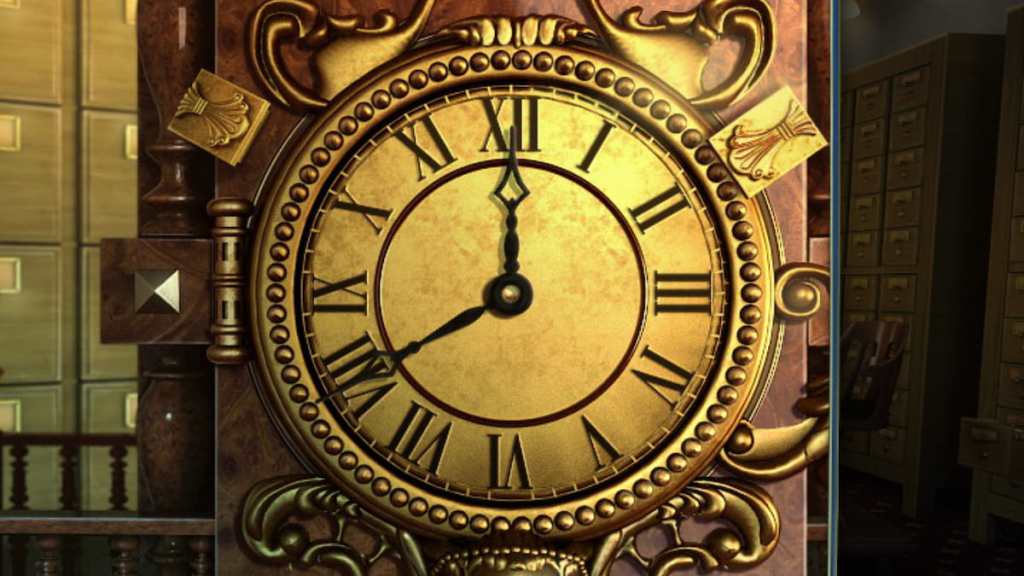
We now have all three hints required to finish the puzzle. Go to the clock within the mailroom and transfer each arms till you set it to the next instances:
Every time you progress the minute and hour arms to their appropriate instances, you’ll unlock a latch. Opening all three rewards you with nippers, a gear, and an angle bracket figurine.
With these three gadgets readily available, faucet on the portray in between the 2 hanging flower pots to discover a G.N. Kotton portrait. Use the nippers on the G to chop it off, permitting you to insert it and the angle bracket figurine into the Medallion of the Order. Now, the Medallion has the G and a compass figurine inside, permitting you to activate it together with your ring. Doing so powers it up, changing it right into a Medallion.

Now that you’ve got the assembled Medallion, return to the blue movie show room and apply it to the rostrum below the speaker. Inside, you’ll discover an audio cable and scissors, which you’ll want very quickly.
Earlier than utilizing them, nonetheless, we are able to get one other merchandise by tapping on the blue glass field below the work and utilizing the nippers on its lock. You’ll unlock the case, letting you seize some paper and a stencil.

You now have sufficient gadgets to restore the speaker above the rostrum. Use the paper, scissors, and glue to repair the speaker. There are a number of elements to this part, with this being the top of one among its main elements.
Subsequent, we’ve got a mini-puzzle to deal with within the film projector room. Along with your new stencil readily available, faucet on the puzzle above the desk and insert the stencil. Your purpose is to maneuver every row till the movie matches the stencil. Fortunately, this isn’t too tough, as you solely have to press every button till you discover all three matches. Doing so reveals a projector bulb, supplying you with the final merchandise you could repair the projector.
By now, in case you haven’t been returning gadgets to the projector, it’s best to have the next sources in your stock:
- Elbaite
- Videotape
- Pointer
- Curler
- Projector Lens
- Gear
- Audio Cable
- Projector Bulb
Six of those eight gadgets can go contained in the damaged projector. Following the meeting information subsequent to it, place all the pieces besides the Elbaite and pointer inside every projector slot. The wheel goes on the high, whereas 4 of the remaining gadgets require tapping on the projector’s physique and inserting them into their respective slots. You may slot within the bulb by tapping on the circle to open a lid, letting you fit it inside and full the restore course of. The final step is to activate its display by tapping on the orange “down” arrow on the wall.

There’s a small hiccup, although. Though the display will go down barely, it gained’t descend absolutely. To repair this, head again into the theater room and use your pointer to fling its band away, letting it fall in full show.
With that accomplished, return to the projector and switch it on to witness a cutscene, concluding this a part of New York Mysteries 4’s story and letting you progress on to its subsequent area.
Analysis Institute walkthrough
We’ve now arrived at a analysis institute to seek for extra clues about Travis. Listed here are some preliminary duties that can assist you progress on this space:
- Faucet on the four-leaf clover collectible atop the van.
- Choose the morphing object atop the pile of crates.
- Choose the fountain to maneuver ahead earlier than returning to this space. The development employee will disappear, supplying you with a greater view of the area.
- Faucet on the bag on the bench. Take the lunchbox out to assert a key.
- On this similar display, unpack the lunchbox and make a part of a sandwich to select up some ham.
- Faucet on the mysterious inexperienced crate to select up tin snips and a chemical safety equipment.

There are a couple of different elements right here, most notably the van’s puzzle, the barrel of acid, and the van’s mirror. Nevertheless, we don’t but have the required gadgets to deal with them. As a substitute, head to the subsequent space earlier than taking the steps under to assert extra gadgets:
- Faucet on the fountain earlier than selecting up the window deal with out of the water.
- Choose the morphing object subsequent to the bench.
- Faucet on the feather on the fountain.
- Go to the wood planks on the left aspect of the display. Clear them away by tapping them once more.
- After eliminating the planks, choose the pockets to assert one other key. Faucet on the planks as soon as extra to disclose a door.

There are two paths from right here. Since we don’t have sufficient gadgets to deal with the left path, go contained in the constructing. There are 4 spots to work together with initially:
- The primary-aid equipment for some sleeping tablets.
- Packing tape on the desk with the flashing mild.
- A morphing object on the high of the steps.
- A statue collectible on the backside of the steps.

Straight away, you should use the sleeping tablets on the ham to arrange it for a future puzzle. Once you’re prepared, head up the steps and work together with the window earlier than reattaching its deal with. You’ll discover a ladder, which you’ll activate to entry one other useful space. We don’t have all the pieces we’d like for this new area simply but, however not less than it’s prepared for later.
With that half ready, return to the primary space and use the thick key you discovered earlier on the van’s again doorways. Doing this unlocks our first main puzzle of this area.
Your purpose is to make use of the central “key” mechanism to rotate every outer ring till the “empty” metallic elements align with the spring on the lock’s proper aspect. You do that through the use of the lengthy metallic peg to nudge every part in a given course.

The most effective technique for fixing that is to show the middle dial clockwise till it picks up the opposite two rings. From right here, you may flip it till the outer ring’s metallic latch aligns with the spring. As soon as it’s in the appropriate spot, flip the middle circle counterclockwise till the center latch is in place. Lastly, you’ll flip the middle circle clockwise once more to finish the puzzle. If at any level you by accident transfer a latch into the flawed space, you may backtrack by linking the three circles and re-rotating the latches into their proper spots earlier than repeating this course of.

Finishing this puzzle will open the van, supplying you with a 15 merchandise scavenger hunt once more. Under is an inventory of each merchandise and their areas:
- Respirator: On the van’s again wall.
- Electrical wire: On the van’s proper wall subsequent to a ladder.
- Hazardous supplies container: On the van’s left wall subsequent to a yellow toolbox.
- Ladder: Leaning in opposition to the van’s proper wall.
- Radiation dosimeter: On the bottom in entrance of a gasoline can.
- Gloves: On a wood crate behind some paint cans.
- Spray: Above a yellow toolbox.
- Mannequin of a molecule: Subsequent to a hearth extinguisher on a again shelf.
- Detergent: On a wood crate behind a gasoline can.
- Helmet: Beneath a brown coat on the van’s proper wall.
- Take a look at tubes: On the left aspect of a giant roll of cables behind the van.
- Hammer: Inside a yellow toolbox.
- Lever: Inside a wood field behind the van.
- Spray can: Inside a cardboard field.
- Boots: Inside a big roll of cables behind the van.

Your reward for ending this mini scavenger hunt is a lever. We now have all the pieces we have to return to the trail with the ladder, letting us activate a crane atop the constructing’s rooftop utilizing this newfound lever. Use the crane to carry up the pallet of wood crates, revealing a canine on the opposite aspect.
Usually, this’d be fairly cute. Sadly, this canine is a bit of aggressive, so we’ll have to get it to calm down earlier than we are able to proceed. Use the tin snips to chop via the gate’s chains earlier than tossing the pill-filled ham to the canine. It’ll take a short nap, permitting us to entry one other new area.
There’s a lot happening on this space, from collectibles to gameplay gadgets to select up. Listed here are some sources we are able to decide up proper now:
- A statue collectible atop the house’s staircase.
- A morphing object merchandise straight under the statue.
- An adjustable wrench atop a toolbox subsequent to the staircase’s proper supporting beam.
- A fishing rod inside the identical toolbox. Use your different key to open it.
- A knife caught inside a desk. You’ll discover the desk below a deck on the appropriate aspect of the display.
- On the similar desk, you’ll discover a wood figurine in entrance of the chair and a poker contained in the barbeque.
- A pipe clamp from the pipes connected to the house’s left aspect.
- On the pipe’s display, use your knife to chop off the hose.

With all of these things readily available, faucet on the ladder main as much as the house door and use the fishing rod to make it descend. You gained’t be capable to unlock this door till a lot later, however we not less than have entry to it when the time involves progress past this level.
For now, we’ve got a key part for fixing one other puzzle. Head to the institute’s major lobby—the room with the primary assist equipment—and work together with the nightstand. Insert the wood figurine inside earlier than beginning the puzzle.
Your goal right here is to maneuver each bit towards the figurine’s heart so that they kind a big sq.. First, we’ll transfer the next beige items, on this order:
Subsequent, we’ll transfer the yellow items within the following order:
With this mini puzzle full, now you can open the drawer, letting you declare a glass container.

Heading out of this constructing, we are able to now take away the unusual lid from the fountain utilizing our adjustable wrench. Faucet on the fountain and use the wrench on the lid to obtain a nozzle earlier than returning to our beginning space. Our subsequent purpose is to take away the van’s mirror utilizing the barbeque poker, permitting us to assert it as a quest merchandise for later.
In the event you interacted with the pink blinking lights within the lobby earlier, you could have observed the trace involving this mirror. In your stock, mix the poker with the mirror and packing tape. You’ll now have a mirror connected to a poker, which’ll provide help to spot an orange button behind the desk. Proper now, the counter is in the way in which, so we’d like a technique to take away it.

What’s the easiest way to do that? Acid. Head again to the institute’s beginning space and work together with the acid barrel. You’ll want to make use of the next gadgets on this display:
- Glass container
- Pipe Clamp
- Hose
- Nozzle
- Chemical safety equipment
With each merchandise in your display, connect the nozzle and hose to the barrel’s spout earlier than attaching the clamp. Tapping on the glass container, turning the lever, and interacting with the pink wheel will trigger you to pour acid within the container to make use of on the lobby’s counter.

With a bottle of acid readily available, return to the pink blinking mild and use the acid bottle on the counter whereas sporting the protecting equipment. Now you can use the mirror-poker on the realm once more, this time with the ability to flip off the sunshine and open the door.
We’re now getting into an workplace room throughout the analysis institute. Now we have one other mini scavenger hunt to participate in, with the checklist under revealing each merchandise’s location, so as:
- Protected Key: Transfer the chair to the appropriate aspect of the room and work together with the desk.
- Sponge with ink: Transfer the paper weight on the desk to search out the sponge beneath.
- Ruler: Faucet on the nightstand within the again nook of the room. The ruler is below a stack of papers.
- Paper Knife: Choose the desk within the again nook of the room to search out the knife atop it.
- Button 5: Use the ruler on the desk’s high drawer to search out the button inside. Learn the inexperienced e-book for a particular clue we’ll want later.
- Button 3: Return to the primary desk. Use the paper knife to open the cardboard field and gather the button.
- Small key: Faucet on the wall of keycards on the room’s left aspect to search out the important thing hanging from an “f” show.
- Button 11: Choose the brown bag on the windowsill. Use the small key to open it. Utilizing the sponge on the window may also reveal a mix lock for one more puzzle.
- Key 1: Enter 2143 into the nightstand the place you discovered the ruler.
- Key 2: Full the secure puzzle.

You’ll want to finish the secure puzzle utilizing the three buttons to acquire the ultimate key. Faucet on the secure within the bookshelf, slot in all three buttons, and rearrange every quantity till every row equals 34.
There are a number of options to this puzzle. Here’s a set of numbers you should use throughout your playthrough:
- Row 1: 1, 2, 15, 16
- Row 2: 4, 7, 10, 13
- Row 3: 6, 8, 9, 11
- Row 4: 3, 5, 12, 14

Now that you’ve got the second key from the secure, open “03_f” from the aspect wall and unlock its show. Declare the 01_f_20 keycard earlier than returning to the house door from earlier. Coming into this room will provoke one other cutscene.
Travis’ Workplace walkthrough
After making it into Travis’ workplace, take the steps under to search out some preliminary gadgets:
- Choose the collectible below the fallen show shelf.
- Faucet on the morphing object atop the damaged show cupboards.
- Faucet on the windowsill on the appropriate wall. Transfer the newspaper to select up a Deal with of a knife change.
- Choose the desk. Use the knife to pry open the drawer and browse a e-book. The second web page has the reply to a puzzle on this room that you would be able to rip out for a Word with a touch.

With this be aware, we are able to remedy the secure puzzle that’s in opposition to the left wall. Faucet on the secure, place the be aware inside, and switch the dials in accordance with its hints. Because the reply depends on the moons and stars on every dial, the answer is 8519.

When you unlock the secure, open the door to search out an orange tube. For now, place it contained in the analyzer that’s subsequent to the door and shut its latch. Trying to pump air out of it’s going to reveal that the pump system is damaged, with a key jammed inside one of many pipes. Choose up the important thing earlier than exiting the display and unlocking the room’s door.
With one other space unlocked, you may decide up the next gadgets:
- Choose up the collectible close to the fish tank.
- Faucet on the hampers on the left aspect of the display. Clear away the books and open the basket to discover a plate and a few hay.
- Transfer this similar basket to discover a bowl of kerosene.
- Choose the damaged staircase to gather a baluster and two of 4 small boards.
- Pull the wire above the hampers to launch a staircase.

Whereas we’ll be returning right here later for one more puzzle, for now, head up the steps and seek for the next gadgets:
- A collectible below a rope.
- A morphing object within the again nook of the realm.
- A nail remover on the bottom.
- An empty burner subsequent to the tar tank.
- A giant and small plank close to the outlet on the left aspect of the realm.
- A rope you receive by slicing it together with your knife at three separate factors.

With these sources readily available, faucet on the crow on the roof earlier than climbing the constructing’s ladder. Now you can take away the nails together with your nail remover, revealing an entrance that’s accessible with the rope you simply picked up. Inside, you’ll discover a door with a lock, which you’ll warmth by filling your empty burner with kerosene and igniting it together with your nail remover.

We now have entry to a basement. Listed here are some preliminary gadgets to gather:
- A four-leaf clover collectible close to some boulders.
- A morphing object subsequent to the door.
- Our closing small and enormous wood boards in a gap on the appropriate aspect of the display.

Within the back-right nook of the room, you’ll additionally spot a metallic field containing numerous coloured wires. That is one other puzzle that requires you to attach one aspect to the subsequent, all of the whereas passing via each node, apart from these which are damaged. The one help you get is with the ability to rotate angled wires for simpler passage.
Listed here are the options for all three elements:
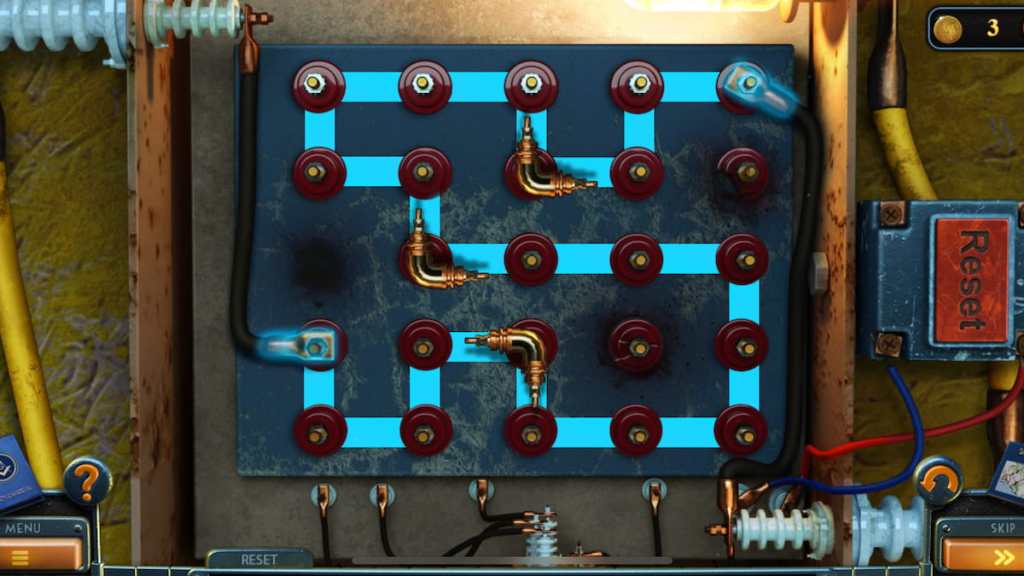
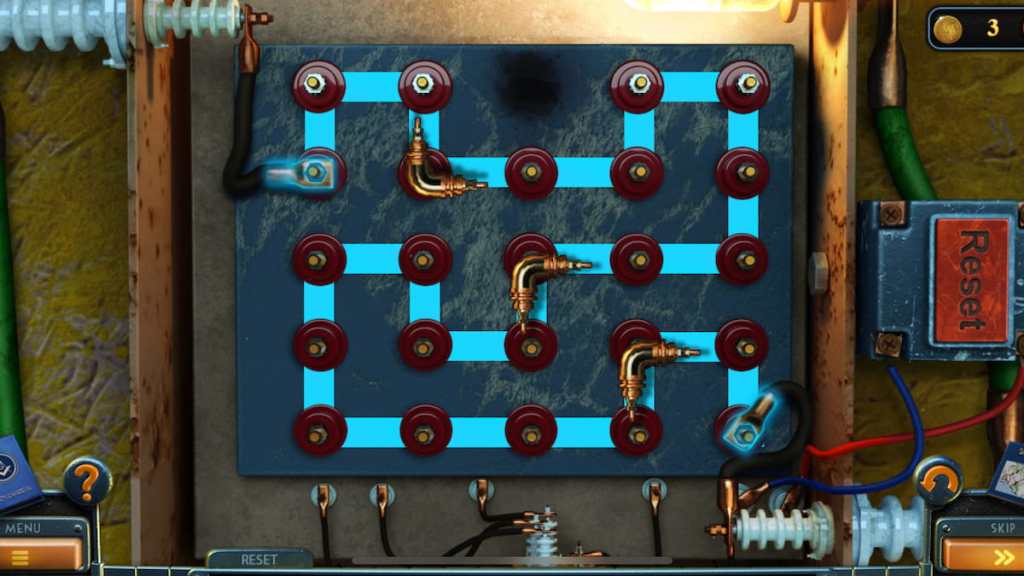

When you full all three sections, insert the knife change deal with into the wire terminal and activate it. Earlier than we are able to go any additional with this, we’ll have to receive a cable from a later puzzle.
For now, head again to the rooftop and work together with the tar tank. You’ll want to make use of the next gadgets on it:
- Hay
- Each units of planks
- Plate
- Kerosene burner

With all 4 gadgets in, use the spoon on the display to scoop out some tar, permitting you to assert the tar as an merchandise. Dunk the baluster contained in the tank as effectively, as you’ll want it for later. Now you can head again right down to Travis’ workplace, the place we first started this part, and use the tar on the analyzer pipe.
With the pipe mounted, flip the pink dial, pour the orange liquid into the small container in entrance of the mortar and pestle, and place the container on the blue carry. Urgent the pink button will inform you concerning the virus pressure on a display. Extra importantly, now you can reduce the machine’s cable twice together with your knife earlier than returning to the basement.
Now that you’ve got a cable for the basement, place it into the outlet under the pink and white cannon earlier than exploring the pit the place you discovered the wood boards. Use your tar-covered baluster to select up a trinket within the water.

Talking of water, our subsequent cease is the fish tank close to the workplace’s staircase. Faucet on the show beneath the tank and use your trinket on the pearl to activate its puzzle. Your purpose is to get the pearl to the white circle within the bottom-right nook of the show whereas transferring round its blocks. Urgent every arrow will transfer all the pieces round, together with the pearl and every block, if potential.
With this data in thoughts, press every arrow within the following order to finish the puzzle:
- Up
- Left
- Down
- Proper
- Up
- Proper
- Down
- Left
- Up
- Proper
- Down
- Proper
- Up
- Left
- Down
- Proper
- Up
- Left
- Down
- Proper
- Down
- Proper
- Up
- Left
- Down
Ending the puzzle unlocks a treasure chest, sending a key as much as the tank’s opening. Use your nail to fish it out earlier than going again right down to the basement, unlocking the door, and witnessing one other cutscene.
Previous Girl’s home walkthrough
We’re lastly getting nearer to discovering Travis and determining what’s happening with this large thriller. Observe the steps under for some preliminary gadgets to gather:
- Acquire the morphing object above the potted flowers.
- Choose up the feather collectible above the potted flowers.
- Take the white cat statue on the ground and place it on the desk in entrance of the previous girl.
- Choose the e-book beneath the previous girl’s desk and place it atop the desk.
- Faucet on the pillow on the ground.
- Choose the tilted cat portray to set it in its appropriate spot.
- Choose up a sprout on the ground, adopted by two extra subsequent to some crate vegetation.
- On the identical plant display, decide up one among 5 balls of yarn.
- Take the inexperienced coat, pink purse, and white coat from the 2 chairs and place them on the coat hangers subsequent to the door.
- Faucet on the sofa. Acquire the sprout from beneath it, the ball of yarn on high, and a second sprout from below a pillow. You’ll additionally discover thread below the cushion.
- Choose the cupboard behind the previous girl and seize the brush.
- Seize the scoop subsequent to the doorway.
- Choose up one other ball of yarn subsequent to the news.
- Faucet on the vegetation within the bottom-left nook of the display and decide up the bag of soil.

Within the subsequent room, there’s a second room filled with objects to gather. Right here’s an inventory of duties you may full right here in the intervening time:
- Acquire the morphing object atop the wardrobe.
- Seize the collectible atop the wardrobe.
- Faucet on the numerous bins on the wardrobe to rearrange them.
- Acquire the sprout on the chair.
- Transfer the chair to disclose a pillow and blanket. Transfer each onto the chair and work together with the hidden doorway.
- Now that the cat is distracted, gather the ball of yarn and sprout from the mattress earlier than rearranging its pillows.
- Faucet on the blanket on the chair to maneuver it again to the mattress.
- Choose the rug to disclose one other sprout.
- Transfer the curtain to disclose a push broom.
- Faucet the underside drawer of the dresser. Acquire the sprout earlier than opening the highest drawer and claiming the threads, yarn, and one other sprout. Open the field to assert a key.
- On the identical display, shut the drawer and open the underside one to seize one other thread spool.
- Transfer to the highest of dresser. Faucet on the cat portrait to regulate its place and use the important thing to unlock the field and gather a tusk. Place the remainder of the dresser’s gadgets inside the jewellery field.
- Reattach the tusk to the elephant show. Acquire the thread and use your knife to unscrew the bolts.
- Use your knife on the key entrance to disclose one other door.

Now that you’ve got a bunch of recent gadgets to play with, return to the room with the previous girl. She’ll offer you a cellar key, which you should use to unlock one other room quickly. Earlier than doing so, faucet on the plant crates and use the next gadgets on them:
- Scoop and brush on the pile of dust.
- Bag of soil on the empty crate and a knife to chop it open.
- All ten sprouts contained in the crate.
- Watering can on the sprouts.

Doing this provides you your fifth and closing thread. Now you can faucet on the show case behind the previous girl and place each the balls of yarn and thread inside. Your final process on this room is to use your push broom on the curtain to repair it.
By now, it’s best to solely have Elbaite, the knife, and a cellar key in your stock. Head into the bed room and use your key to unlock the door subsequent to the dresser. You’ll enter a pantry filled with meals and a scavenger hunt to search out 15 coloured cubes. Right here’s an inventory of each dice’s location:
- Contained in the slippers on the bottom.
- Inside a glass jar behind a brown container on the pantry’s backside shelf.
- Atop a bowl of fruit.
- Inside a white field.
- Behind a blanket linked to this field.
- Inside a jar subsequent to this field.
- Inside a wool basket.
- Additionally contained in the wool basket.
- Behind a jar of grains above the puzzle field.
- Inside a toolbox. Use the scissors on the appropriate shelf to chop a rope holding a key. Use this key to unlock the field.
- Use a crowbar on the pantry’s high shelf to interrupt open the trapdoor.
- Underneath the trapdoor, use the lever on the identical display to activate the pulley system and declare one other dice.
- Inside a lampshade on the high of the pantry.
- Behind dried peppers and garlic.
- Inside a handbag. Use the knife on the ground and the brick beneath to unstick it from the shelf.

With all 15 cubes readily available, insert them into the puzzle field to start your subsequent problem. Utilizing the 2 placeholders as reference, your goal is to create a cohesive picture utilizing each dice. The entire resolution will create a lightweight blue diamond with pink and darkish blue within the heart, as proven under:

Ending the puzzle will reward you with glasses to return to the previous girl. She’ll offer you a key in return to make use of on the key door within the bed room. Clear away the wood boards and different particles to uncover the door, permitting you to enter Travis’ dwelling.
Travis’ home walkthrough
We’ve formally made it into Travis’ home. Listed here are some preliminary steps to absorb this new area:
- Faucet on the digicam on the door to achieve it as an merchandise.
- Choose the nightstand and use your knife to open it. Seize the chip inside it.
- Choose the books on the mattress to gather a guide on pictures, picture, and emergency evacuation plan.
- Seize the collectible on high of the wardrobe.
- Learn the secure mixture hints atop the left doorway, beside the curtain, and within the again nook of the room.

With these preliminary 5 steps accomplished, head into the room to your proper to discover a hallway. Listed here are some extra steps to take:
- Faucet on the morphing object subsequent to the clock.
- Use your knife to chop open the cardboard field subsequent to the clock to acquire a tank for photographic movie and picture paper.
- Choose the coats on the left aspect of the display and open their pockets to assert a key.
- Acquire the four-leaf clover collectible above the coats.

Earlier than happening the steps, return to Travis’ bed room and use the important thing to unlock the wardrobe’s locked compartment. You’ll discover a colourful puzzle to fit your chip into.
To finish this puzzle, you’ll want to slip every chip round so it lands in its respective colour part. Nevertheless, they’ll solely go into the empty slot closest to the middle and might’t bounce over different chips. Right here’s a step-by-step information to fixing this puzzle:
- Transfer the yellow part’s inexperienced chip into pink.
- Transfer each yellow chips into the yellow part.
- Slide the inexperienced part’s blue chip into the blue part and the pink chip into the yellow part.
- Transfer the pink part’s inexperienced chip into the inexperienced part.
- Alternate the chips from the blue and pink sections so the third inexperienced chip goes into the inexperienced part.
- Transfer the yellow part pink chip into the pink part.
- Slide the blue chips into inexperienced and yellow’s empty slots so the third pink chip can go into its part.
- Return the blue chips to their very own part.

Finishing this puzzle rewards you with one other key to make use of later on this half. Earlier than heading down the staircase within the different space, we have to deal with the thriller with this digicam. For now, head into the pink doorway and choose the fridge to start out a mini scavenger hunt. Right here’s an inventory of each merchandise and their areas:
- Lightbulb: On the fridge’s door.
- Steel bracket: On the fridge’s door.
- Matches: Connect the deal with to the highest compartment on the door to search out some matches.
- Can opener: Inside the highest compartment. Mix each halves and the screw collectively to gather them.
- Triangle button: Faucet the highest a part of the fridge and alter out the lightbulbs. The button is on one of many cabinets.
- Piece of cardboard: Faucet the fridge’s center shelf and the cereal field.
- Circle button: Do away with the bees through the use of the piece of cardboard and matches within the high part. Activate the fridge earlier than going to the center part and gathering the button from the cereal field.
- Sq. button: Open the pizza field and transfer one of many slices.
- Line button: Faucet on the rotten burger.
- Star button: Choose the underside fridge drawers. Use the can opener to extract it from the can.

Now that you’ve got all 5 buttons, faucet the highest of the fridge and insert them. The right order to press them depends upon the variety of traces within the form. Briefly, you could press Circle, Line, Triangle, Sq., and Star. Upon opening the realm, gather the Sodium sulphate resolution and Benzol earlier than transferring on.

We now have two key components to assist us develop these pictures. Go away this room and head down the steps earlier than taking the next steps:
- Faucet on the morphing object above the lamp.
- Choose the picture wall to obtain a picture. Learn the secure mixture right here.
- Go to the desk. Open the chemical bottle and add your Sodium sulphate resolution and Benzol to it to obtain the creating resolution.
- Place your two pictures and emergency evacuation plan on the desk blueprint.
- Use the important thing on the secure to arrange it for a later puzzle.

Now that we’ve got the creating resolution and cleared some stock house, use the tank and resolution in your digicam. You’ll take away the movie, place it contained in the tank, and use the answer to develop it.
Earlier than we return upstairs, we’re able to deal with the secure. Use the important thing on it and browse the mix web page that seems on it. Utilizing the coloured circles on the web page, we’ll uncover 95 is the answer to it. You’ll discover Fixing resolution inside, supplying you with the ultimate piece you want for the picture improvement course of.

Listed here are the steps to creating Travis’ picture after returning to the pink room and interacting with the movie analyzer:
- Place the guide on pictures, picture paper, and tank of developed movie within the desk’s space.
- Place the movie contained in the machine.
- Pour the Fixer resolution.
- Reduce the picture paper together with your knife and place it contained in the water.
- Activate the machine and decide up the picture with the close by tongs.
- Go to the room’s sink and refill the container.
- Place the undeveloped picture inside.

With the ultimate picture readily available, return to the secure’s room and place the image on the blueprint desk. You’ll provoke a cutscene, main you on to the ultimate a part of New York Mysteries 4’s storyline.
Water-pumping station walkthrough
The final part we’ll discover is the water-pumping station. Listed here are some first steps to take earlier than advancing:
- Faucet the collectible above the automotive.
- Acquire the morphing object on a constructing above a burning barrel.
- Seize the bottle of alcohol from atop a inexperienced crate.
- Faucet the white garments on the left aspect of the display. Reduce a few of it together with your knife.
- Mix each gadgets to make a Molotov cocktail.
- Use the cocktail on the burning barrel.
- Work together with the yellow guard constructing and seize the sign pistol.
- Press the large pink button contained in the guard constructing earlier than leaving the zone.

We’re now contained in the water-pumping station facility looking for Travis. After gathering the morphing object subsequent to the staircase, open the wood crate throughout the workshop space on the left aspect of your display. You’ll discover a valve inside, which you should use on a yellow door on the alternative aspect of the ability.
The subsequent part is a timed trial. You’ll have simply over a minute to make it to the top. Right here’s the precise path to take to exit this space:
- Enter the appropriate exit and rummage via the garments for a key.
- Go ahead, adopted by left, and unlock the metallic door with the important thing.
- Exit this door and gather the brick earlier than returning.
- Go up the staircase to your proper and throw a brick on the mild to distract the guards.
- Go away via the metallic door once more and head proper to obtain a wrench.
- Backtrack twice and head down the central staircase. Use the wrench on the pipes to get one other key.
- Undergo the metallic door once more and head ahead to discover a second door. Unlock it with the important thing.

Now that we’ve exited that aggravating state of affairs, it’s time to maneuver ahead. Open the yellow jacket to gather a keycard. Backtracking to the water-pumping station’s facility and climbing the steps will now result in a locked door you may unlock with this keycard.
Inside this new room, faucet on the 2 areas lit up with lamps. One would require urgent a pink button, rewarding you with a key. Earlier than leaving, you could find a morphing object beneath the right-most desk. From right here, return to the bridge and use the important thing to unlock the latch within the floor, resulting in a small puzzle.
Throughout this puzzle, you’ll place numerous objects in your stock primarily based on blue highlights to reassemble and activate a water reservoir. Listed here are all of the elements you’ll have to activate:
- Place the valve and deal with of their respective spots. Activate each.
- Insert all the pieces besides {the electrical} fuse into their spots.
- Open the panel within the top-right nook and insert the fuse.

With that accomplished, return to the safety room and use the appropriate terminal to redirect water into the higher proper tank. This’ll require one other puzzle the place every tank redirects in several instructions. Because the yellow tank is the one one which sends water to the higher proper one, our purpose is to ship water right here earlier than transporting all of it to the top-right.
Right here’s an entire information to fixing this puzzle:
- Empty the middle-right gray tank into the bottom-right purple one.
- Empty purple into pink and yellow.
- Empty blue into the top-left purple tank.
- Empty the top-left purple into pink.
- Absolutely empty pink into blue and inexperienced.
- Absolutely empty inexperienced into yellow.
- Absolutely empty yellow into the higher proper tank.
- Faucet blue, purple, pink, inexperienced, and yellow as soon as every. Repeat this thrice.
- Empty middle-grey and yellow.
- Empty purple, pink, inexperienced, and yellow to finish the puzzle.

When you end the puzzle, work together with the left terminal to provoke one other puzzle. Listed here are the steps to finishing it:
- Transfer the yellow bar left two squares and proper one.
- Transfer it up one sq. and proper two.
- Transfer the bar down and up one sq. earlier than sliding it proper twice.
- Transfer it left, proper, and down one sq., on this order. Repeat this as soon as.
- Slide it left two squares, proper one, and down one.
- Slide it left one sq. and proper two to finish the puzzle.

With all that accomplished, return to the water-pumping station’s inside facility and go away via the yellow door to witness one other cutscene. After watching it, you’ll have one final process: restore your sign pistol.
There are ten items to gather on this space. 4 are on the bridge straight in entrance of Travis, whereas two extra are on the appropriate in the identical spot as a collectible feather. The final 4 are obtainable by tapping the water generator-like machine on the left aspect of the bridge.

With all ten elements accessible, choose the pistol in your stock to reassemble it. You’ll want to fit every half collectively utilizing the blue outlines as a information, beginning with the small bolt within the gear. Following these pointers will allow you to restore the pistol, which you’ll want to make use of on Travis to wrap up New York Mysteries 4’s story.

