#Tips on how to full Transmigration in Future 2: The Ultimate Form

Table of Contents
Tips on how to full Transmigration in Future 2: The Ultimate Form
As you start your journey in Future 2‘s final main growth, The Ultimate Form, you’ll have to enter the Traveler, decide up your new Subclass, and discover your approach into The Pale Coronary heart. To do that, you’ve received to finish Transmigration, however it’s a mission with twists at each flip for newcomers.
While you start The Ultimate Form marketing campaign for Future 2, the primary mission you’ll be thrown into is Transmigration. This mission sees Mara Sov use her energy to carry open the Threshold into the Traveler so that you can cross via, however you’ve received to do it earlier than she’s overcome by The Witness. This mission is a implausible introduction to the unusual issues that’ll turn out to be commonplace in The Pale Coronary heart, however it may be tough in locations.
Tips on how to full Transmigration in Future 2: The Ultimate Form
Beneath, I’ve damaged down Future 2: The Ultimate Form‘s Transmigration mission into steps. While some components of the mission are straightforward to get via, some had me scratching my head or butting up towards robust enemies for ages.
Step 1: Attain and activate the properly
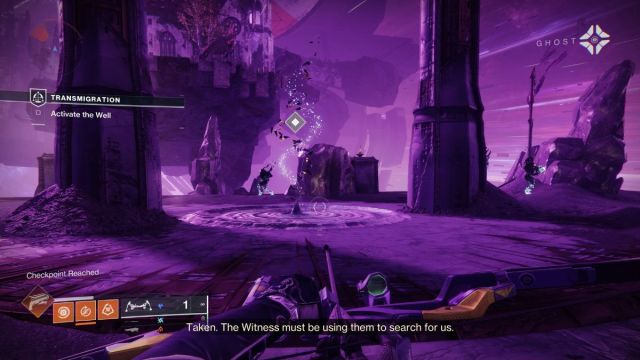
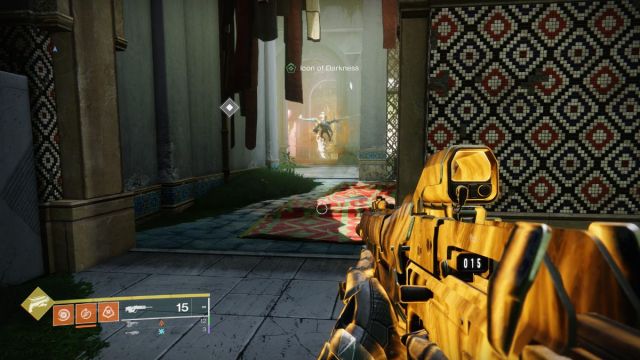
As soon as you start the mission, observe the hunt marker till you attain the properly. It is a new gameplay mechanic in Future 2 that you simply’ll be utilizing lots. While you stroll as much as the properly, it’ll turn out to be an orb of darkness. Capturing it can reveal a path ahead, however you possibly can’t entry it simply but.
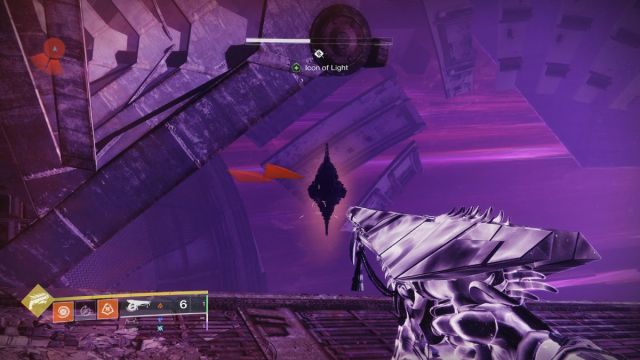
When you’ve unraveled that darkness, enemies will spawn. You have to kill all of them till you discover a highly effective one carrying an Icon of Gentle. As quickly as you decide this merchandise up, extra enemies will spawn, so be prepared. You’ve received to return the Icon of Gentle to the properly and activate it to carry the trail you noticed into actuality and progress.
Step 2: Attain the blocked hatch
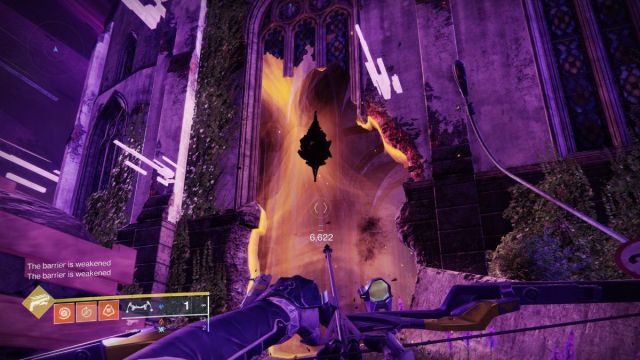
Head over the brand new path, and also you’ll be stopped by a barrier. There are three locks on the barrier you could shoot to cross via. Keep in mind how you probably did this as a result of these limitations are about to turn out to be fairly frequent. Subsequent, you’ll make your approach via extra of this twisted nightmare and face off towards a few of The Dread, the brand new enemy race in The Ultimate Form.
The following stopper in your journey is a hatch blocked by one other barrier. This one additionally has three locks, however you’ll solely discover one to begin with. Along with the lock on the barrier, there’s one within the surroundings up and to the left and one behind the construction reverse the hatch. You possibly can see the construction on the right-hand facet of the picture above.
After opening the hatch, you’ll enter an area the place you’ve received to defeat a sequence of waves of pretty highly effective Taken enemies. You’ve received to get one other Icon of Gentle to activate a properly, however this time, a barrier will block the properly after you decide the merchandise up. Shoot all three locks dotted across the area. There’s one on prime of the barrier, and the opposite two are to the left and proper of it within the surroundings.
Step 3: Evade and escape

Make your approach via the quick leaping part, and also you’ll encounter your first Sure Taken enemy. Ignore these guys for now as a result of you possibly can’t kill them but. Simply escape them and get to the online encounter. The realm is a repeat of what you’ve simply been via, so activate the properly, kill the highly effective enemy, and decide up the Icon of Gentle.
When it’s good to carry the barrier down this time, look on prime of it and to the edges once more. The locks are floating simply off the sting of the platform. Activate the properly, and also you’ll get one other leaping part to work via. At this level, Mara Sov is basically struggling, so it’s good to cross via the Threshold pronto.
Fortunately, when you’re on the prime of the leaping part, you’ll be whisked away into The Pale Coronary heart. There’s a barely spooky cutscene that performs out, which is a superb callback to the unique Future and feeds into what number of tales we’ve performed via since then.
Step 4: Enter The Pale Coronary heart and get your Prismatic Subclass

After zipping via area, you’ll emerge in a shiny area with platforms that seem in a line so that you can observe. After just a few of those, the one approach ahead will likely be a darkish department, and for those who observe that, you’ll enter the beautiful new location.
The Pale Coronary heart is gorgeous, and your solely instruction is to discover. Observe the blue crow for those who don’t know the place to go. It flies off within the route you ought to be shifting. After just a little exploring, you’ll encounter extra of The Dread, so take them out and preserve pushing on.
This subsequent part is a play on what you’ve simply been doing. There’s a barrier blocking your approach, however you possibly can’t shoot the lock. As a substitute, you’ve received to kill enemies till certainly one of them drops an Icon of Darkness. It will then open the barrier after it spawns extra enemies to attempt to kill you.
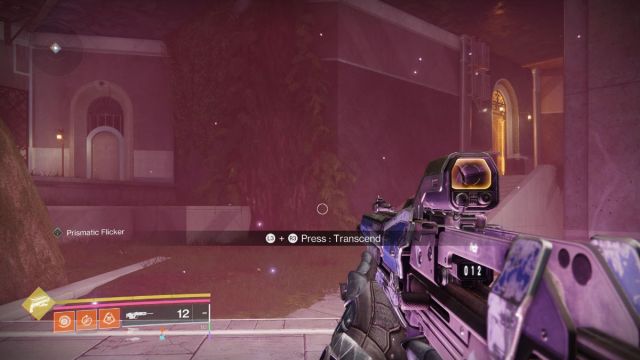
It’s after this that you simply’ll meet extra Sure Taken enemies, besides this time, you possibly can kill them. There are Prismatic wells on the ground that may cost you with Prismatic power. You possibly can see it filling up within the bar underneath your well being. As soon as full, you possibly can press each joysticks to Transcend.
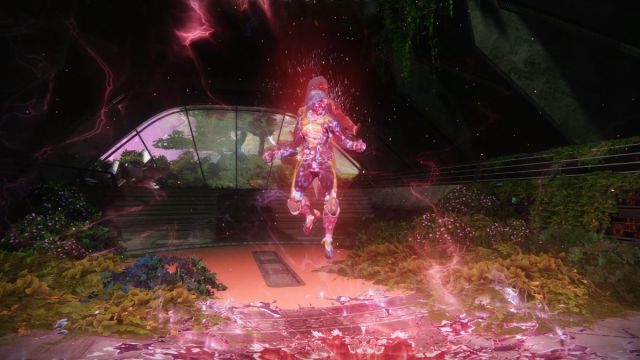
On this new state, you possibly can harm Sure enemies and take away the Prismatic shielding they’ve. You’ll lose your cost each second after activating the state, however you solely want a few good photographs to take away that defend, after which you possibly can end the enemy with out it.
You’re practically there now. This subsequent part takes every thing you’ve simply realized, the Transcend mechanic for Sure Taken enemies and the wells that require Icons of Darkness and smashes them collectively. You have to unlock a barrier with two Icons of Darkness, one from both facet of the realm, while coping with highly effective Sure Taken enemies and The Dread.
Take down the barrier and proceed. The following space is one you may acknowledge from the unique Future. Inside it, you’ll weave collectively Gentle and Darkness and unlock your Prismatic Subclass. This lets you mix skills from throughout all of your Subclasses and Transcend with out utilizing a properly, which means you are able to do every thing it’s good to face the ultimate boss of the mission.
Step 5: Defeat Vrihn, Subjugator of Gardens
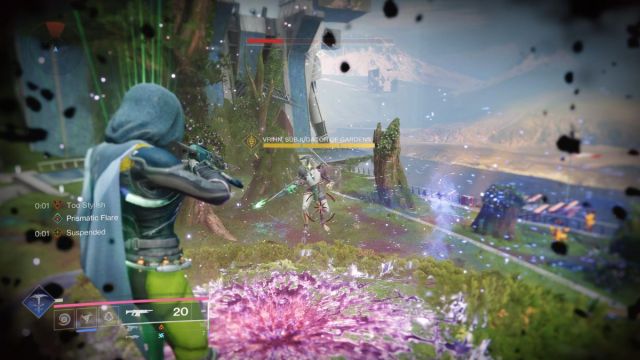
The following space within the mission is the final one in Transmigration. Lay down a Marketing campaign Banner to revive ammo, power, and well being, after which stroll ahead. It will spawn in a wave of Taken enemies. Don’t get snug, although, as a result of the true enemy will spawn after you’ve defeated them.
Vrihn, Subjugator of Gardens is a large Dread enemy with three phases to its well being and a mastery of Strand. It spawns with Dread enemies and can spawn extra each time you hit a well being threshold. This factor will wait till you’re distracted by the smaller foes after which launch a trio of Strand assaults at you that may hoist you up and droop you. Then, it’ll soar in and attempt to kill you with a fast melee transfer.
Kill the smaller enemies first and dodge these Strand assaults. The opposite assault Vrihn, Subjugator of Gardens will pull is a set of Strand spears that may nearly kill you in a single hit. Taking out the smaller enemies first offers you loads of room to maneuver round, preserve distance, and deal the harm it’s good to.
I discovered that my Tremendous was fairly ineffective towards this enemy. As a substitute, I centered on grenades, thrown melee assaults, and my rocket launcher. For those who die whereas going through Vrihn, Subjugator of Gardens, you’ll have to restart the complete encounter, and that’s extremely annoying, consider me. Take your time, and also you’ll kill the enemy and watch it remodel right into a tree earlier than finishing the mission.

When you’ve accomplished Transmigration in Future 2: The Ultimate Form, you’ll be handled to a good cutscene the place your Guardian reunites with Cayde-6 and speaks for the primary time in I don’t even understand how lengthy. It’s a implausible reward for the mission and made me wish to soar proper again in to see extra of my favourite character and the place the story goes subsequent.


