#The First Stroll – Destructoid

Table of Contents
The First of Dawntrail’s Alliance Raids has arrived in Last Fantasy XIV in spectacular type, with ample references and inspiration taken instantly from Last Fantasy XI. In case you’re about to dive in to Jeuno: The First Stroll, right here’s every part you’ll want to look out for.
Jeuno: The First Stroll is about up in a lot the identical means as every other Alliance Raid in FFXIV, with three predominant bosses, a bunch of trash mobs to select via, and one mini-boss-trash-mob mixture combat to work via. On the time of launch, it takes about 45 minutes to at least one hour to finish, relying on get together wipes and iLvl of gamers.
Prishe of the Distant Chains walkthrough
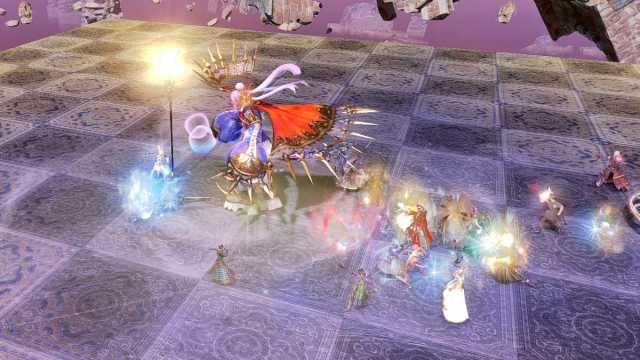
After the primary trash mob is taken down on the principle road of Jeuno, you’ll be flung instantly into the primary boss combat of the raid and also you’ll be dealing with off in opposition to Prishe. She has some very arduous hits, and an attention-grabbing charge-up mechanic that has beforehand been seen in The Sil’Dihn Subterrane.
The one factor you’ll want to actually take note of throughout this combat is Prishe’s voice traces. When casting sure assaults, she is going to show three telegraphs slightly than one, after which she is going to start to say “Await it…”. Every look forward to it corresponds to one of many telegraphs for the assault, with a most of three, and also you’ll want to position your self accordingly to take care of the incoming brutal assault.
Prishe’s predominant assaults are as follows:
| Assault | Explainer |
| Knuckle Sandwich | Targets a location on the bottom to slam, with three circles every barely bigger than one another. Prishe will say “Await it…” as much as thrice, with every time akin to one of many circles. Nonetheless many occasions she says “Await it…”, stand exterior the corresponding circle. |
| Nullifying Dropkick | Very brutal tank-buster designed to be shared between all three tanks. Time for a bunch hug! Be certain that to make use of your talents to mitigate injury. |
| Banish Storm | Three staves seem on the bottom with arrows pointing outwards. After a brief second, reasonably sized AoEs will start to cascade out from the staves within the route of the arrows. |
| Crystalline Thorns | Marks a big portion of the sector with purple, creating deadly spikes that can’t be stepped on. This transfer will all the time come earlier than Auroral Uppercut. |
| Auroral Uppercut | All gamers can be focused with a knockback assault much like that seen carried out by Black Cat within the first Arcadion raid. Three telegraphs can be proven, so pay attention for Prishe’s “Await it…” rely and alter your place to make sure you land in a secure location. |
| Banishga IV | Orbs start to cowl the sector, swelling up in sequence. Stay close to the smaller orbs because the bigger ones trigger giant AoEs, then transfer into the newly secure house. |
Fafnir the Forgotten walkthrough
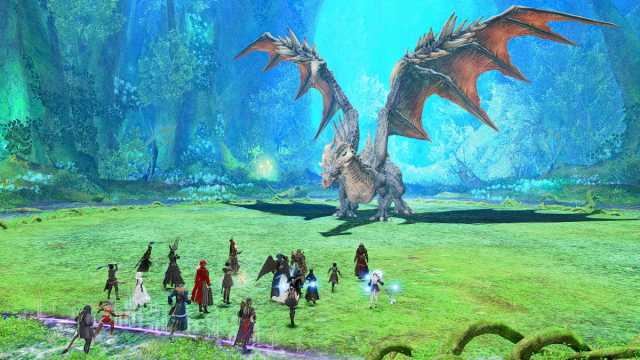
Fafnir is a really giant dragon who’s intent on inflicting as a lot injury as it may, and the assaults from this boss come extremely quick. The primary time you undergo this battle, it would appear to be full chaos, but it surely’s completely manageable when you’ve found out the patterns.
A few issues to notice about this combat are the truth that Fafnir will periodically forged Hurricane Wing, which can trigger damaging wind to whip up throughout your entire enviornment. This may blow gamers round, and in addition trigger some hefty injury, so Healers will have to be on their toes throughout this.
Tanks want to concentrate as nicely, even when they’re not Fundamental Tank. Throughout Hurricane Wind, Fafnir can even summon a variety of Darters that have to be picked up and felled earlier than persevering with.
Apart from Hurricane Wind, Fafnir’s predominant assaults are as follows:
| Assault | Explainer |
| Offensive Posture | Offensive Posture can take three totally totally different kinds, and also you’ll want to concentrate to Fafnir to determine experience out the oncoming assault. These can come instantly after each other in any sample, so keep in your toes:
Head Charged: Tail Charged: Ft Charged: |
| Baleful Breath | Excessive-damage stack that hits a number of occasions and spreads injury throughout all gamers it hits. Keep collectively as a bunch and solely depart the stack when the assault is over. |
| Winged Terror | Fafnir’s will transfer to the sting of the sector and it’s wings will start to develop purple, slamming right down to the left and proper after a brief second. Solely the middle of the sector in entrance of Fafnir’s head is secure. |
| Absolute Terror | Very like Winged Terror, Absolute Terror is carried out whereas Fafnir is on the fringe of the sector. It’s physique will begin to glow purple earlier than capturing a big AoE via the center of the sector in entrance of it’s head, so be sure that to stay to the edges. |
After you’ve labored via Fafnir, you’ll encounter a single stone Talos kind enemy in your method to the following encounter. This enemy has an interruptible Tank Buster, so be sure that to make use of Interject whereas it’s being forged.
The Ark Angels walkthrough
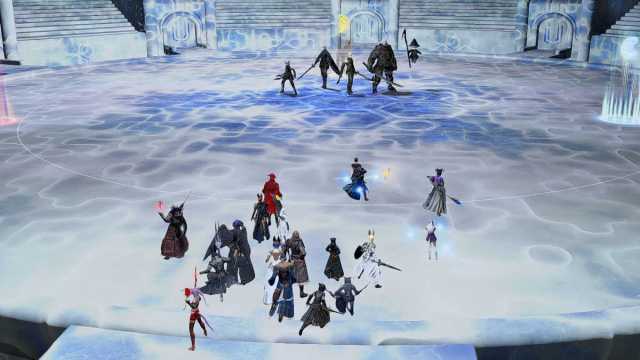
The Ark Angels are a bunch of 5 enemies who have to be fought collectively, and so they all have their very own assaults and AoEs to dodge. Alone, these assaults could be remarkably easy to keep away from, however grouped collectively, these 5 undoubtedly pose a little bit of a problem.
It might probably really feel fairly chaotic, however to make issues simpler, it’s potential to tank all 5 enemies in a bunch and easily AoE assault them to loss of life. It’s slower, but it surely undoubtedly makes issues rather less demanding for all concerned.
Listed here are the principle assaults to look out for with the Ark Angels:
| Assault | Explainer |
| The Decisive Battle | Upon commencing the battle, the three tanks will change into tethered to one of many three Ark Angels which are current, making use of the Epic Hero Impact. Gamers will solely be capable of injury the Ark Angel with the matching impact. In case you’re uncertain, stick along with your Alliance’s tank. |
| Meikyo Shisui | A Variety of totally different AoE assaults will go off in fast succession:
– Checkerboard ice AoE This bit is somewhat chaotic, and on the final half, do not forget that the secure cone of house is definitely smaller than it seems as soon as the assault goes off, so it’s most secure to face instantly in the course of a secure cone. |
| Meteor | Ark Angel TT begins a prolonged forged that have to be interrupted utilizing Interject earlier than it goes off to stop catastrophic raid-wide injury. |
| Guillotine | Ark Angel TT strikes to at least one facet of the room earlier than performing just a few giant cleaves in entrance of him. Stand on to his sides to keep away from the assault. |
| Utsusemi | Ark Angel HM creates 4 clones that can tether to a participant earlier than chasing them across the enviornment. Hold a distance from them, and different gamers ought to keep away from getting caught within the tethers. |
| Mijin Gakure | That is presumably probably the most very important mechanic of the raid, as failing this could trigger a wipe. Ark Angel HM begins casting Mijin Gakure, whereas Ark Angel EV creates an Ark Protect. Focus all assaults on the protect and, when it’s defeated, somebody should use Interject to interrupt Mijin Gakure to stop a wipe. |
| Rampage | Ark Angel MR will sprint across the enviornment, inflicting three giant linear AoEs earlier than leaping up and slamming right down to create a big circle AoE that ought to be averted. |
Like I stated, this combat appears like full chaos, but it surely’s largely avoidance strategies. So long as you may grasp the artwork of interrupting Mijin Gakure, it’s best to get via this in a single attempt.
Shadow Lord walkthrough
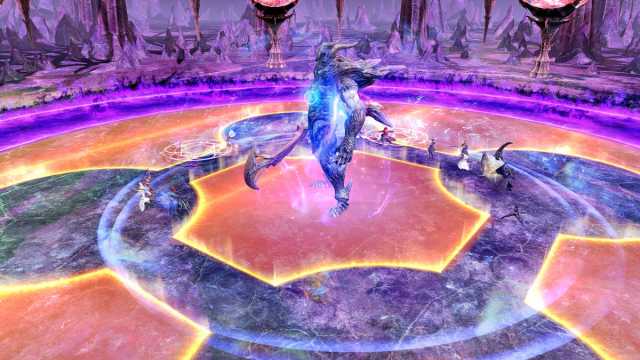
The massive baddie of Jeuno: The First Stroll, and the ultimate boss, is Shadow Lord. His means to make use of each magic and brawn make him a worthy foe, and he additionally calls upon clones to make issues much more difficult. On the plus facet, that is as soon as once more a lesson in avoidance and after the primary go, you’ll just about know what you’re doing, though this combat will check your reminiscence considerably.
Right here’s all of Shadow Lord’s predominant assaults and take care of them:
| Assault | Explainer |
| Giga Slash | Two sweeping swords will seem round Night time Lord earlier than disappearing, leaving a small secure zone that received’t be affected by the incoming cleave AoEs. The assaults received’t occur till after the second telegraph, so be sure that to face within the first secure spot after which in a short time transfer to the second. |
| Giga Slash: Dusk | Precisely the identical as Giga Slash, besides a 3rd telegraphed assault can be added. Be certain that to dodge and weave accordingly. |
| Umbra Smash | Shadow Lord smashes the bottom in a straight like AoE. These line AoEs will then cascade outwards from themselves, so run right into a secure spot created by a beforehand executed AoE. |
| Implosion | Shadow Lord lifts an orb in every hand, every making a half circle AoE round him. Considered one of these orbs will develop greater, and also you need to stand on the other facet of the sector to keep away from a half arena-wide AoE. |
| Chthonic Fury | Shadow Lord remodel the sector, dealing raid-wide injury and starting a brand new part. |
| Darkish Nebula | After the sector is was 4 circles with interconnecting passages, Shadow Lord will create a knockback line AoE on one facet of the sector. Be certain that to face on the facet that offers you adequate house to fly again right into a secure spot. Afterward within the combat, 4 will occur in fast succession, sending you in a whole circle, however you’ll want to recollect the order. |
| Darkish Sigils | Round and sq. telegraphs seem across the enviornment with thorns showing on both the surface dealing with outwards, or inside dealing with inwards. The AoEs that goes off when this forged finishes will observe the route of the thorns, so alter your place accordingly. |
| Shadow Spawn | Shadow Lord creates two clones of himself that can use Giga Slash or Implosion, following the order that the 2 assaults are carried out by Shadow Lord himself. |
| Binding Sigil | Three units of round sigils will seem on the bottom in sequence, detonating to create giant AoEs on the finish of the forged. You’ll want to recollect the order and determine the secure spots, operating into beforehand detonated AoEs to keep away from injury. |
When you’ve defeated Shadow Lord, you’ll be capable of declare your spoils. Good luck rolling on the Nano Lord minion, and in case you’re fortunate sufficient to win one of many Tattered Sheet Music gadgets, bear in mind to move to Jeuno to commerce it for FFXI impressed Orchestrion Rolls by speaking to the Peculiar Goblin.


