#Path of Exile 2 Act 1 Development Information and Walkthrough – Destructoid

Table of Contents
One of many greatest adjustments in Path of Exile 2 is the marketing campaign. On the time of Early Entry, there are three Acts that you’ll play via twice earlier than reaching the endgame. And whereas many of the Acts within the authentic PoE had been somewhat brief, in PoE2 they’re longer with much more aspect content material with non-compulsory rewards. This development information for Act 1 will totally full every thing you may in Act 1 of Path of Exile 2.
PoE2 Act 1 Progress Route and Facet Quests
The Riverbank (Stage 1)
You’ll begin on the shores of the Riverbank, which is a positive callback to how the unique PoE begins. Observe alongside the tutorial pop-ups as you trek throughout the Riverbank; this primary space could be very easy. Once you come to the crimson partitions, you need to do what the tooltip is instructing you to do to progress, resembling utilizing your ability. Ultimately, you’ll come throughout the primary PoE2 boss, The Bloated Miller.
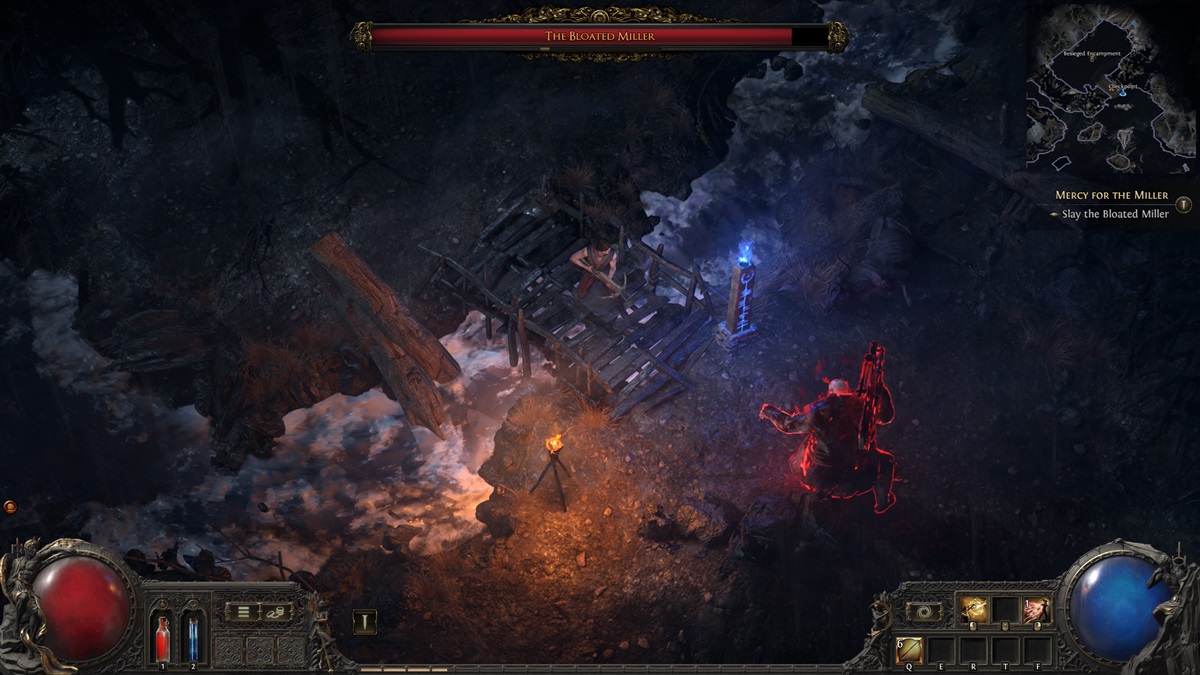
The Bloated Miller (Boss)
As the primary boss of Path of Exile 2, The Bloated Miller isn’t too tough of a boss struggle. Nevertheless, he does have just a few talents price looking for, as they will deal some large harm.
- Sword Slam – The Bloated Miller will glow crimson for a few seconds earlier than slamming his sword into the bottom and sending a shockwave in a straight line. Merely hit Spacebar to dodge out of the best way.
- Cost – Periodically the Bloated Miller will cost ahead till he hits one thing, and can then slam the bottom dealing AOE harm round him. Merely dodge out of the best way than transfer as removed from him as you may.
- Name for Help – All through the struggle, the Bloated Miller will spawn in provides to assist help within the struggle. Shortly burst them down earlier than switching your focus again to the boss.
After defeating the Bloated Miller you may enter Path of Exile 2’s first city, the Clearfell Encampment.
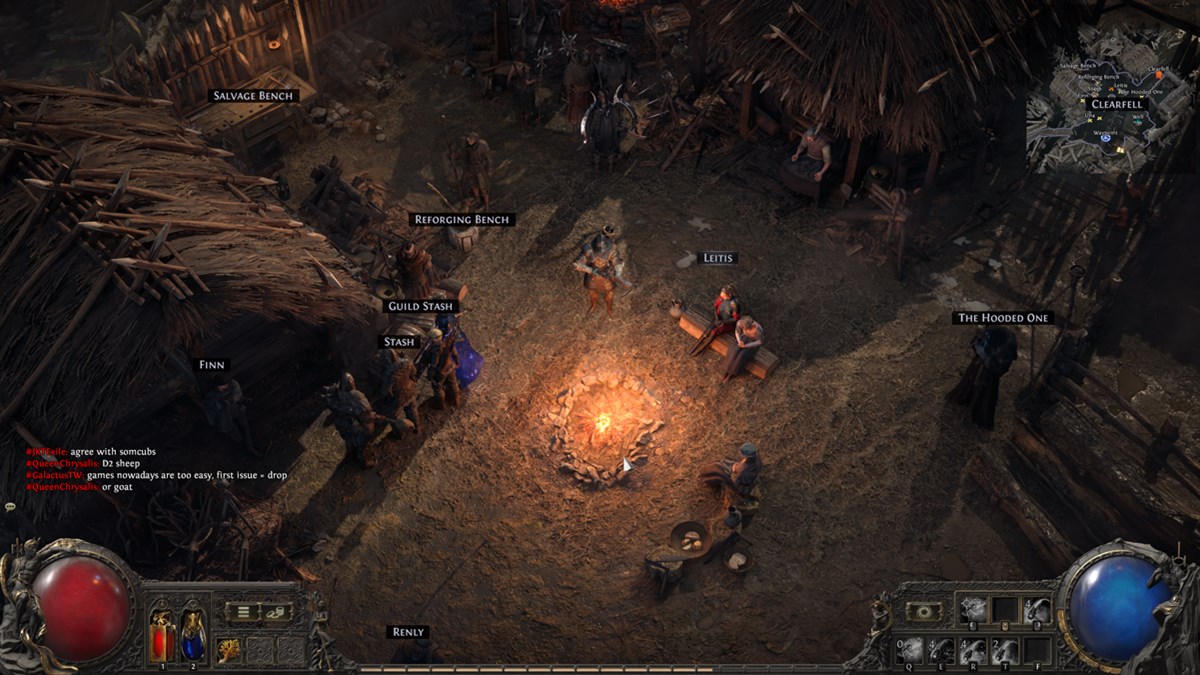
Clearfell Encampment (City)
Seize the Waypoint by operating over it (do that anytime you see one, because it means that you can quick journey to that location), after which click on the Effectively to replenish your well being and mana in addition to refill your Flasks. Communicate with any NPC’s with the yellow quest indicators over their head so you may choose up any aspect quests obtainable in addition to progress the principle quest.
In Clearfell Encampment, you may work together along with your Stash and Guild Stash to retailer gadgets in storage. With the restricted stock house in Path of Exile 2, it may be extraordinarily helpful. You’ll additionally discover the Salvage Bench, which lets you place Sockets in your gear and break down current gear with sockets to obtain Artificer Shards that are used so as to add new sockets.
There are additionally a handful of NPCs you may communicate to as a way to view their store stock:
In a while you’ll recruit one other NPC again to Clearfell Encampment named The Hooded One. He’ll determine your unidentified gadgets totally free and can be used to refund factors in your passive ability tree at the price of gold.
After you have all of the quests, head out to the subsequent zone, Clearfell.
Clearfell (Stage 2)
The primary actual journey zone of PoE2, Clearfell is a sprawling forest ready so that you can discover it. Situated across the centerish of the map is the boss Beira of the Rotten Pack, who you need to undoubtedly make an effort to take out as you’ll obtain a everlasting reward. Afterwards, search for the Mysterious Campsite bonus goal on the map for some additional rewards, earlier than on the lookout for the doorway to a aspect space known as Mud Burrow.

Beira of the Rotten Pack (Boss)
Beira of the Rotten Pack is an ice-based boss that can throw some new talents at you. Fortunately, you may really exit the sector space and run round with out restarting the boss, which you need to do at a number of elements all through the struggle. Listed here are the Beira talents to look out for:
- Ice Shards – Beira will spawn a number of AoE circles that shoot out ice shards in a 360 diploma course round them after just a few seconds.
- Summon Wolves – Periodically Beira will spawn a horde of wolves that can assault you. The realm can get fairly overwhelming, which is when you need to exit the sector and run round to take out the wolves earlier than heading again in and specializing in Beira.
Defeating Beira the Rotten Pack boss will reward you with a consumable merchandise known as Head of the Winter Wolf. Utilizing this merchandise will grant your character a everlasting +10% Chilly Resistance. Be sure you do that boss once more when on Act 1 (Merciless Problem) as you may obtain the reward once more, granting +20% Chilly Resistance in whole.
Mysterious Campsite (Bonus)
The Mysterious Campsite is a small space with numerous chests you may loot for random rewards. There aren’t any precise targets right here, only a small campsite so that you can discover. There are a number of of those areas all through the marketing campaign, however some have precise targets as effectively which we’ll point out if that’s the case.
Mud Burrow (Stage 3)
Coming into the aspect space of the Mud Burrow will allow a aspect quest known as Treacherous Floor you probably have not but acquired it, tasking you with killing The Devourer. Clear the enemies within the Mud Burrow till you discover a larger area which is residence to The Devourer and enter it to set off the struggle at an space known as the Vile Nest in your minimap.
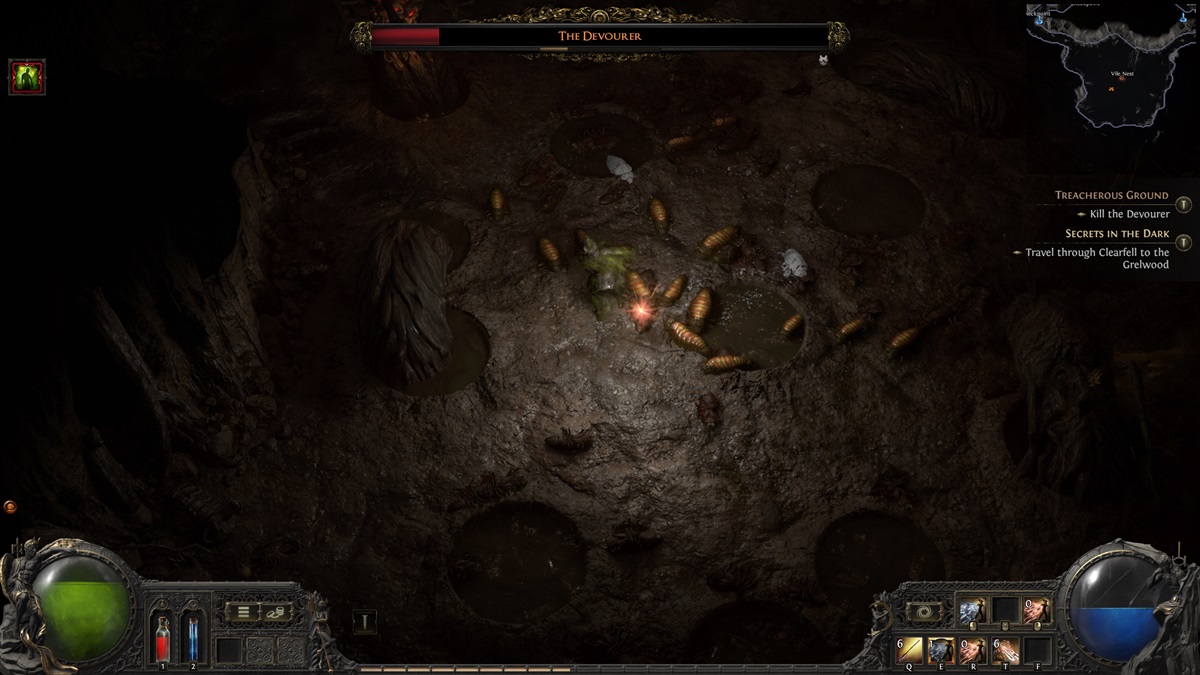
The Devourer (Boss)
The Devourer may be fairly tough in case you’re unsure methods to struggle it. It’s an enormous muddy worm-like creature that makes use of poison assaults and spawning a ton of grubby larva to assault you as effectively. Listed here are the entire assaults to be careful for from The Devourer boss:
- Acid Spit – The Devourer will spit toxic ball projectiles at you, which it’s essential dodge. If you’re hit, you’ll take poison chaos harm for just a few seconds.
- Burrow – Periodically The Devourer will burrow underground earlier than popping again up out of the bottom at a random spot. This may depart a gap within the earlier spot he was, earlier than he repeats this course of 4 instances. You’ll be able to solely harm his head all through this section.
- Larva Spawn – A number of instances all through the struggle the boss will spawn a bunch of Larva mobs which you need to focus down earlier than switching again on the boss.
- Acid Puddle – The Devourer will spit large poison bombs at numerous areas all through the struggle that can create an AoE circle of poison that inflicts a damage-ticking dot on you in case you stroll via it.
Defeating the Devourer will full the Treacherous Floor aspect quest. Return to Renly on the Clearfell Encampment to show within the quest and obtain an Uncut Assist Gem (Stage 1) as a reward. Subsequent, head to The Grelwood.
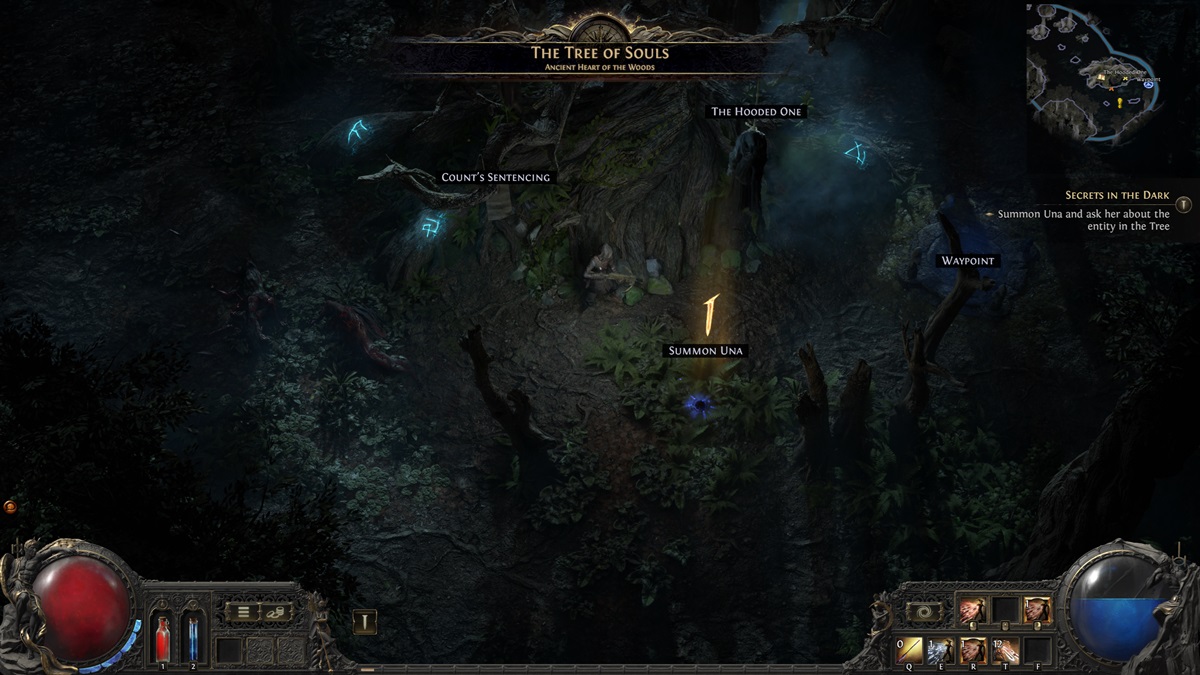
The Grelwood (Stage 4)
The Grelwood is a much bigger zone, and your focus needs to be discovering an enormous mysterious tree close to the middle of it known as The Tree of Souls. You’ll see a person hanging from the tree known as The Hooded One in addition to three runes on the tree and the flexibility to summon the NPC Una, which you need to do. To proceed you’ll want to go to The Crimson Vale, however you need to first discover the map to search out the 2 non-compulsory bosses in The Grelwood.
The Brambleghast (Boss)
The primary Grelwood non-compulsory boss is The Brambleghast. This boss is usually static however can nonetheless be a ache in case you don’t know its mechanics. Listed here are all the skills of the Brambleghast you need to look out for as a way to defeat the boss:
- Frontal Slam – The Brambleghast will often swipe a frontal cleave, dealing harm to you if you’re in entrance of him.
- Root Slam – The boss slams the bottom sending a tree root via the bottom in a straight line in your course. Merely dodge out of the best way.
- Spiny Thorns – Periodically The Brambleghast will shoot out a swirling object that spits thorns in a 360 course round it.
- Spawn Tendrils – These tendrils can pop up across the area and can attempt to slam down on you in case you come to shut whereas additionally taking pictures purple chaos projectiles at you.
Defeating The Brambleghast will reward you with an Uncut Talent Gem (Stage 2).
Areagne, Forgotten Witch (Boss)
The second boss of the Grelwood is Areagne, the Forgotten Witch, who may be discovered inside a small Witch’s hut close to the river operating via Grelwood. Enter the hut and communicate to the aged lady within the again, and she’s going to disappear. Then head exterior and you’ll discover Areagne, able to be encountered. That is a particularly straightforward encounter and doesn’t also have a full Boss HP Bar like most encounters, so merely be sensible and you’ll take out Areagne.
Witch Hut (Bonus)
Enter the Witch Hut and discover it for an opportunity at receiving some new Flasks.
The Crimson Vale (Stage 5)
Upon coming into the Crimson Vale, you’ll discover three Obelisk of Rust’s positioned across the map. Work together with every of those, as upon activating the third one you’ll begin The Rust King boss encounter which is required to progress.
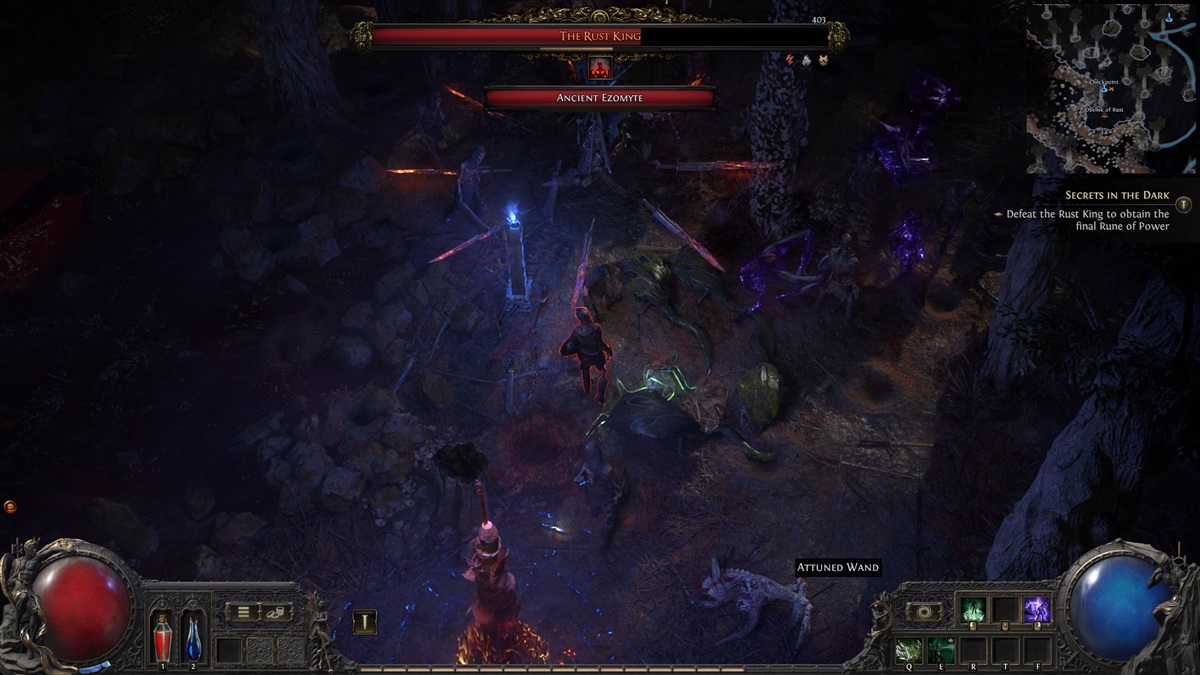
The Rust King (Boss)
As a steel armored-boss, The Rust King is proof against Hearth however weak to Lightning. When you have any Lightning assaults or spells, you’ll wish to use them to struggle this boss. Listed here are The Rust Kings assaults you wish to keep watch over:
- Circle of Swords – Summons swords in a round space round him earlier than taking pictures them out in all instructions. Stand again from The Rust King to simply dodge the swords.
- Flight of Swords – The Rust King will often hurl swords at you as effectively in a direct line, merely dodge out of the best way of them.
- Name Lightning – Once you see him maintain his weapon up into the sky, he’ll start channelling lightning bolts that spark the world round him in an AoE.
- Rusty Spikes – A line of Rusty Spikes will shoot out from The Rust King in the direction of you, knocking you up and again if you’re hit by them.
- Name Historic Ezomyte – A number of fodder ANcient Ezomyte enemies will spawn within the area. Defeat them earlier than switching again to the boss.
For defeating The Rust King you’ll obtain the Rune Cranium Cap quest merchandise and an Uncut Talent Gem (Stage 3). Head again to the Tree of Souls to finish that quest after which head into The Grim Tangle.
The Grim Tangle (Stage 6)
Ergvig, the Rotten Druid (Boss)
Cemetery of the Eternals (Stage 7)
Lachlann of Countless Lament (Boss)
Historic Damage (Bonus)
Tomb of the Consort (Stage 9)
Asinia, the Praetor’s Consort (Boss)
Embattled Trove (Bonus)
Mausoleum of the Praetor (Stage 9)
Draven, the Everlasting Praetor (Boss)
Forgotten Riches (Bonus)
Searching Grounds (Stage 10)
Dyadic Ritual (Occasion)
The Crowbell (Boss)
Ritual Altar (Bonus)
Freythorn (Stage 11)
The King within the Mists (Boss)
Ogham Farmlands (Stage 12)
Crop Circle (Occasion)
Una’s Hut (Bonus)
Ogham Village (Stage 13)
Renly’s Workshop (Bonus)
The Executioner (Boss)
The Manor Ramparts (Stage 14)
The Gallows (Bonus)
Ogham Manor (Stage 15)
Candlemass, the Dwelling Ceremony (Boss)
Rely Geonor (Act 1 Ultimate Boss)
This walkthrough is a WIP.


