#All Picture Expedition places – Destructoid

Table of Contents
The digicam is arguably top-of-the-line options of Infinity Nikki. It means that you can take stunning selfies, but in addition gloriously detailed scenic panorama pictures, and it’s filled with options that may be upgraded.
For those who’re on the lookout for a strategy to check your pictures, or need a comparatively straightforward strategy to replenish on Improve Packs to unlock new lighting types, poses, or filters, then you’ll be able to’t go flawed with the Expeditions Handbook.
The way to use the Expeditions Ebook in Infinity Nikki
Earlier than you may get into the Expeditions Handbook, you’ll want to attend for a message to come back via from LuminaLens Touring Photographers. You possibly can set off this in-game occasion very simply by getting snap-happy and taking some pictures with the digicam.
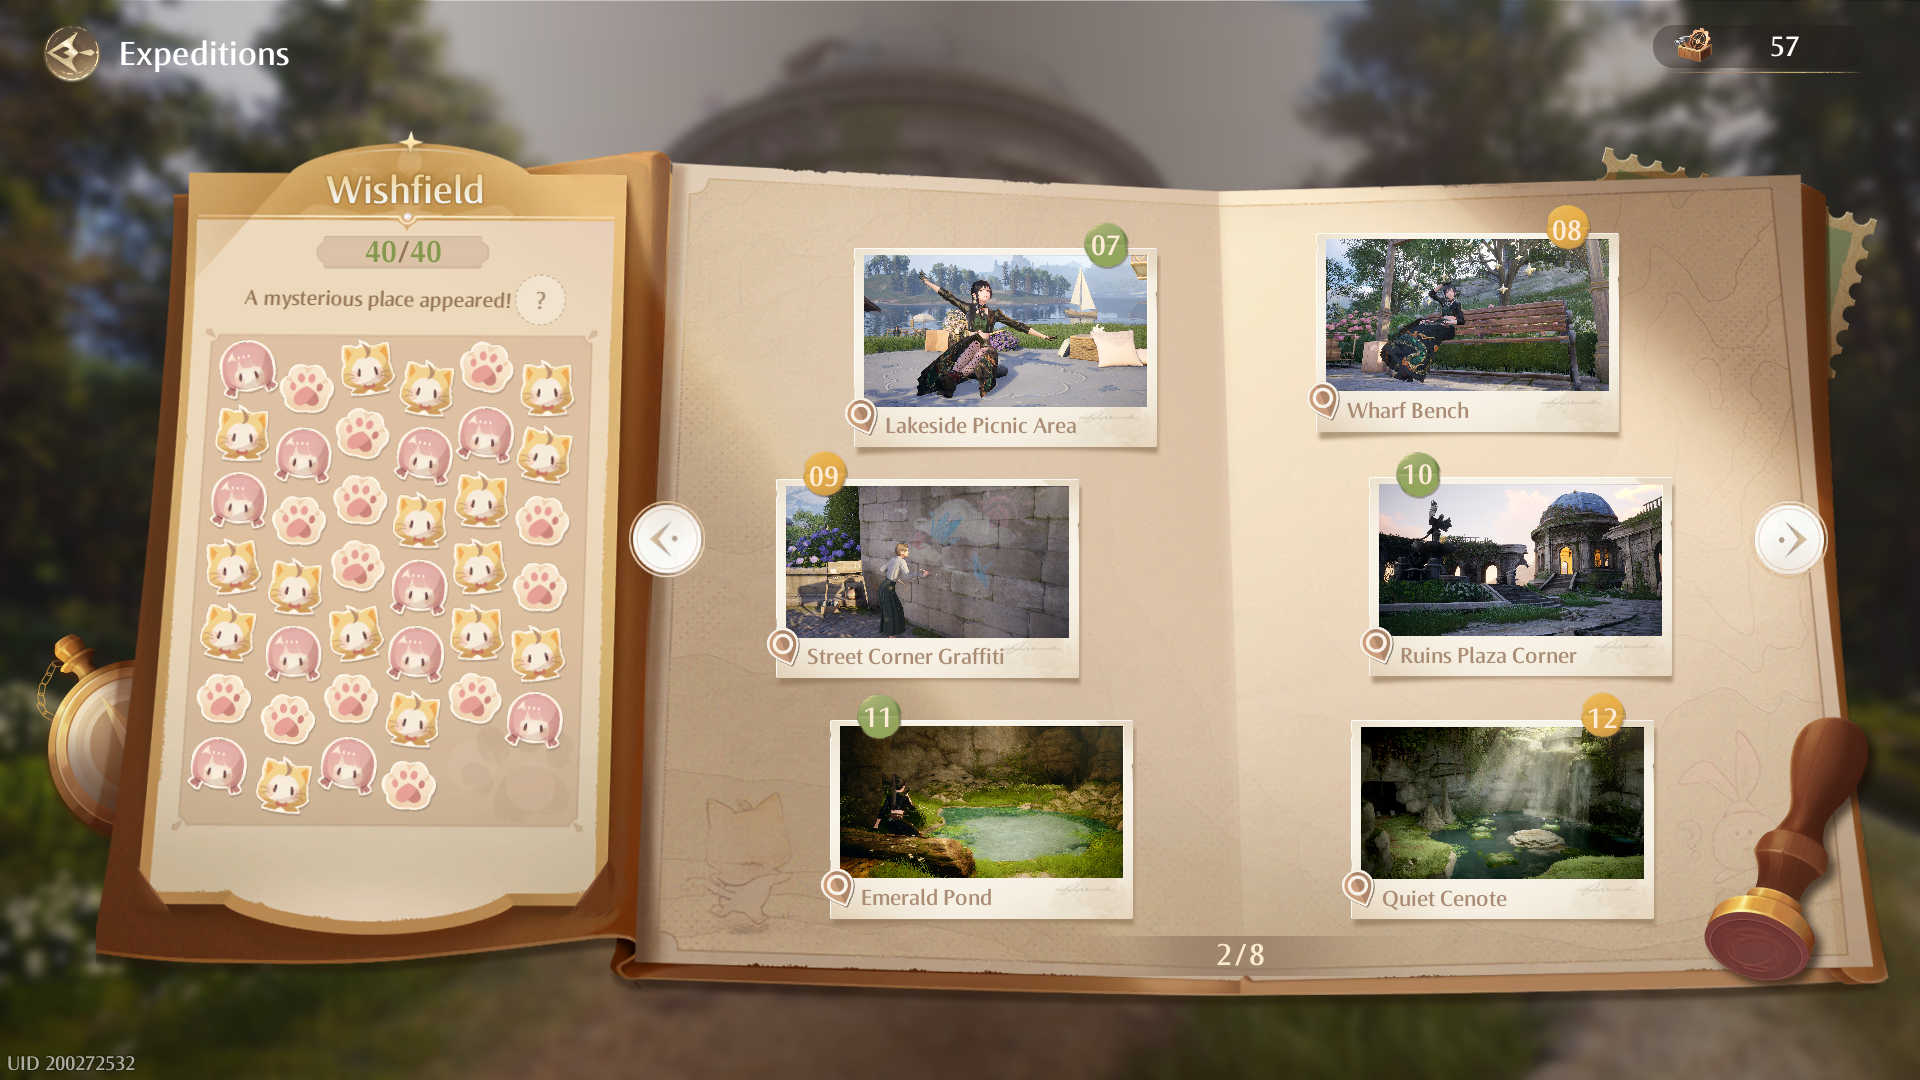
Then, to entry the Handbook, open up the digicam after which choose the center icon within the prime proper of the display. You’ll see a very clean model of the Expedition Handbook, ready to be crammed in. Every efficiently taken {a photograph} will earn you a stamp, and also you’ll have to get 40 in complete to finish the Handbook. Every photograph may also reward three Upgrades Packs.
The way to take Expedition images in Infinity Nikki
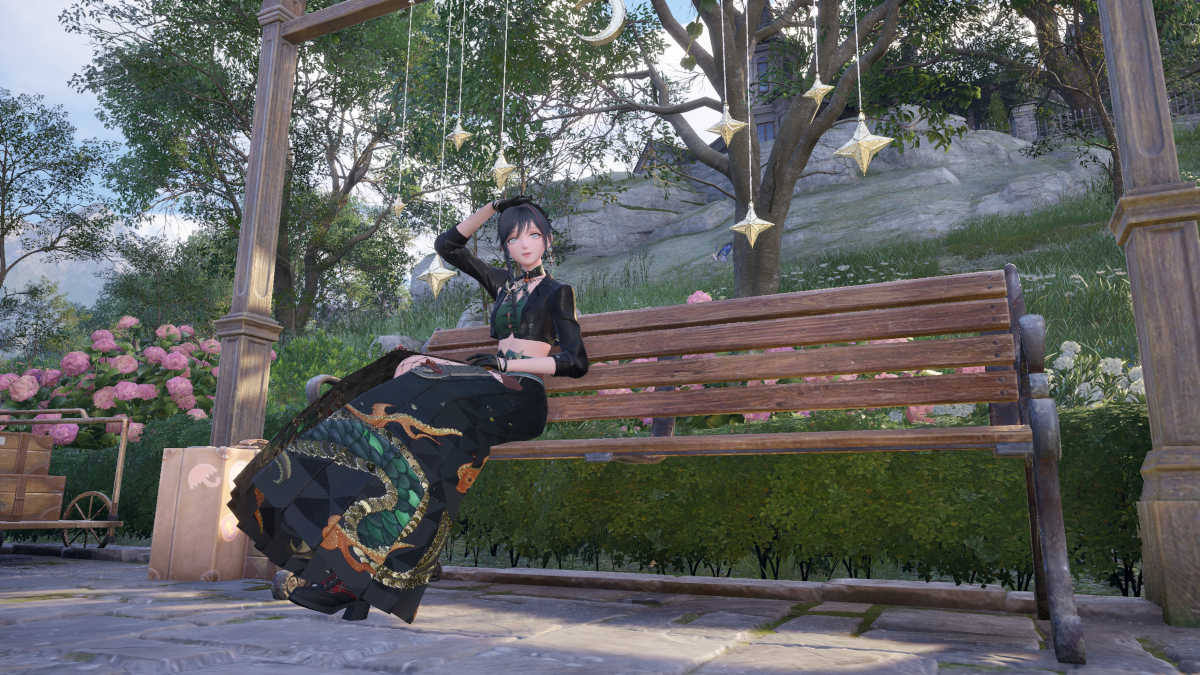
The 40 places it’s essential {photograph} for the Expedition Handbook are littered all through Miraland. The preliminary 32 pictures may be taken purely via exploration from the purpose at which you get the e-book, however images 33 – 40 are locked behind the primary quest development, with the most recent of them changing into unlocked in Chapter 6 whenever you enter the Wishing Woods.
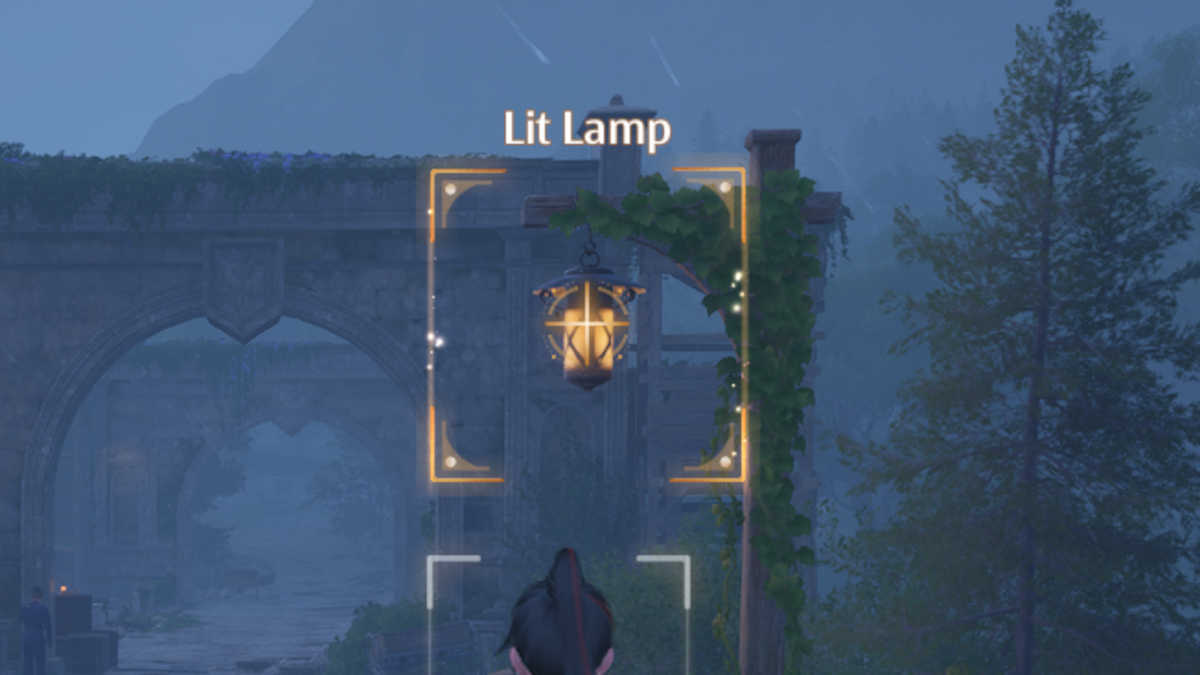
While you come throughout a spot the place an Expedition photograph may be taken, your quest on the left facet of the display will change to the title of the photograph as will probably be displayed within the Expedition Handbook. The situation through which it’s essential stand is at all times very small, so that you’ll have to cease and enter digicam mode, then go searching to seek out the topic of the photograph. While you’ve discovered it, it can present up in a gold field with the textual content above it, as proven above.
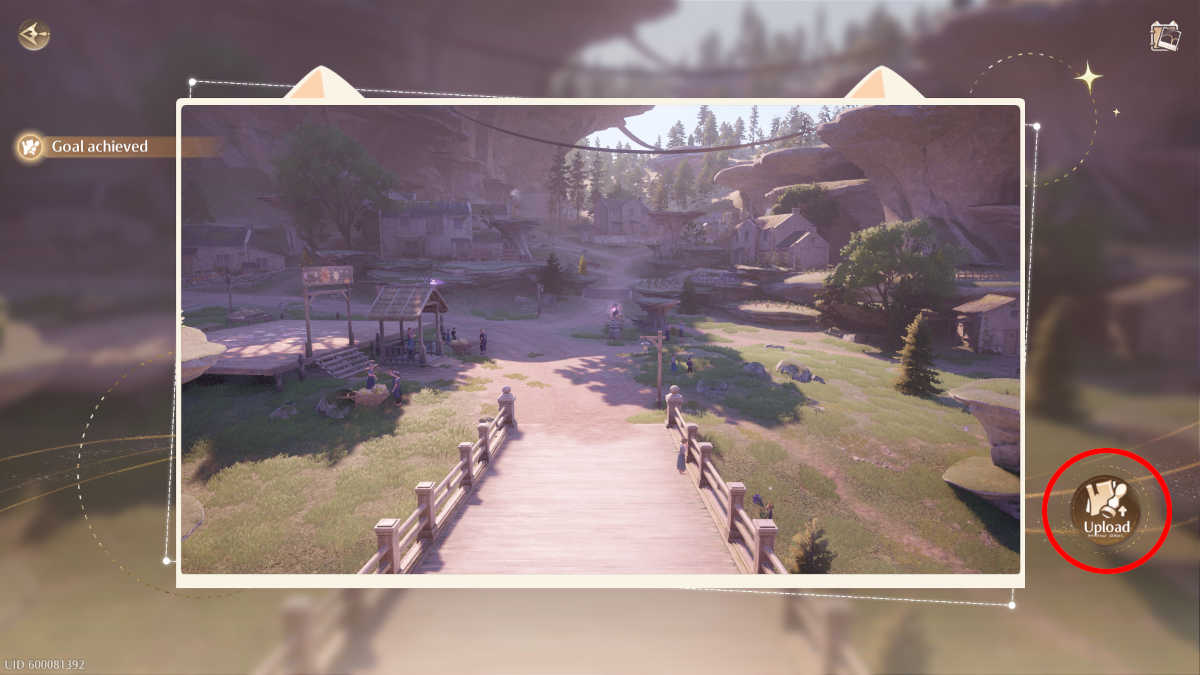
When you’ve taken your photograph, you’ll have to ensure you press the “Add” button on the appropriate facet of the display (circled above) when the photograph is proven. For those who skip over this step, it received’t be included within the Expedition Handbook.
All Expedition photograph places in Infinity Nikki
The 40 images that it’s essential take are situated within the following areas of Miraland:
| Space | Pictures |
|---|---|
| Memorial Mountains | 2 |
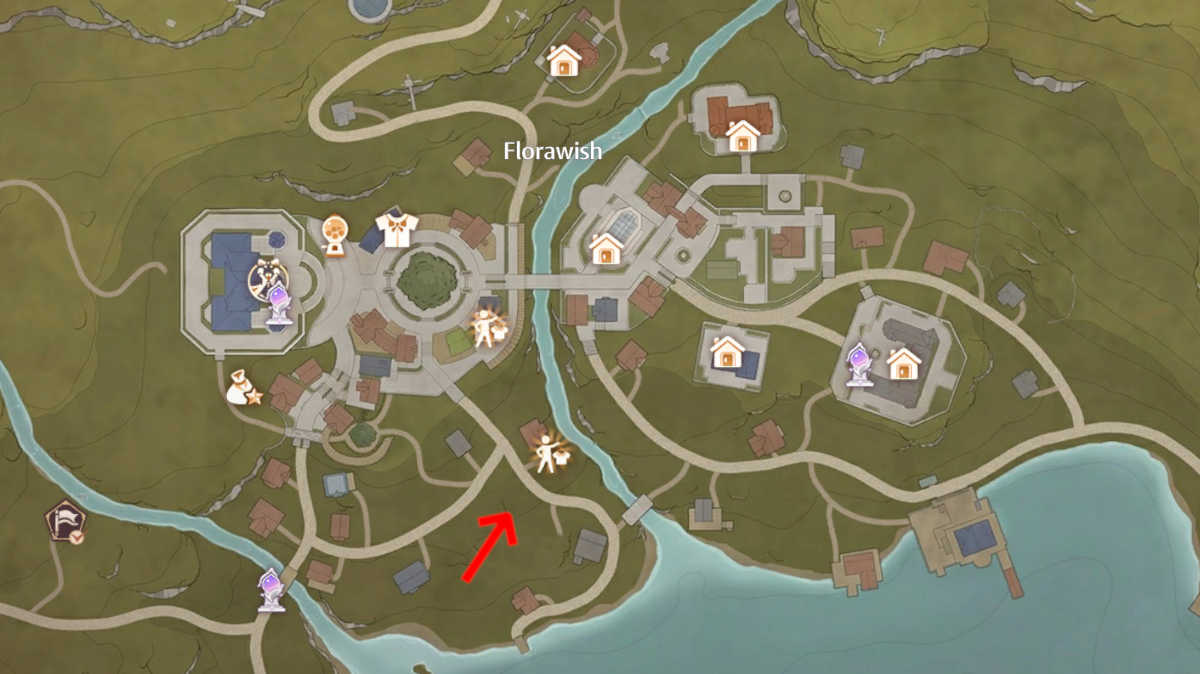
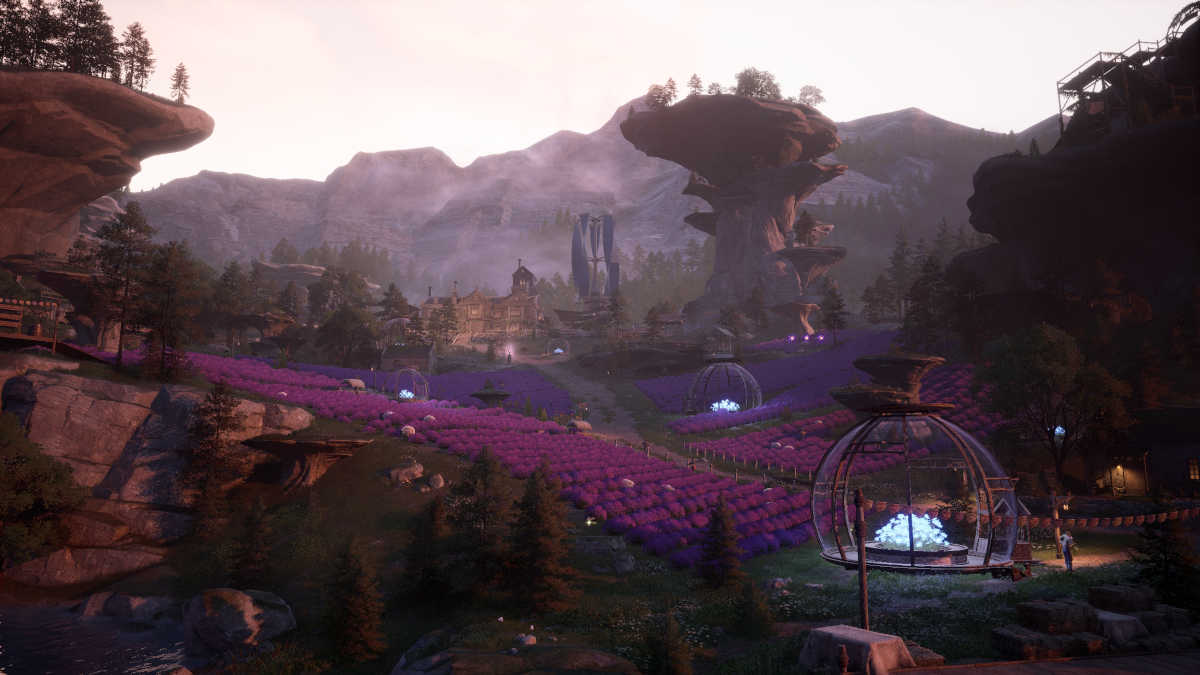
| Florawish | 15 |
| Breezy Meadow | 9 |
| Stoneville | 5 |
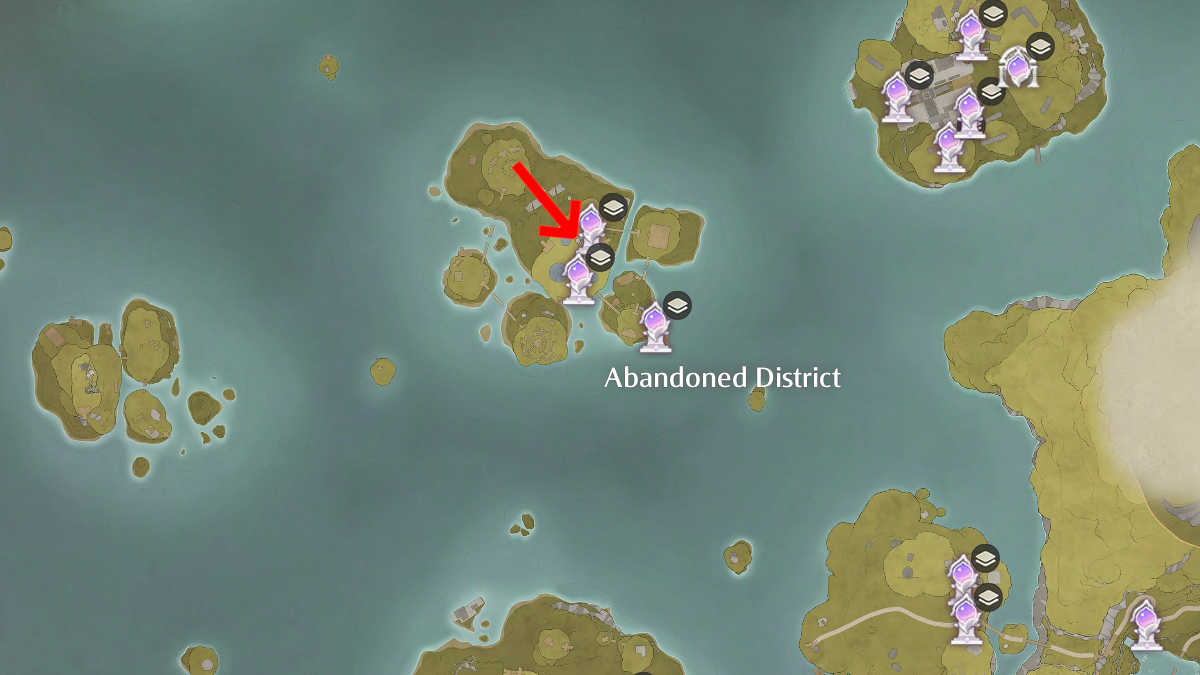
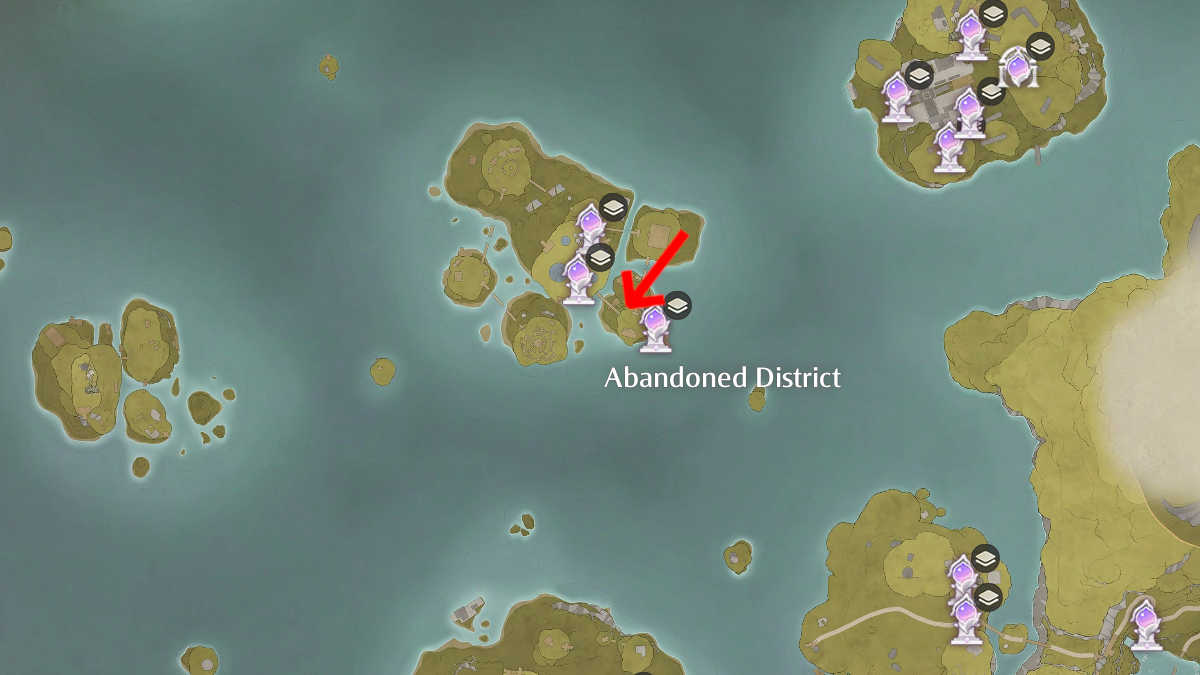
| Deserted District | 4 |
| Wishing Woods | 5 |
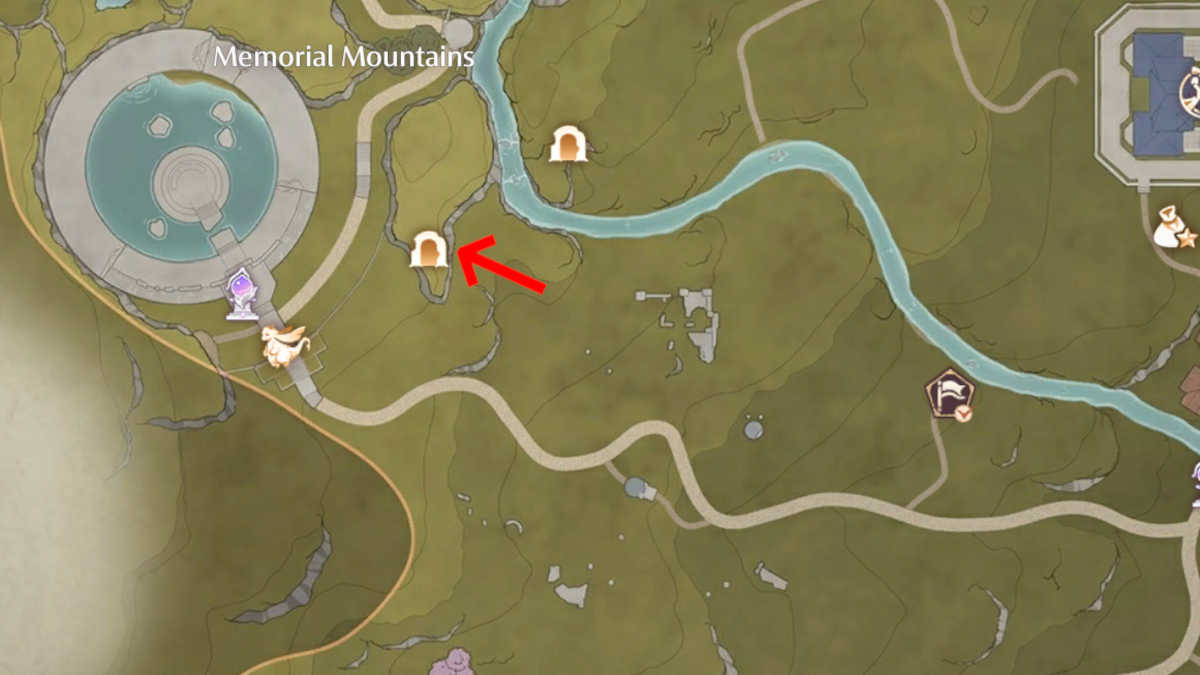
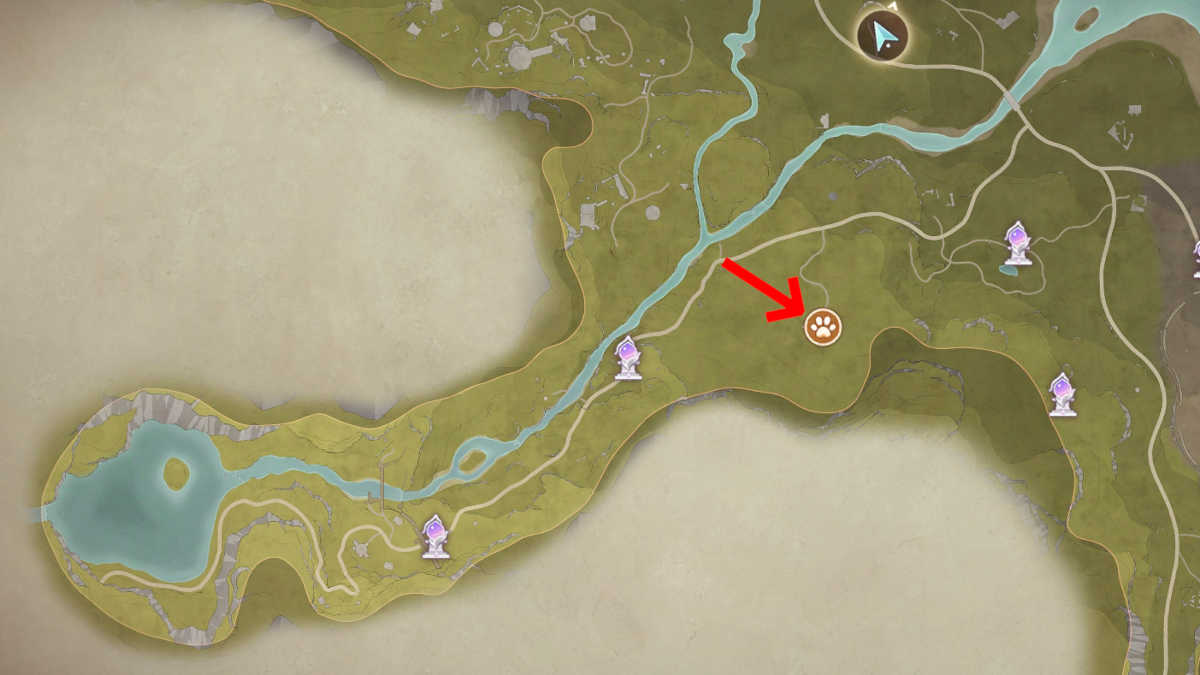
Memorial Mountains Expedition images
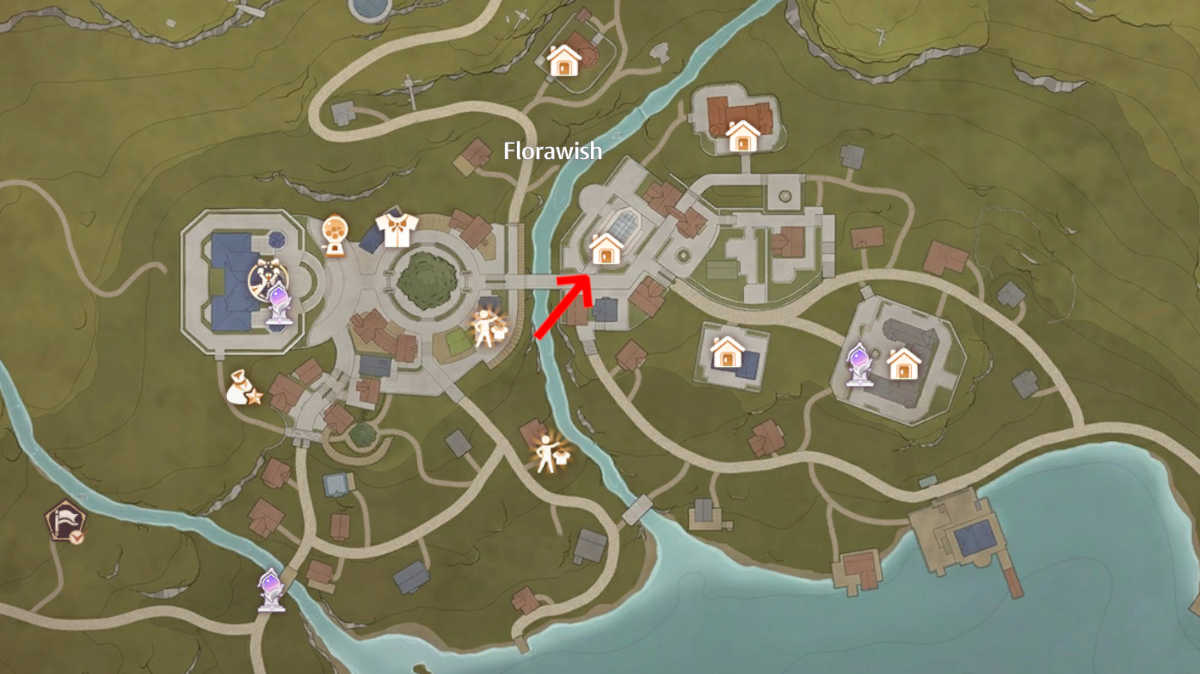
With 15 images to take and add, most of your time engaged on the Expedition Handbook will probably be spent in Florawish and the countryside surrounding it.
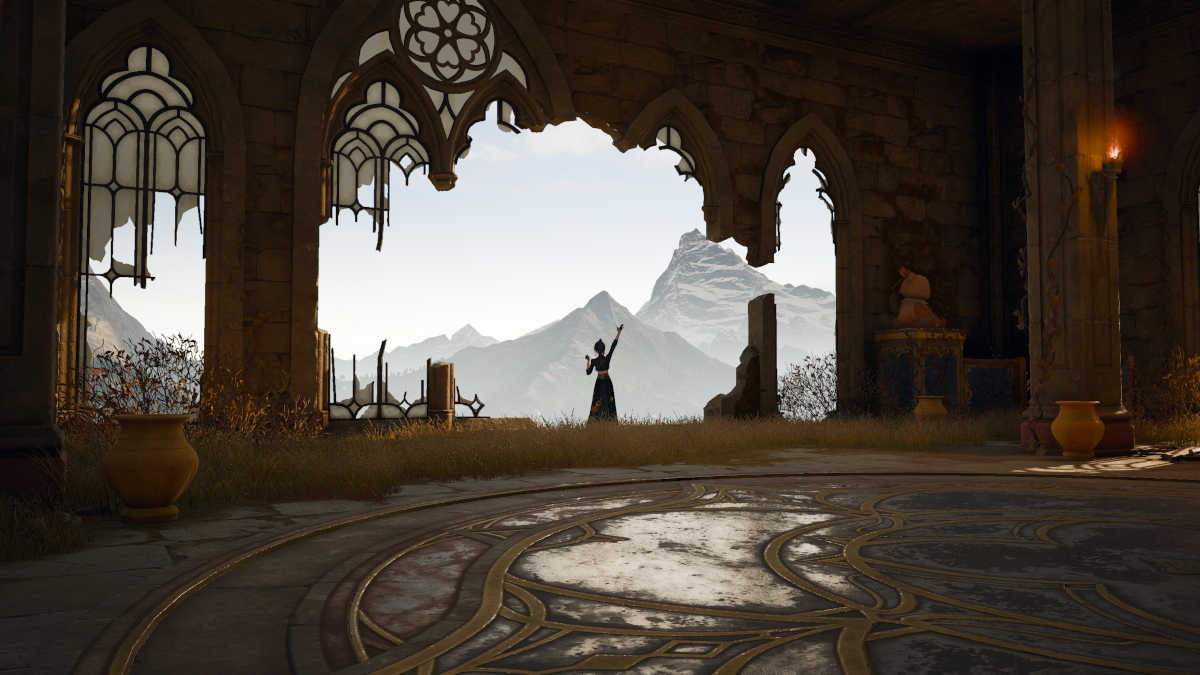
1. Outdated Florawish Memorial
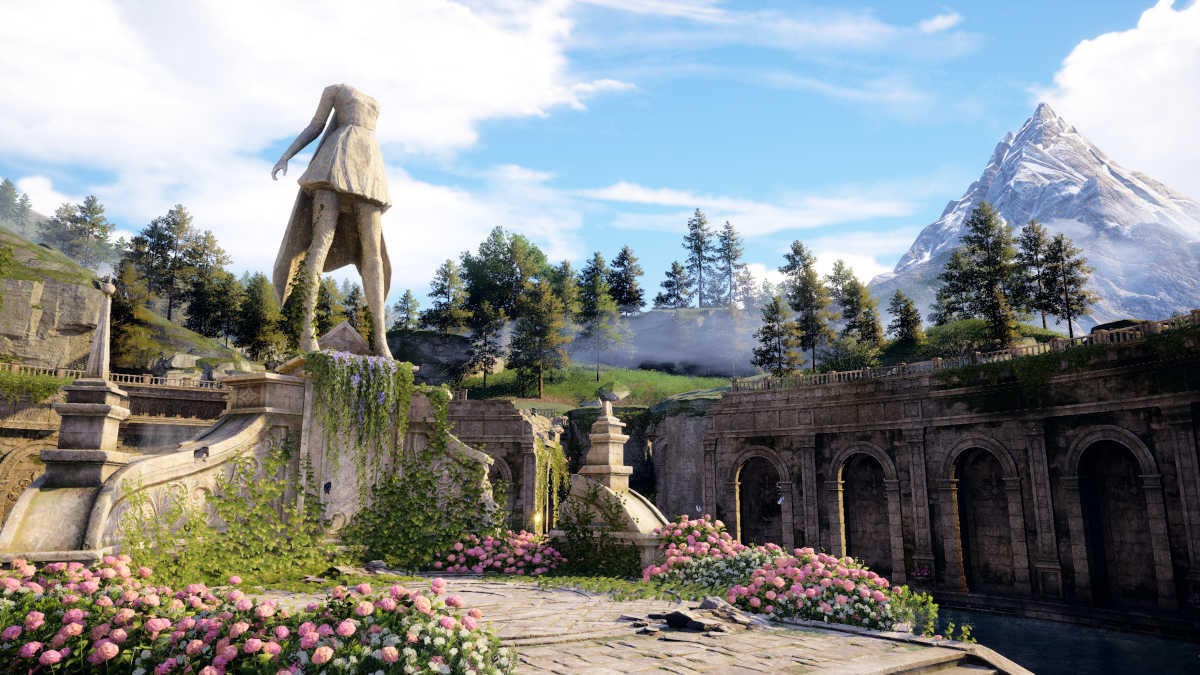
The goal of this photograph is the headless photograph within the middle of the plaza.
2. Memorial Fountains Log Bridge
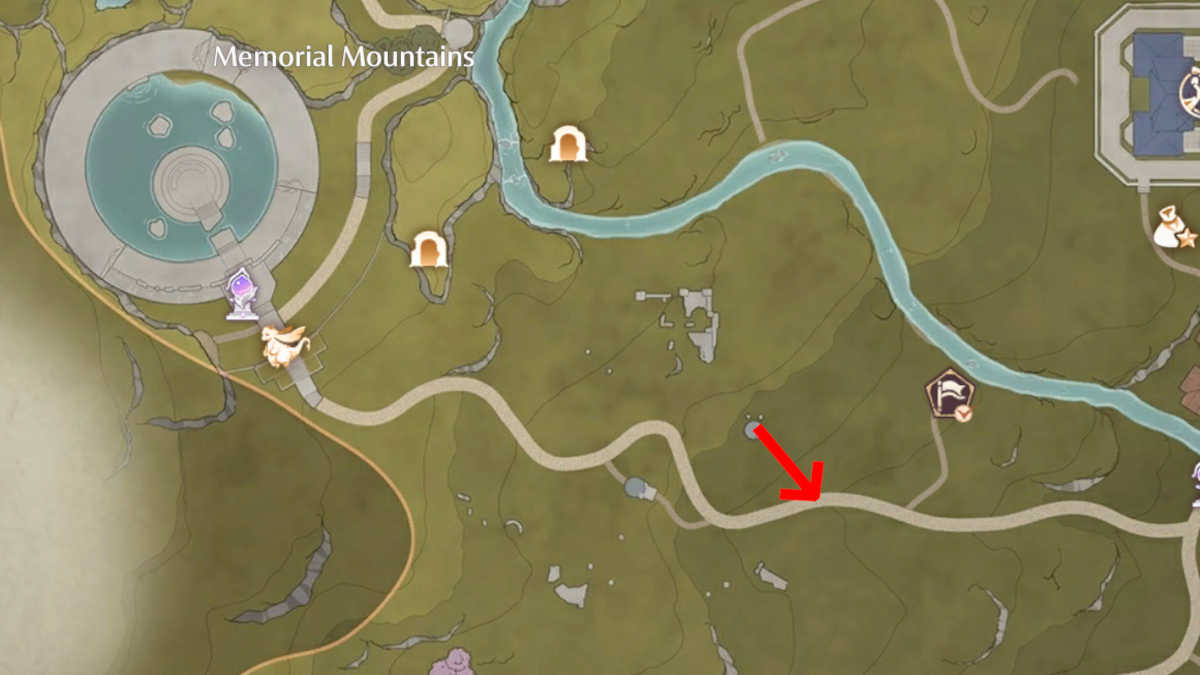
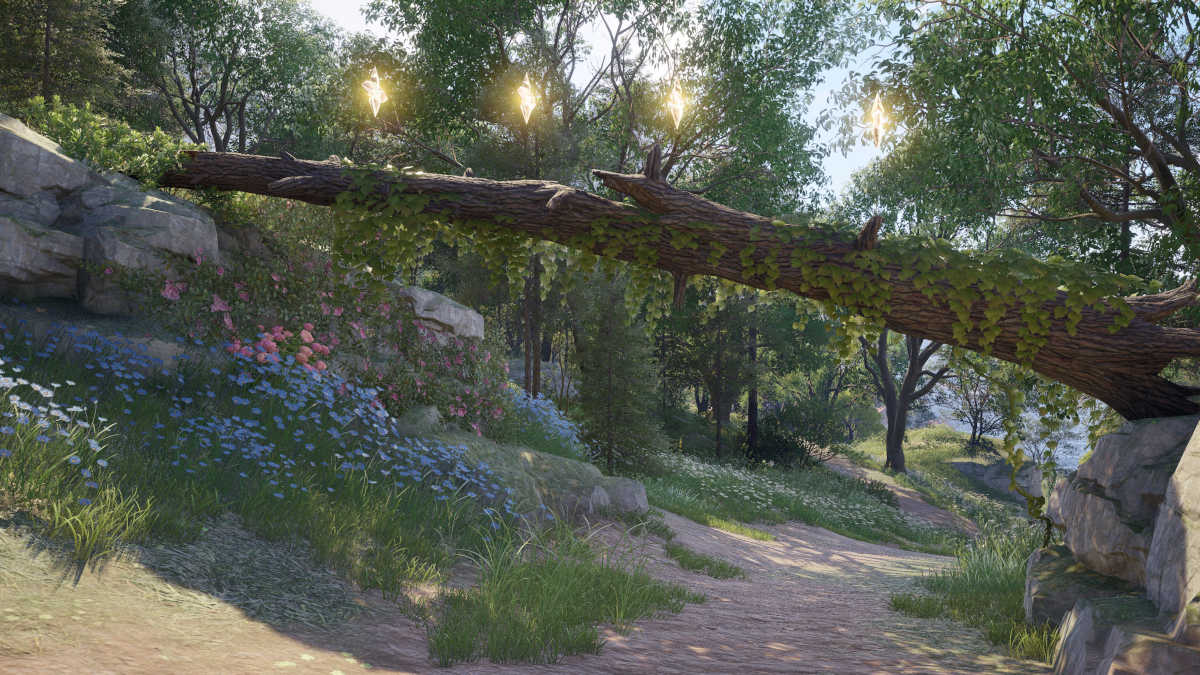
Keep on with the primary path to the southeast from Memorial Mountains in the direction of Florawish. The log bridge is situated about midway between the 2.
Florawish Expedition images
3. Swing by the Path

The swing you want is situated proper subsequent to Elena, who sells flowers. You don’t must be within the photograph for it to depend.
4. Lilina’s Statue

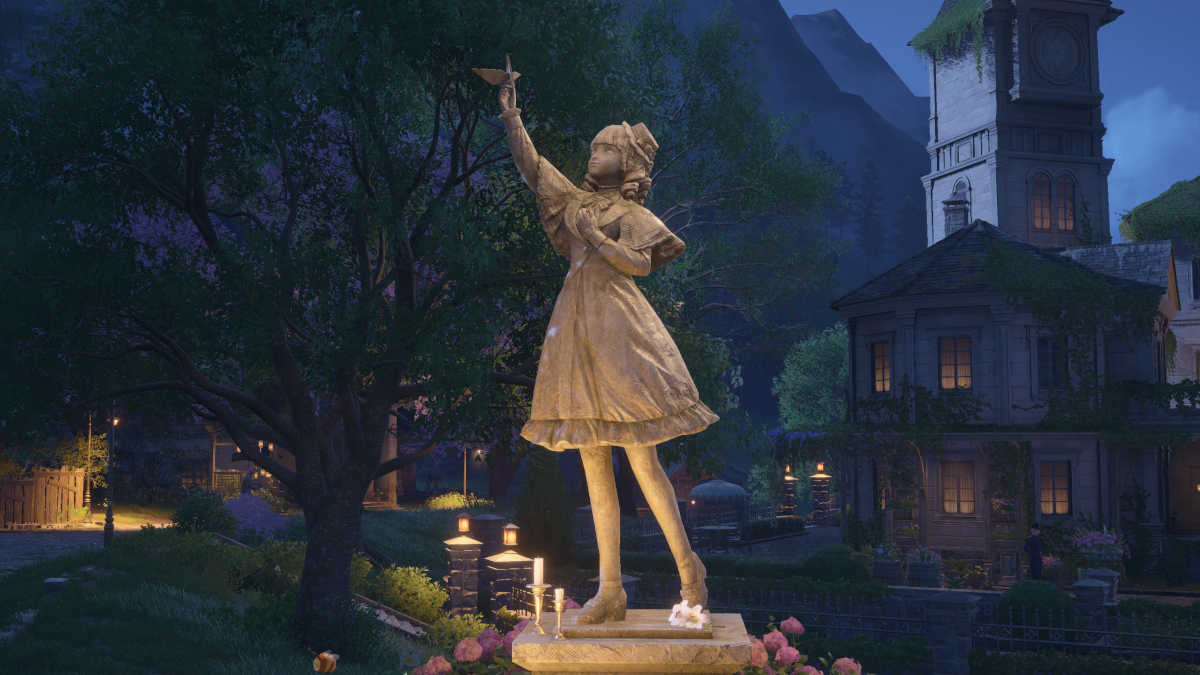
Outdoors the primary doorways of the Mayor’s Residence, may be taken from any angle so long as the face is current within the ensuing photograph.
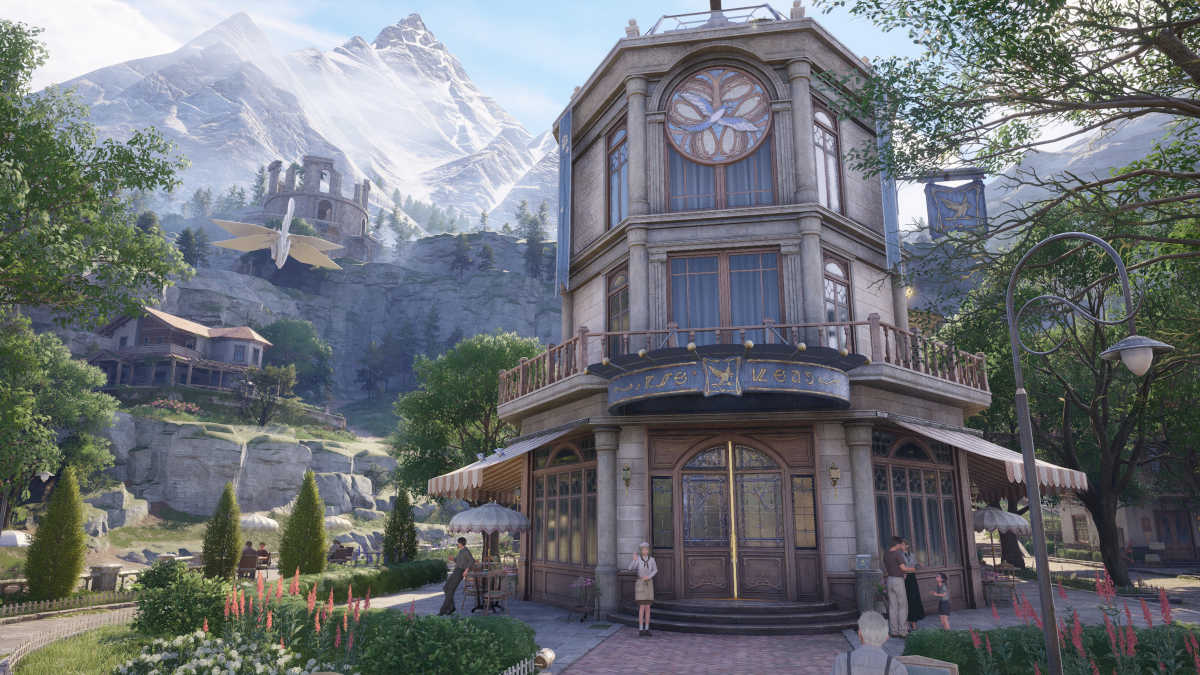
5. Ray and Wing’s

Simply throughout the bridge to the east of the Wishing Tree. For those who go inside, you may as well verify off Picture #15 to avoid wasting you from having to come back again later.
6. Historical Tree Swing

Within the small round courtyard to the southwest of the Wishing Tree.
7. Lakeside Picnic Space

There’s a group of picnic blankets laid out on this shoreline, however the one you need is the round one with a spot for Nikki to sit down in the course of it.
8. Wharf Bench

In a small canopied courtyard reverse the doorway to the Wharf.
9. Road Nook Graffiti

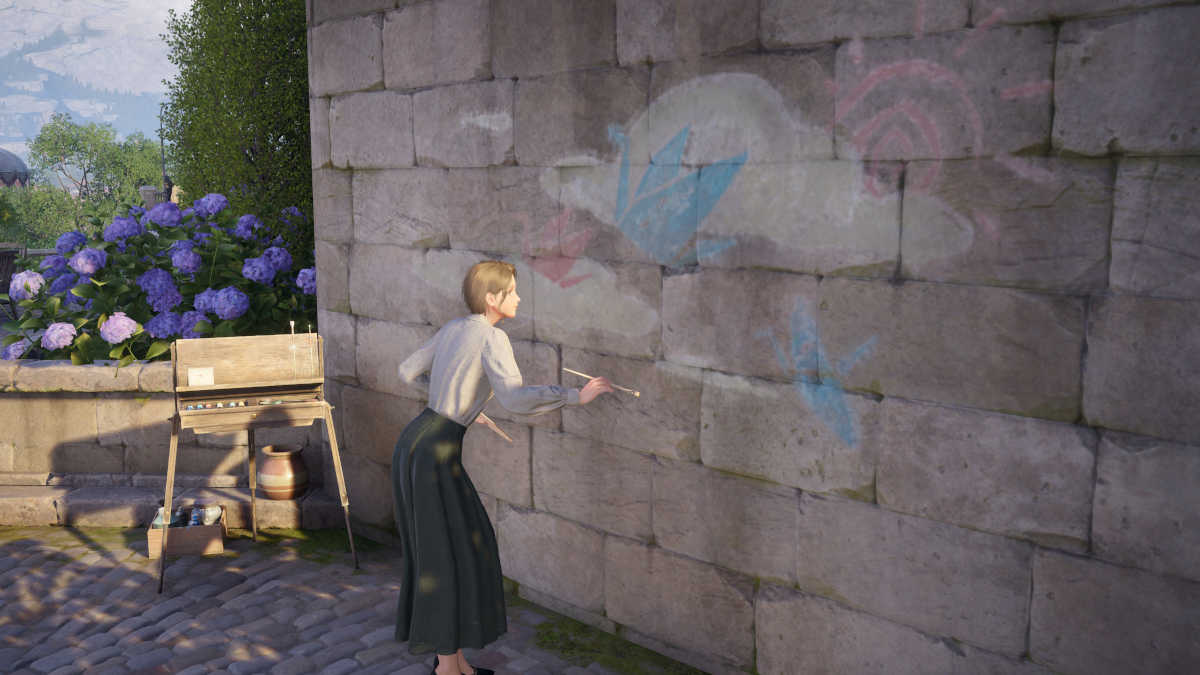
On the backside of the steps that go south from the Wishing Tree, you’ll discover a girl portray graffiti on the wall.
10. Ruins Plaza Nook
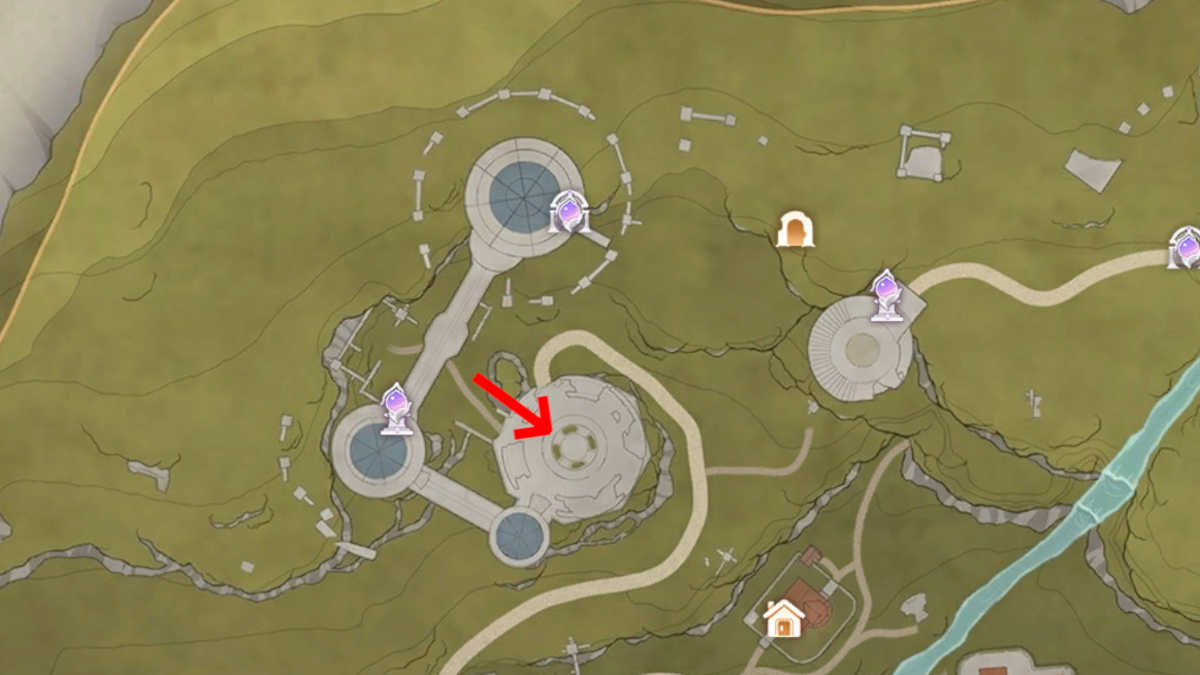
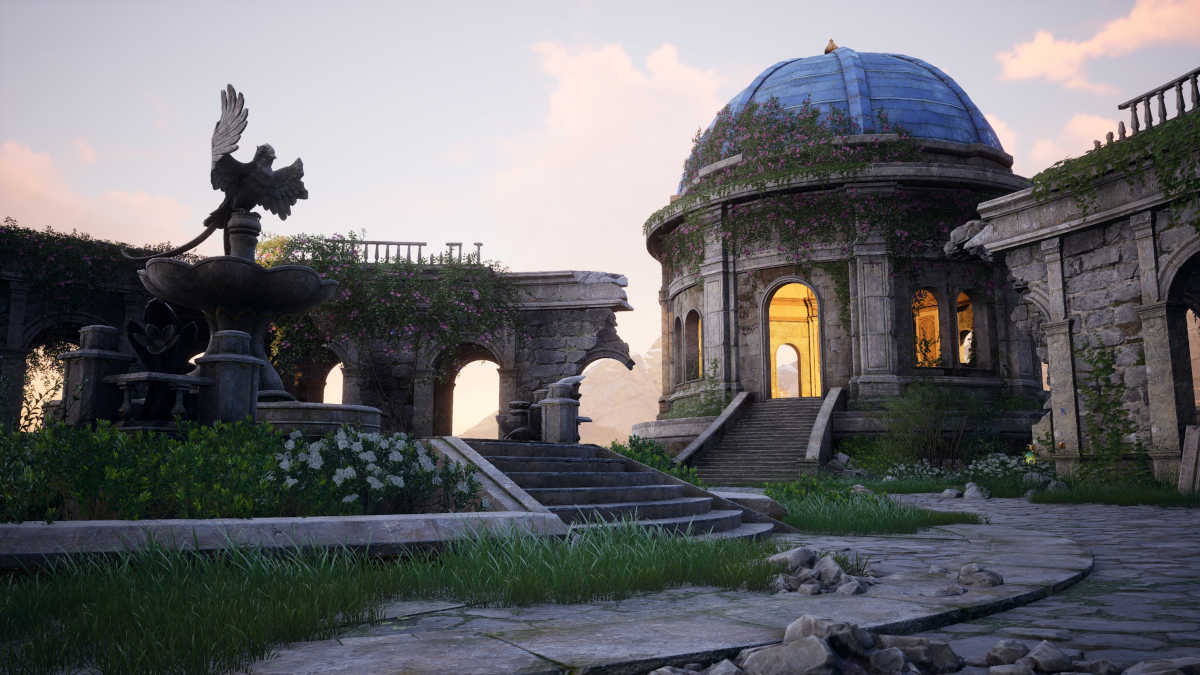
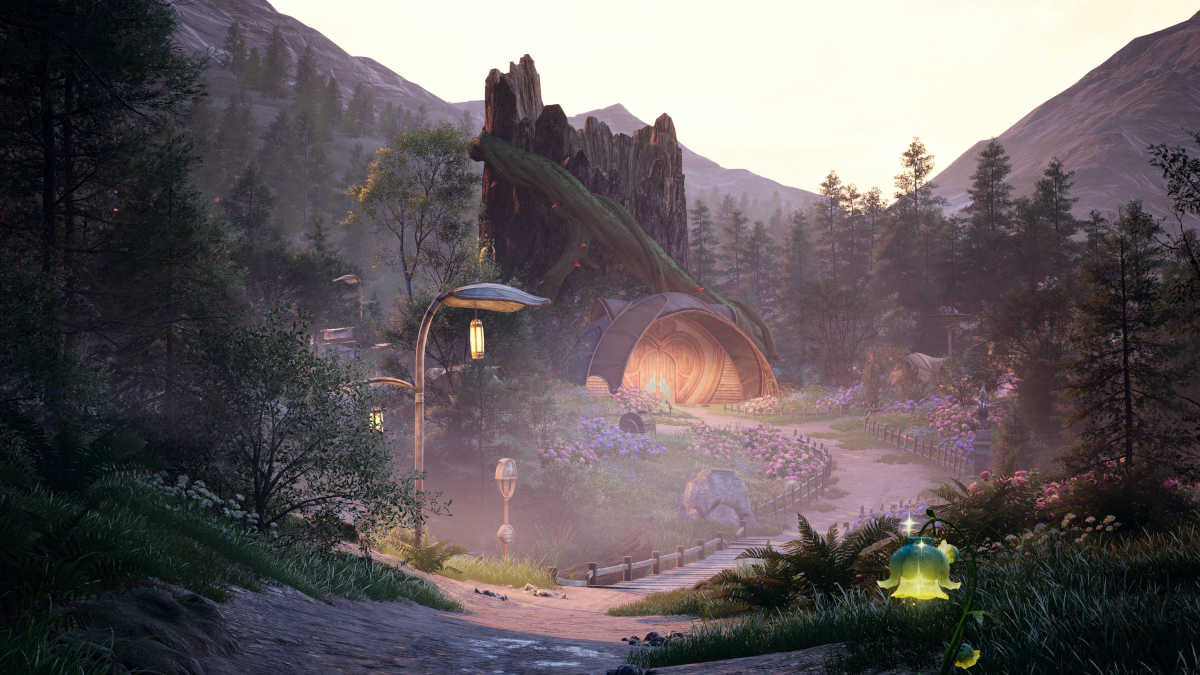
The goal of this {photograph} is the smallest of the Dream Warehouse’s domed buildings.
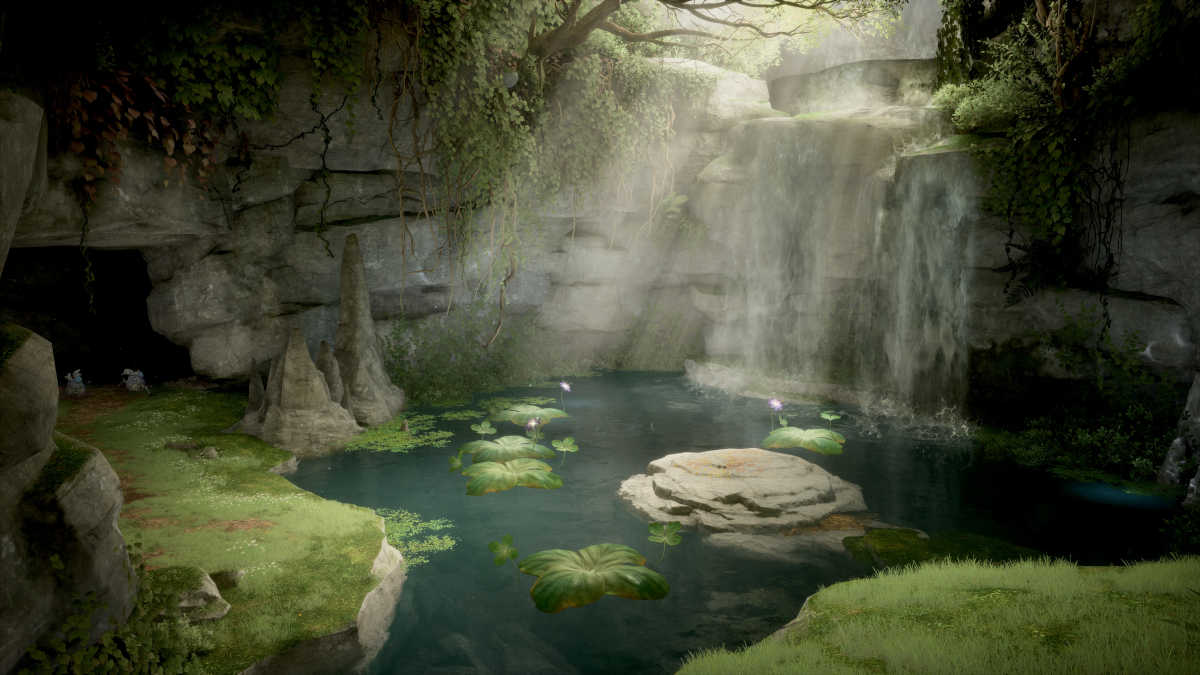
11. Emerald Pond
This photograph can solely be shot contained in the Dream Warehouse Cavern, which is discovered up within the hills. Comply with the trail contained in the Cavern till you come throughout this small pond with a log subsequent to it.
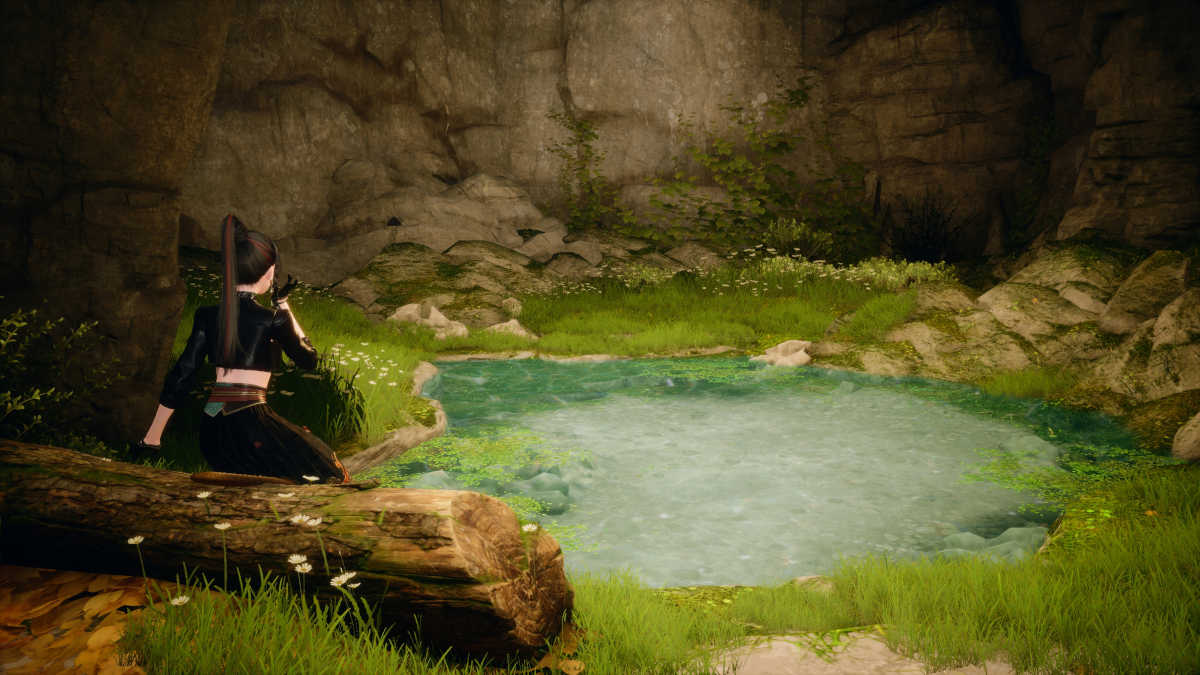
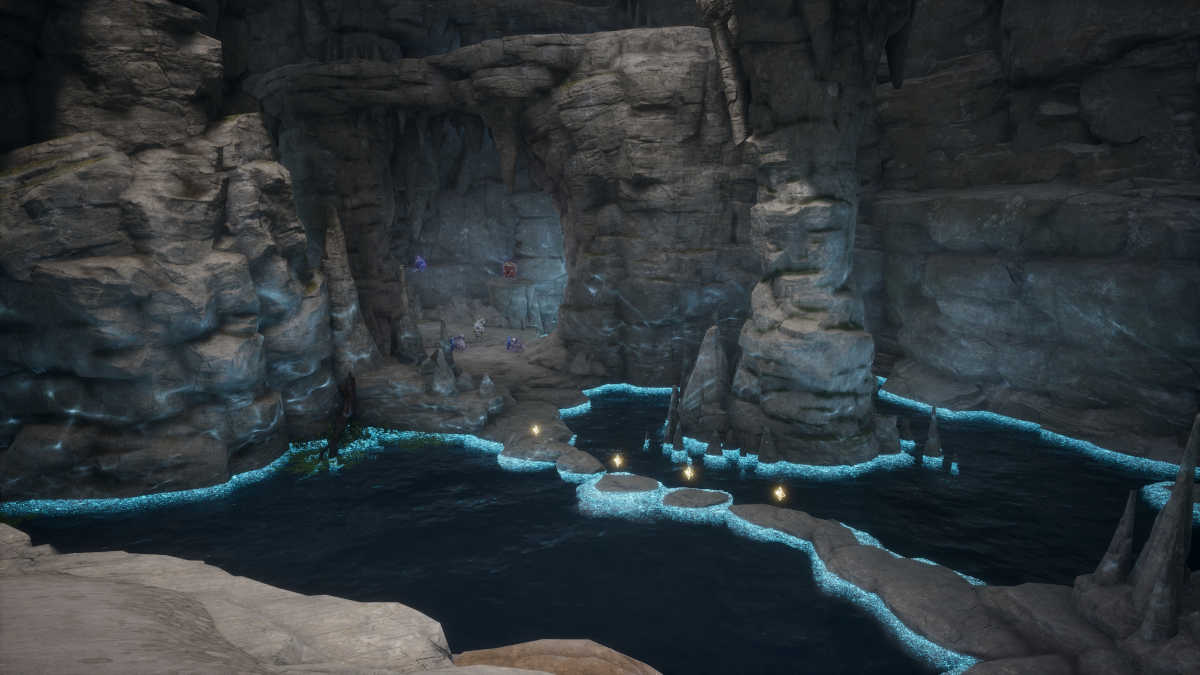
12. Quiet Cenote
Although it’s technically within the Memorial Mountains, this one is included in Florawish. You’ll want to move down into the Riverside Cavern to seek out this location, then comply with the trail inside.
13. Nonoy’s Dressing Mirror

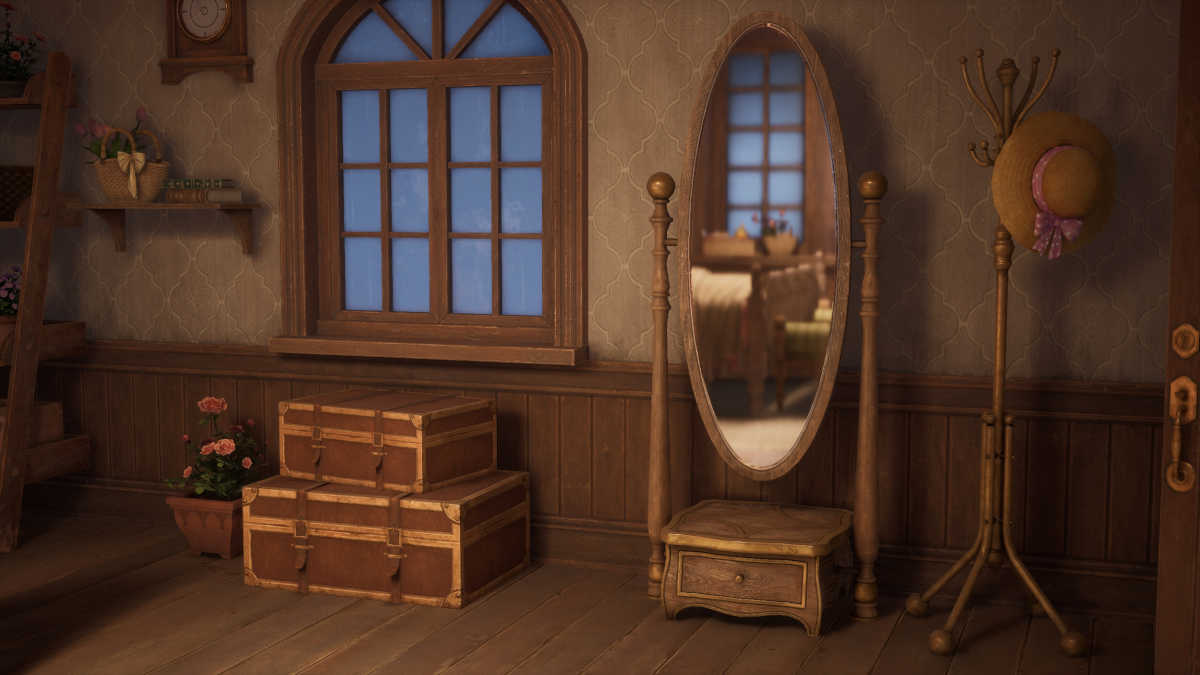
Head upstairs in Nonoy’s Home to seek out her Dressing Mirror, after which head into the opposite room to additionally take the photograph wanted to finish #17 within the Expedition Handbook.
14. Sanctum of the Observant
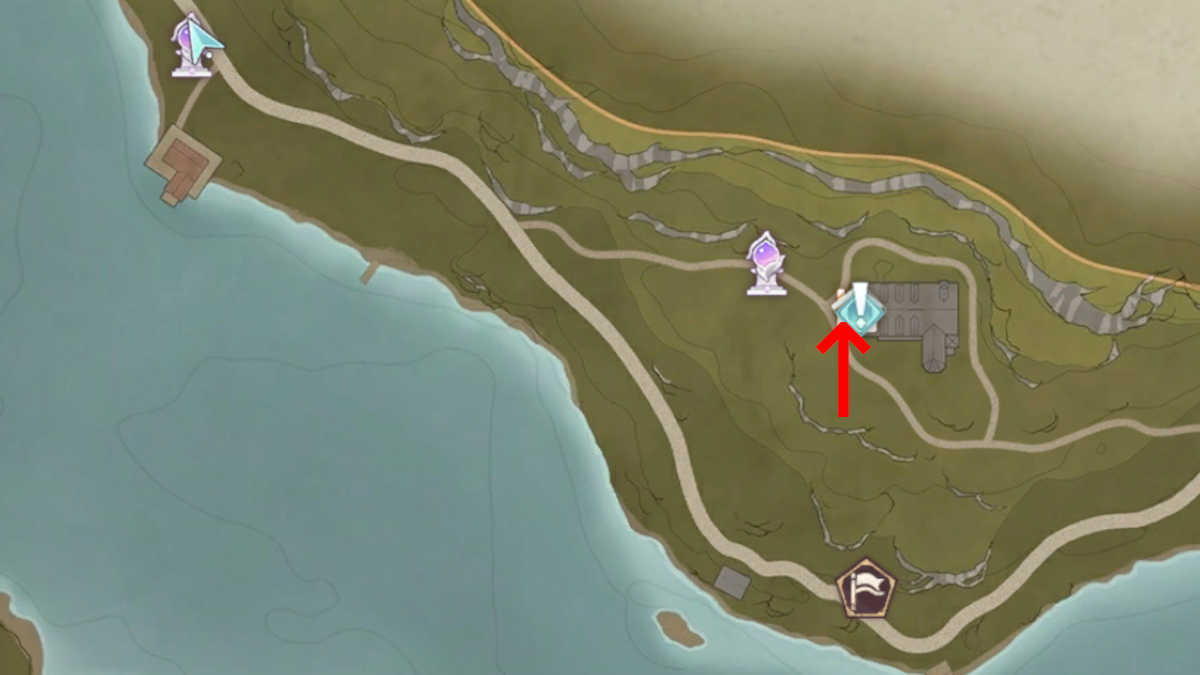
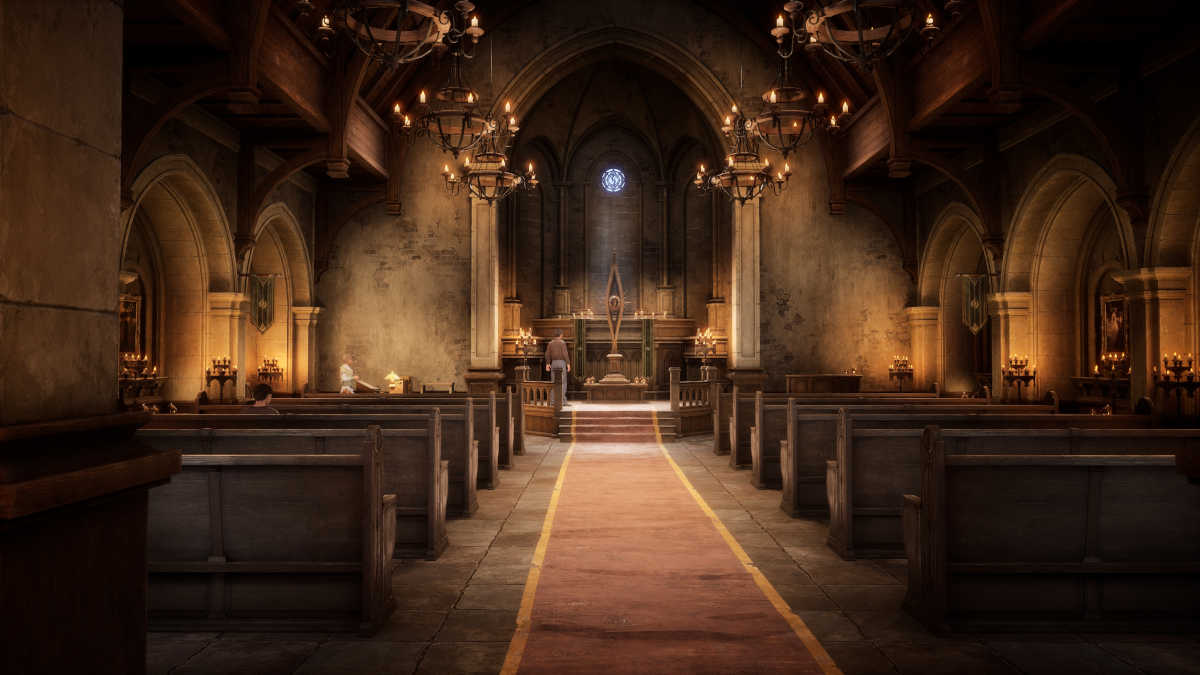
The Sanctum of the Observant is situated east of Florawish, alongside the trail on the northern shore of the lake. While you get there, head inside and take a photograph of the altar to tick this one off.
15. Ray and Wing’s Dessert Bar
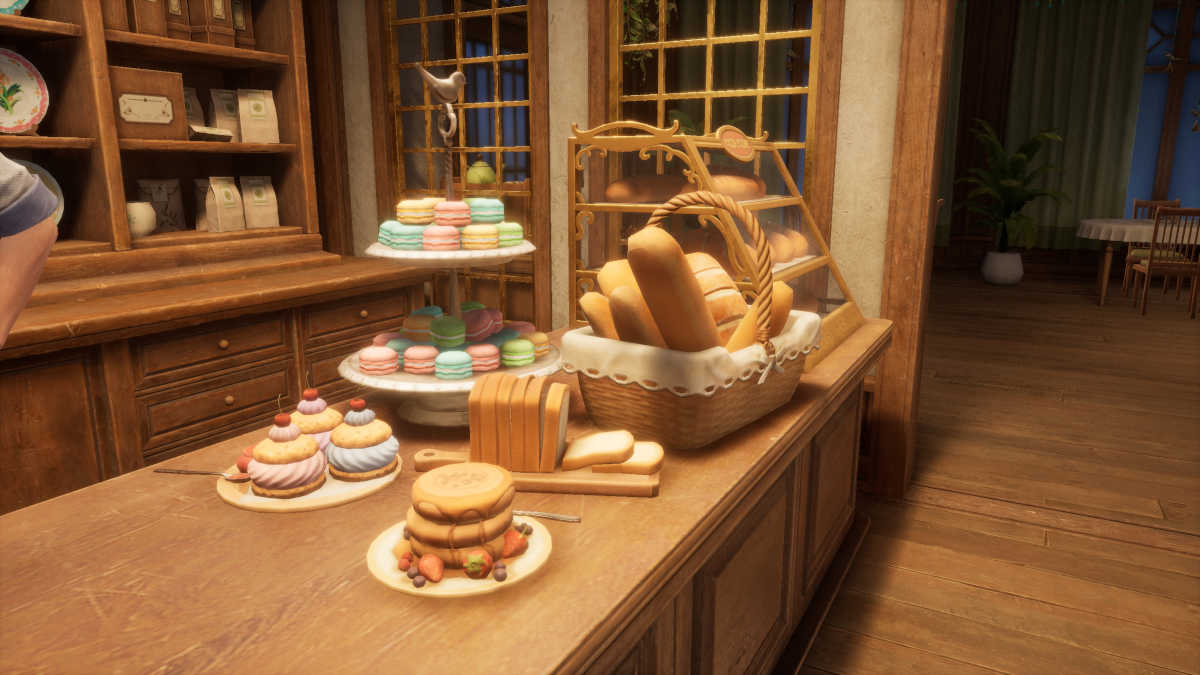
Hopefully you’ve gone inside Ray and Wing’s when you’ve taken image #5. The goal on this picture is the bread and pastries laid out on the counter midway into the room.
16. Bibcoon’s Chuckle Membership Stage


The Bibcoon Chuckle Membership is situated to the southeast of the Wishing Tree and has an enormous Bibcoon on the surface, so it’s arduous to overlook. Go inside and head downstairs, then take a photograph of the stage. So long as the microphone is seen, the photograph ought to depend.
17. Nonoy’s Bed room

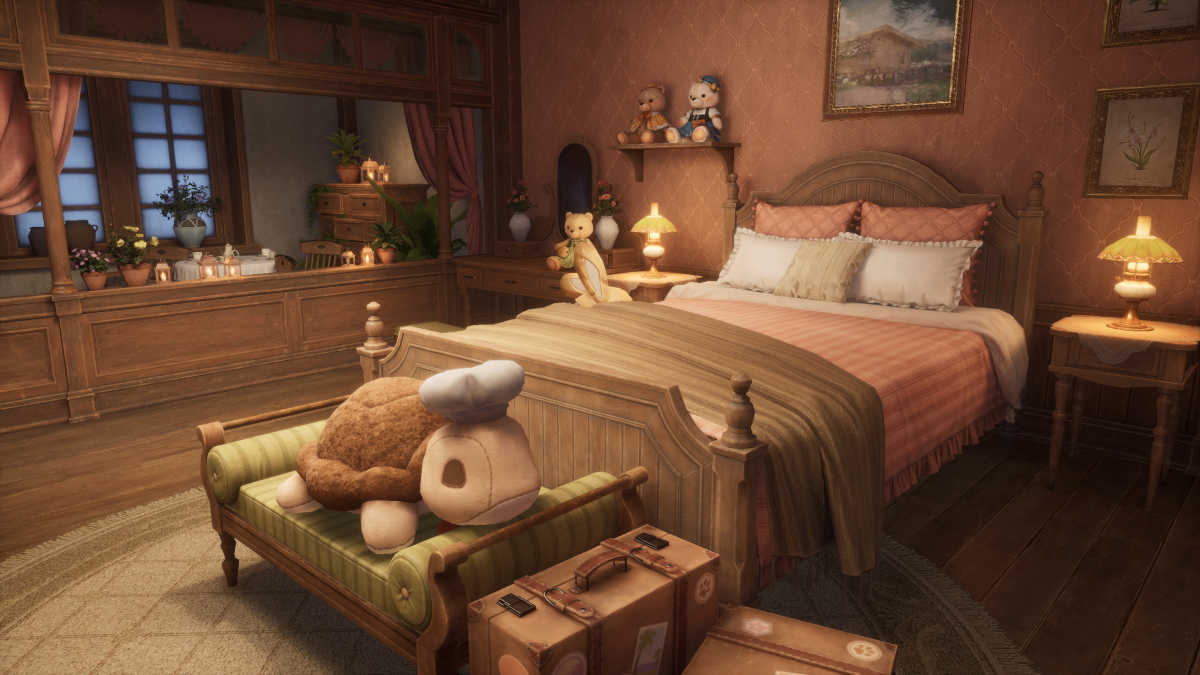
I’m undecided why we’re taking images of Nonoy’s bed room, however some questions are higher left unanswered.
Breezy Meadow Expedition images
Breezy Meadow provides 9 new images to the Expedition Handbook, and so they’re all fairly unfold aside, so get able to do quite a lot of operating, biking, or teleporting.
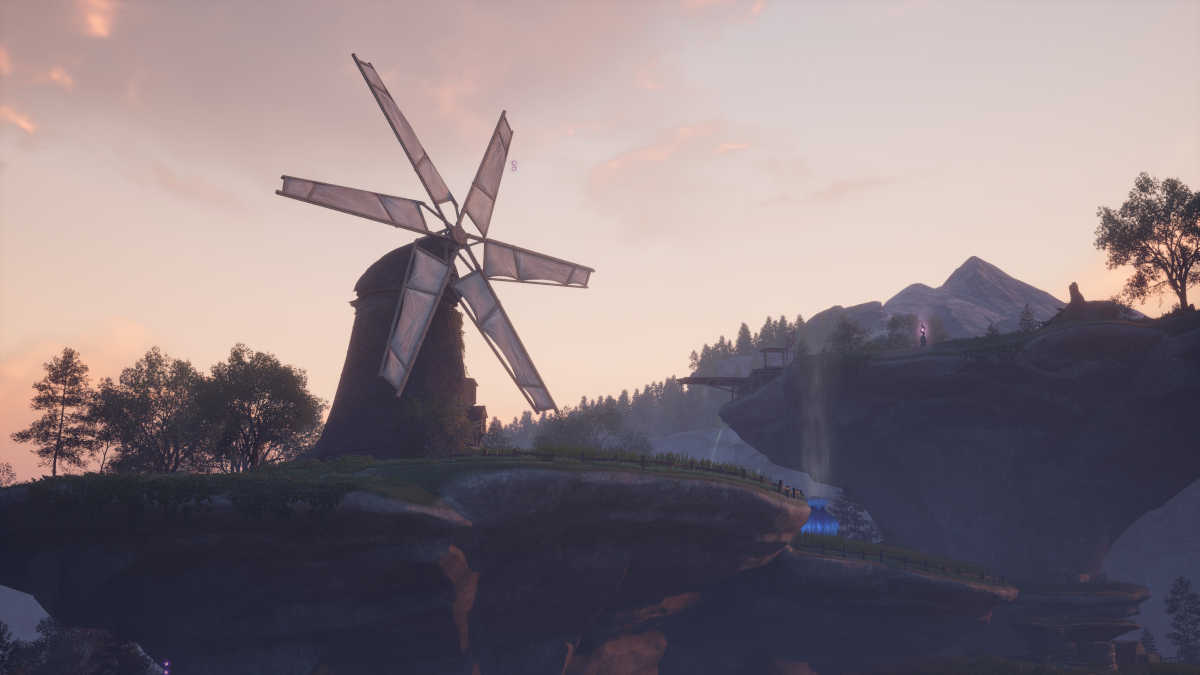
18. Bug Catcher’s Cabin

Attempting to get in the appropriate spot for this one is usually a little difficult, however hopping round a bit and operating in circles appeared to repair it lengthy sufficient for me to take this photograph. So long as the windmill is absolutely in shot, this one will depend.
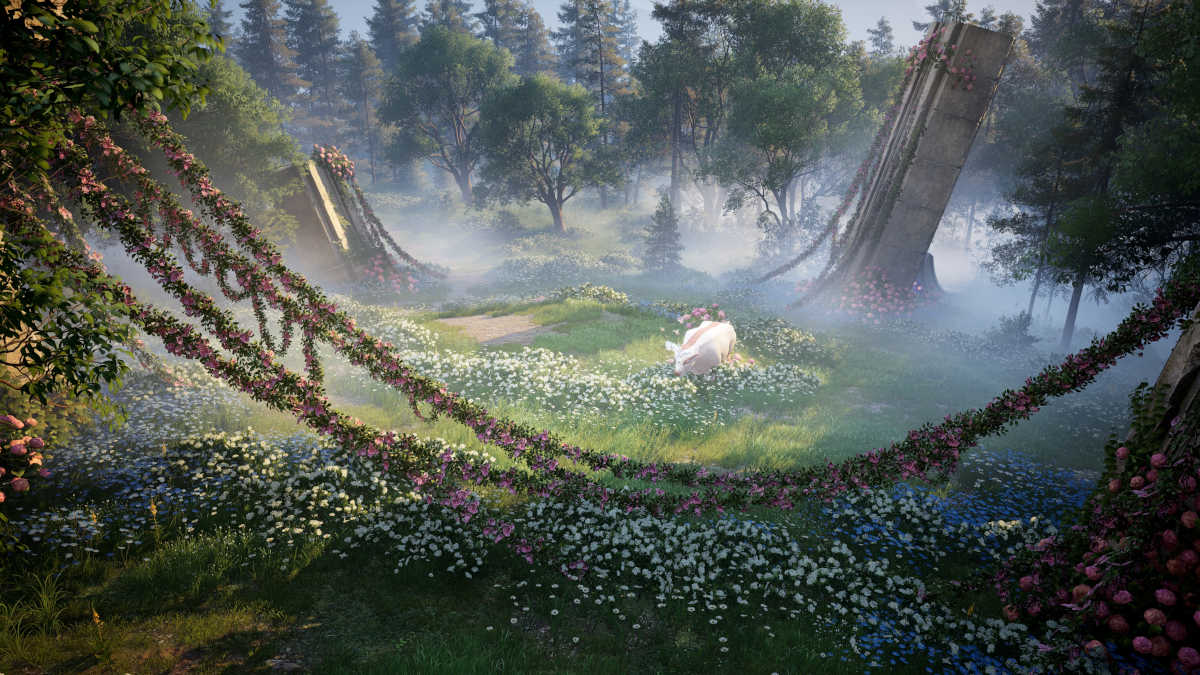
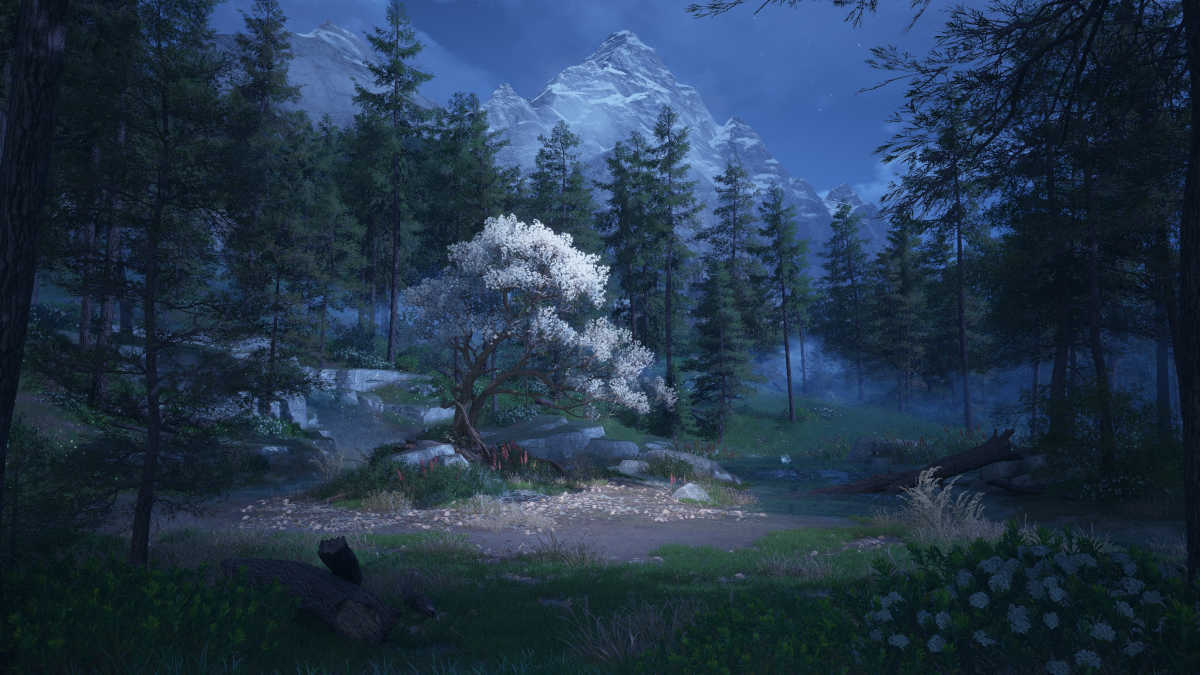
19. Blossom Forest

Regardless of how fairly this space is, the main target of this photograph appears to be the ground of the trail. I managed to mess around with zoom and focal size to seize extra of the encircling space, although, so it may be finished.
20. Swan Gazebo

For those who accomplished day two of the Wishfield Journal Occasion, Moments of Journey, then you definitely’ll know precisely the place to seek out this stunning gazebo. It’s situated east of Bug Catcher’s Cabin, on the circle platform.
21. Bullquet Habitat
This location is beautiful, and may be discovered to the south of the primary path in the direction of the Deserted Want Fanatics Camp that it is best to have visited throughout day one of many Wishfield Journal occasion.
22. Queen’s Palace Ruins


The Queen’s Palace Ruins are situated within the far southeast the map, east of the Bullquet Habitat. These ruins are expansive and overrun with Esselings, so that you’ll have a battle earlier than you get to the highest to get this shot.
23. Queen’s Palace Ruins Tower
Southeast of the place you simply bought the earlier shot, there will probably be a path as much as the tower. You’ll want to make use of lace trampolines and talents to get to the highest, however when you get there you’ll be handled to at least one hell of a view.
24. Artwork Academy Discipline Base
You’ll discover this stage out the again of the Artwork Academy Discipline Base to the west, and it’s the main target of this picture.
25. Deserted Fanatic Wisher Camp
Inside the identical cavern that you’ll have hunted for as a part of day one of many Wishfield Journal occasion. Comply with the trail inside till you come throughout the most important cavern inside.
26. Shimmer Pond
Positioned simply southwest of the Fishing Affiliation in southern Breezy Meadow, Shimmer Pond seems stunning at night time, so I’d suggest in search of it out after darkish.
Stoneville Expetition images
Stoneville solely has 5 places to hunt out if you wish to fill out the Expedition Handbook, however a few them are fairly awkward.
27. Lakeheart Stonetree

To get the shot of this Stonetree, you’ll have to make your method up the cliff on the southern facet of the lake and angle your digicam very fastidiously. It’s somewhat finnicky, however you’ll get it.
28. Flower Discipline Viewpoint
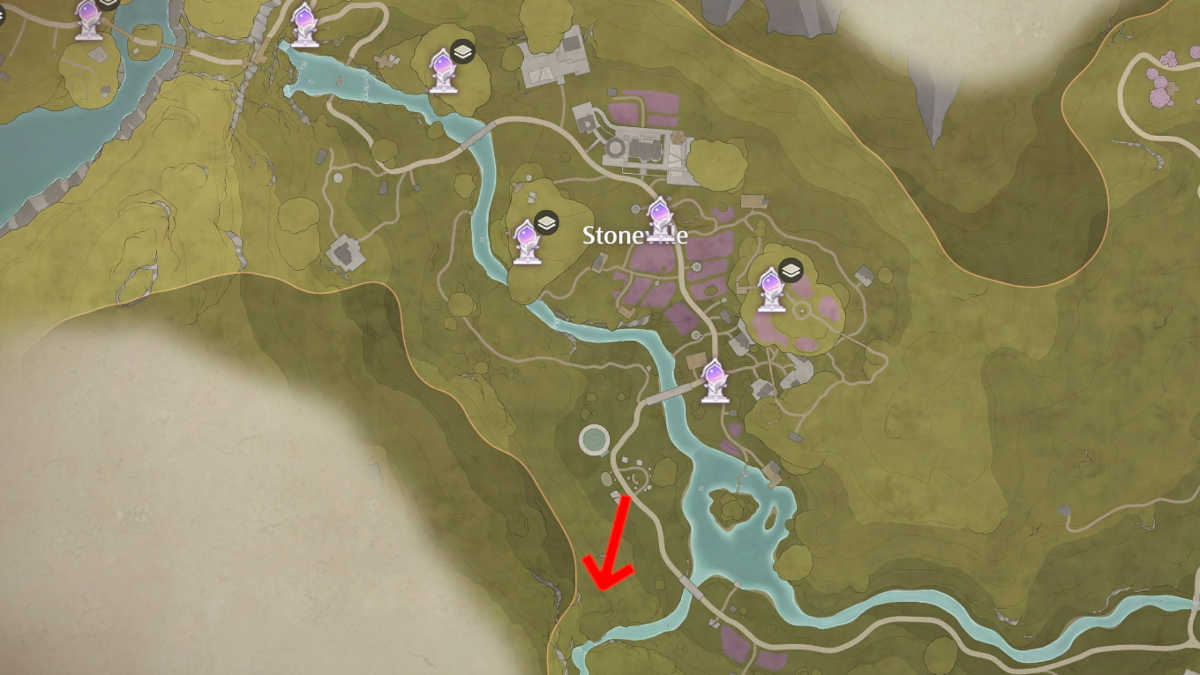
Once more, this one requires you to climb up the cliffs and shoot the photograph from above. This one is extremely tough to place correctly for, however you’ll know whenever you’re within the spot when the hunt on the left facet of your display adjustments.
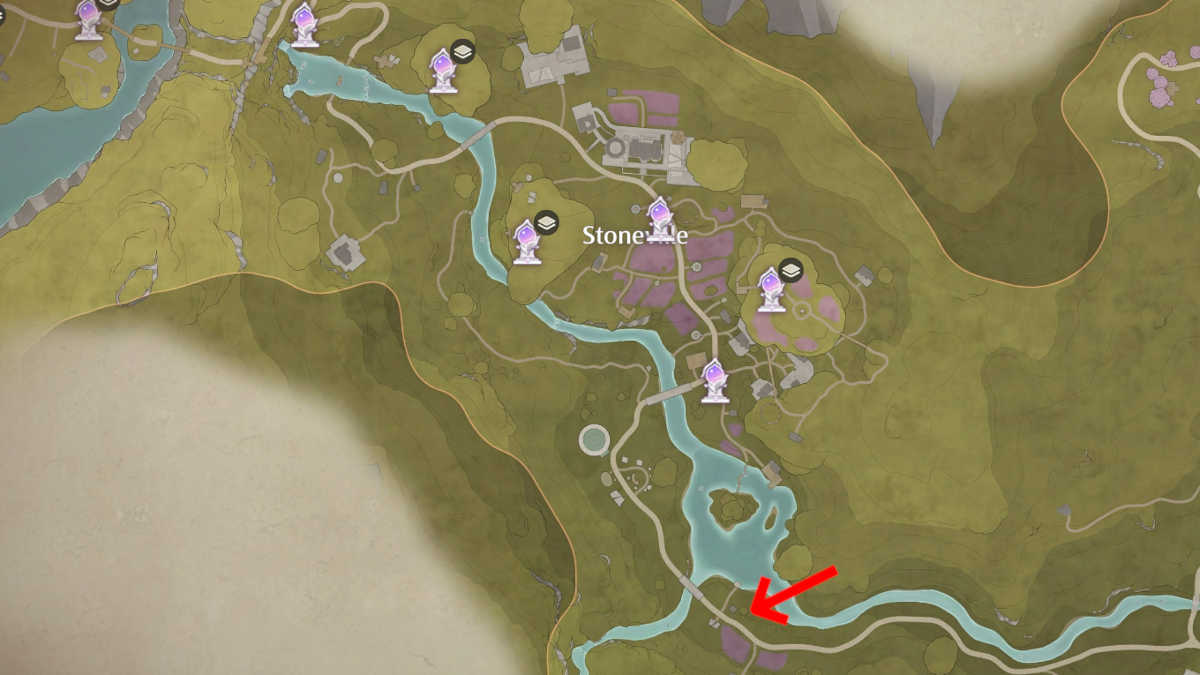
29. Village Home Entrance
In all probability the simplest of all of the images it’s essential absorb Stoneville, this one may be shot from the primary bridge into city going through eastwards.
30. Lavenfringe Discipline

For those who hop down from the bridge to the north after taking the earlier photograph, you’ll instantly be capable to take the following photograph of the Lavenfringe Fields.
31. Village Nook
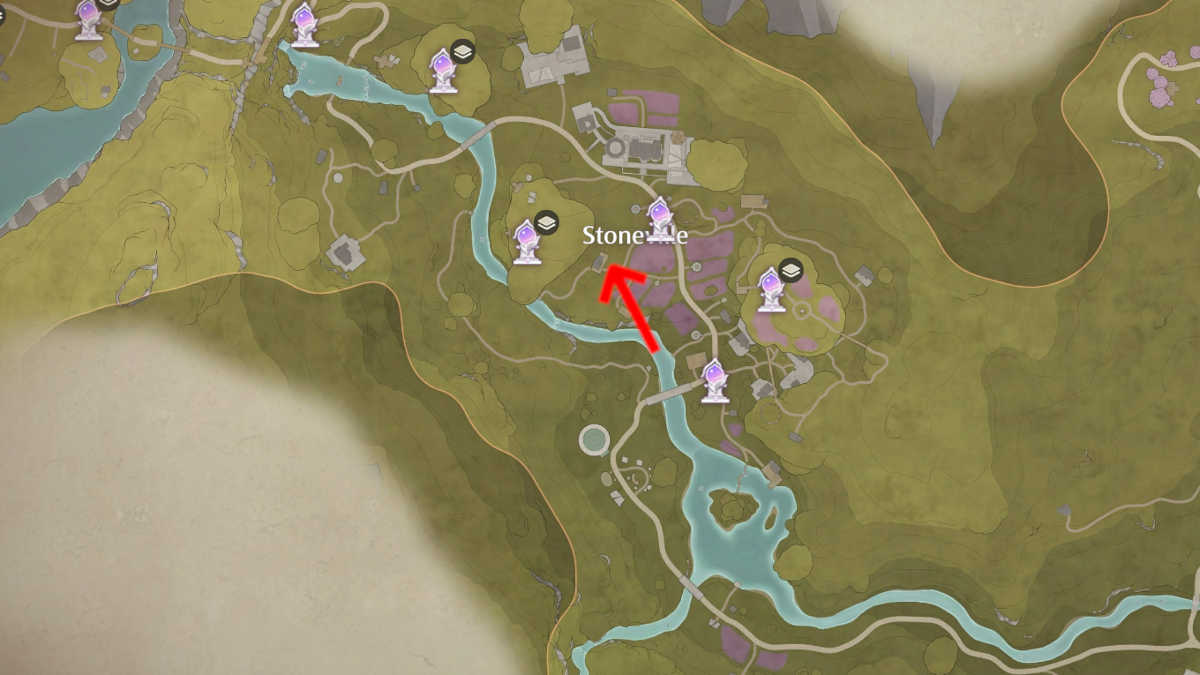
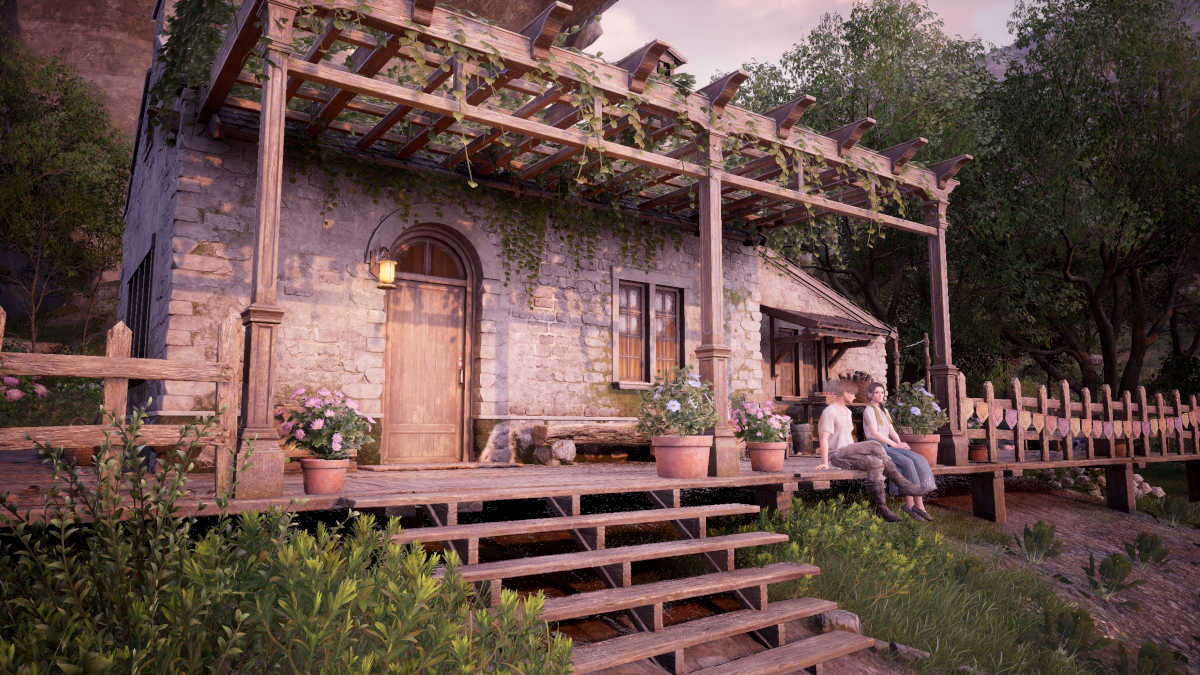
Simply to the west of the Lavenfringe Fields Warp Spire, you’ll discover a small home. Take a photograph of the entrance porch to get this stamp in your Expedition Handbook.
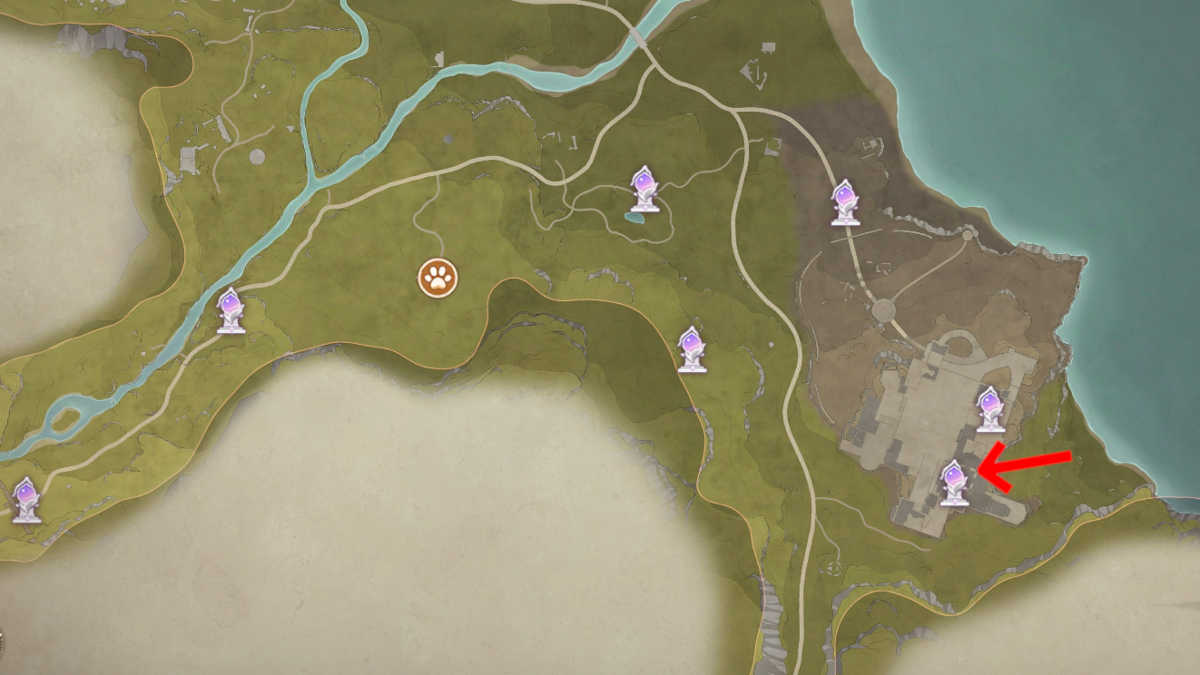
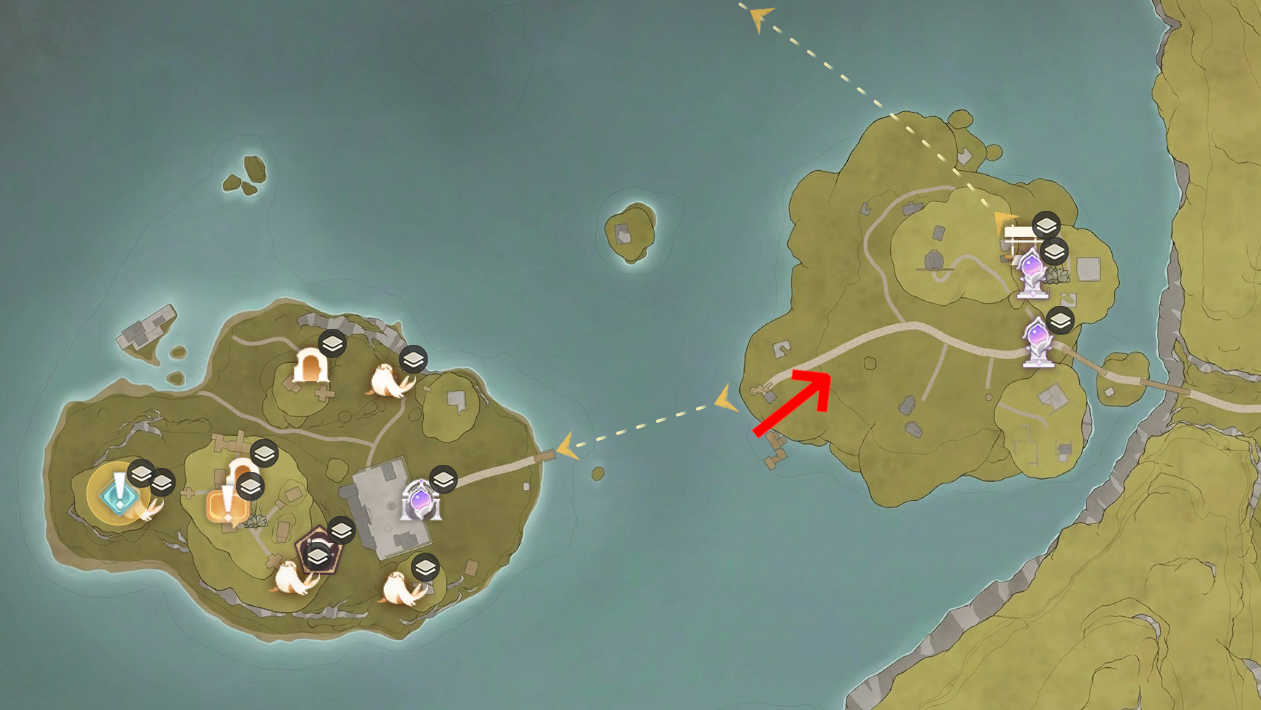
Deserted District Expedition images
There are solely 4 images to soak up the Deserted District, however you’ll want to attend till at the very least Chapter 5 earlier than you unlock he space and have entry to take the images you want.
32. Golden Fields
You’ll be capable to get this photograph as quickly as you step foot within the Deserted District in Chapter 5, because it’s on the primary island that you simply go to. Merely purpose in the direction of the windmill on the platform and also you’ll tick off this photograph.
33. Good-looking Lads Circus

You’ll attain the Good-looking Lads Circus Warp Spire naturally as you progress via Chapter 5, so that you’ll be capable to get this shot of them frolicking on the prime with out a lot added effort.
34. Market of Mirth

The Market of Mirth is situated on a platform decrease than the Good-looking Lads Circus, and it is best to have handed via and unlocked the Warp Spire in your method up the Stonetree. The goal of this photograph is the Pieceys on the stage.
35. Choo-Choo Station

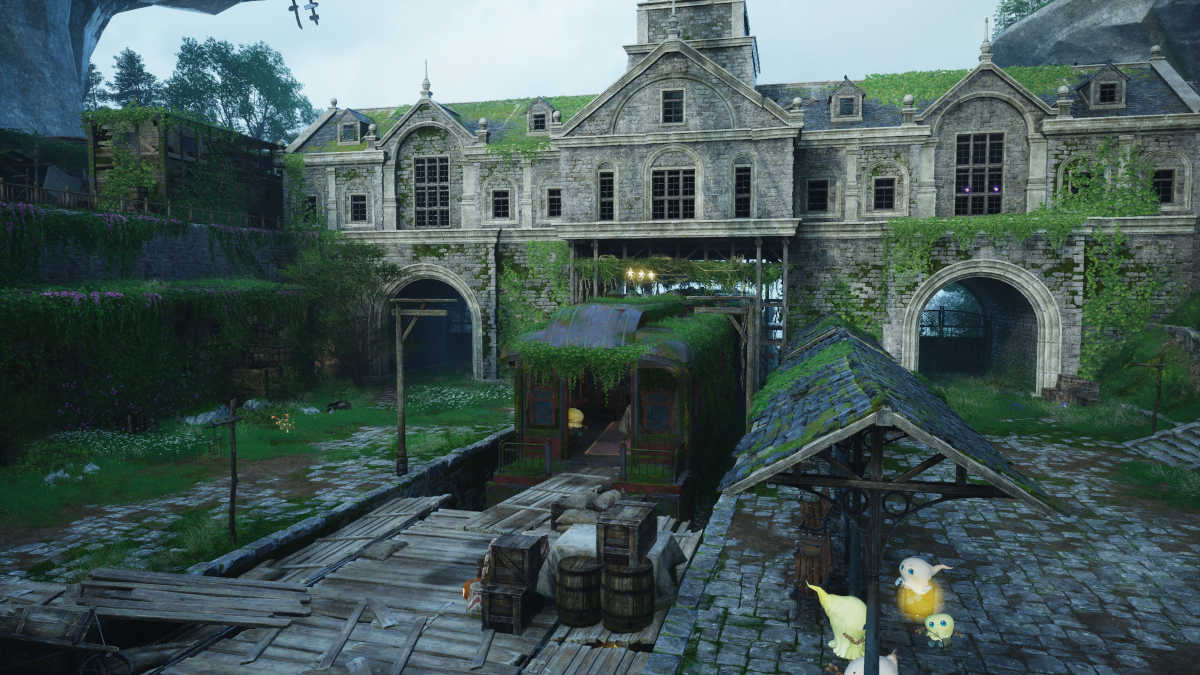
The Choo Choo Station is explored through the technique of Chapter 5, so that you’ll unlock this space naturally. Getting a superb shot of the Station is tough, however if you happen to transfer the digicam up, you may get a reasonably clear view.
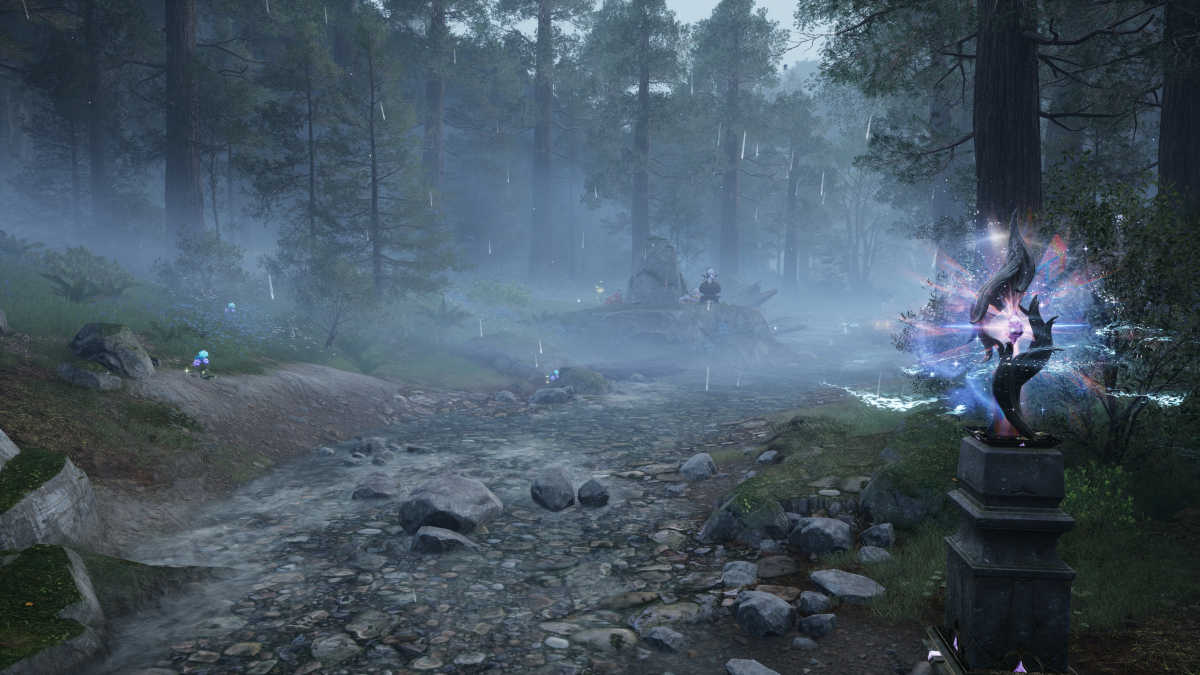
Wishing Woods Expedition images
The ultimate 5 Expedition Handbook images may be snapped within the Wishing Woods, which will probably be unlocked as you progress via Chapter 6.
36. Valley Entrance
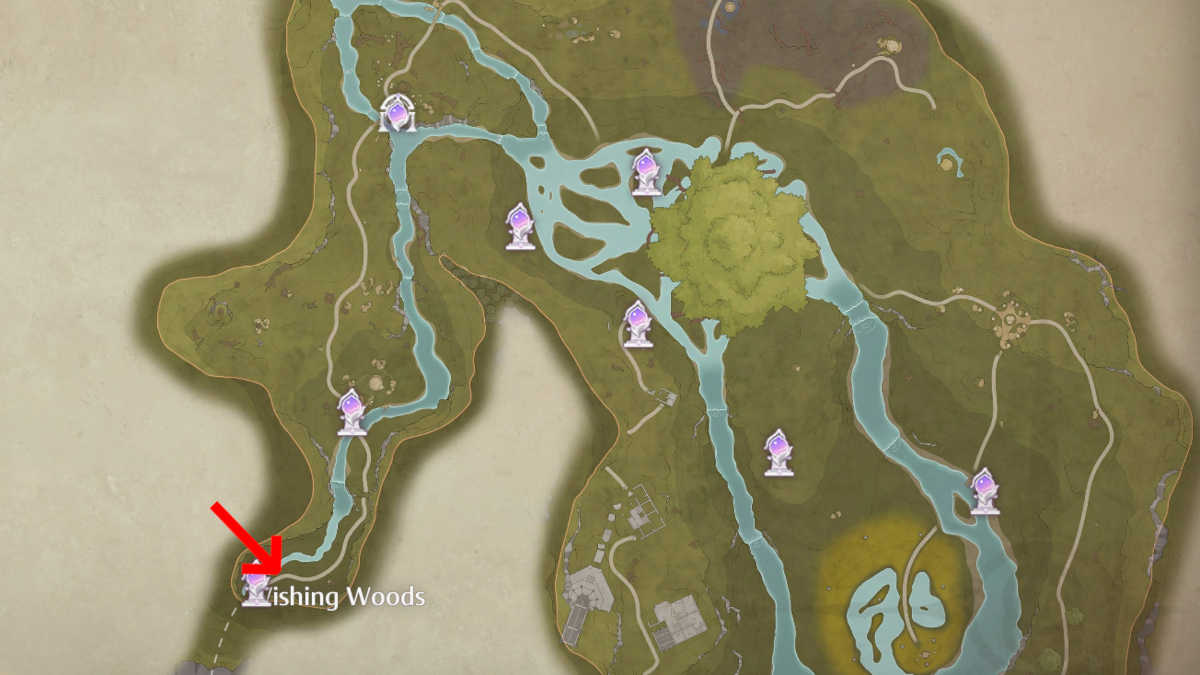
This photograph may be taken as quickly as you step foot within the Wishing Woods for the primary time, and can depend so long as you’re going through north up the trail.
37. Wishcraft Lab Entrance
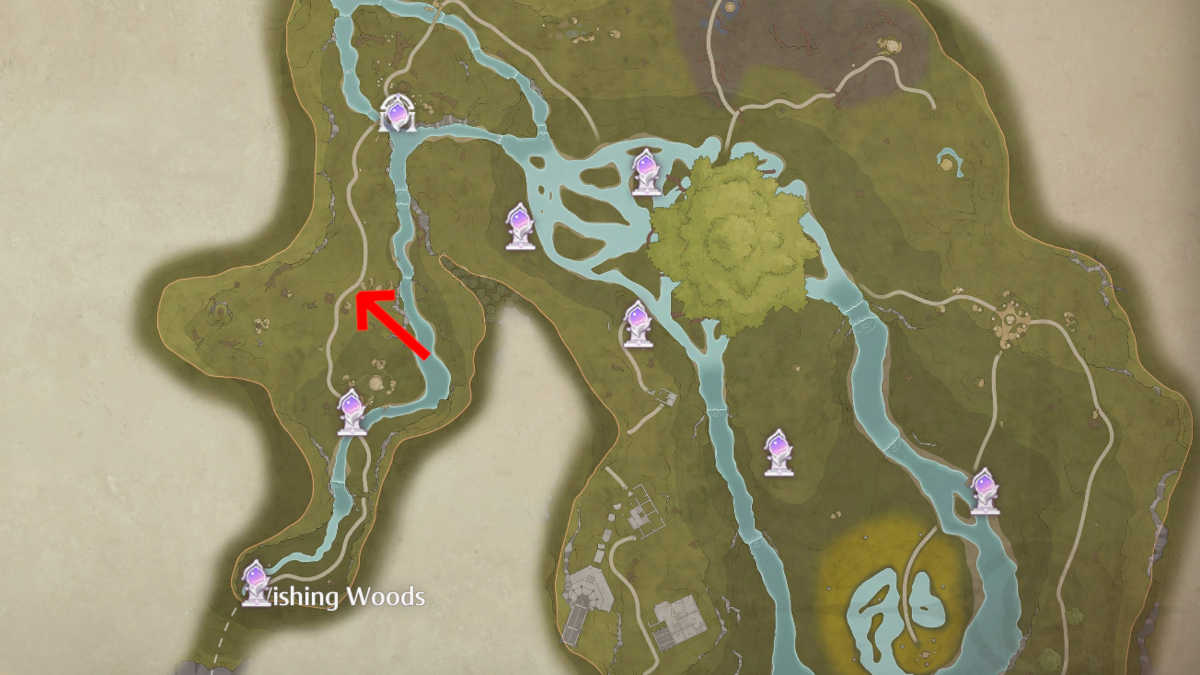
The Wishcraft Lab is one other location that you simply’ll go to throughout Chapter 6, so simply hold progressing the primary story and also you’ll get this photograph with out getting too distracted.
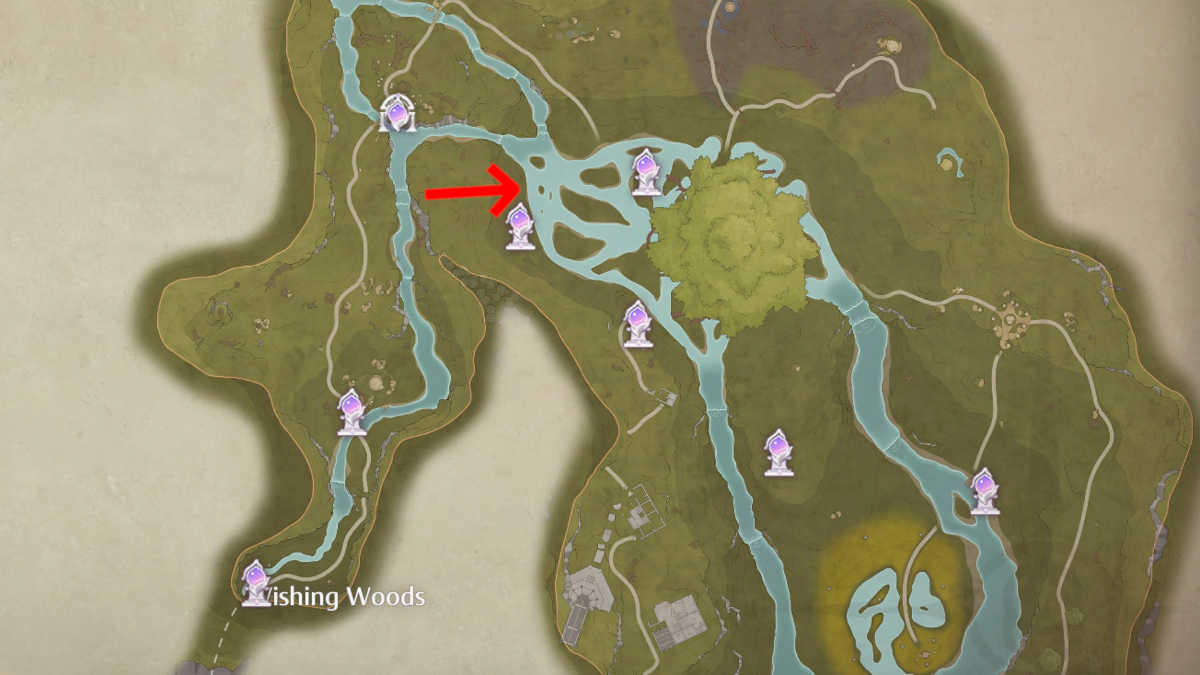
38. Tranquil Shoal
Don’t let the map confuse you. You’ll want to be standing beneath the tree as a way to get this photograph, near the sting of the water however not fairly in it.
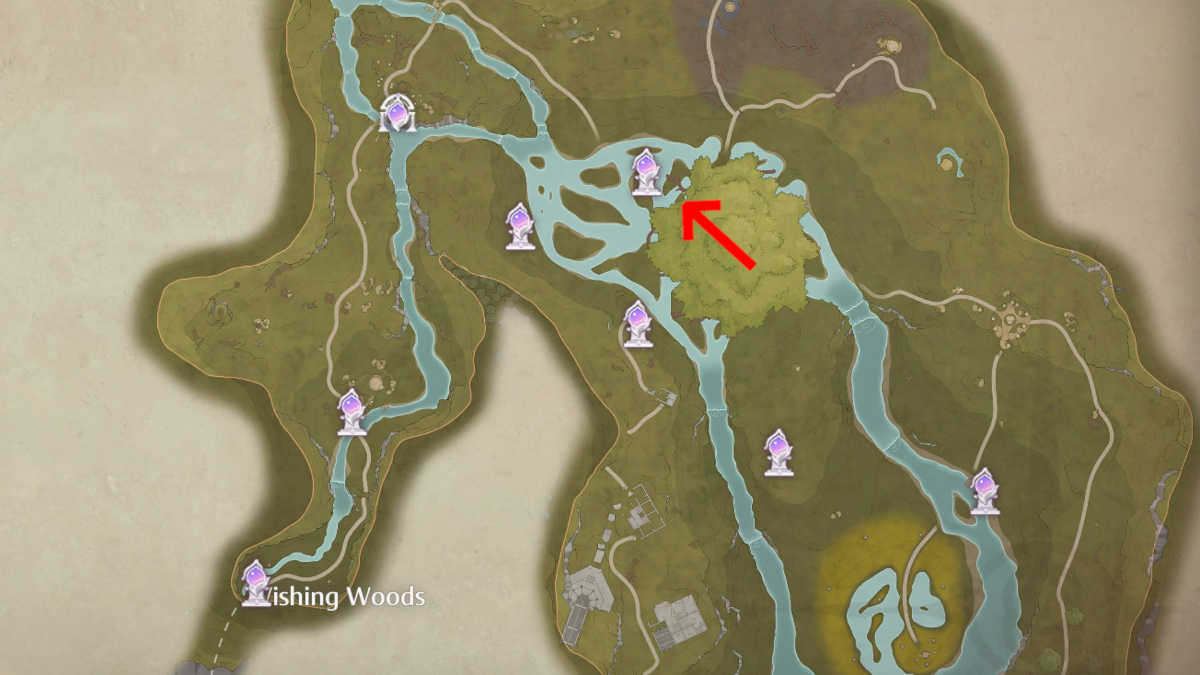
39. Grand Millewish Tree
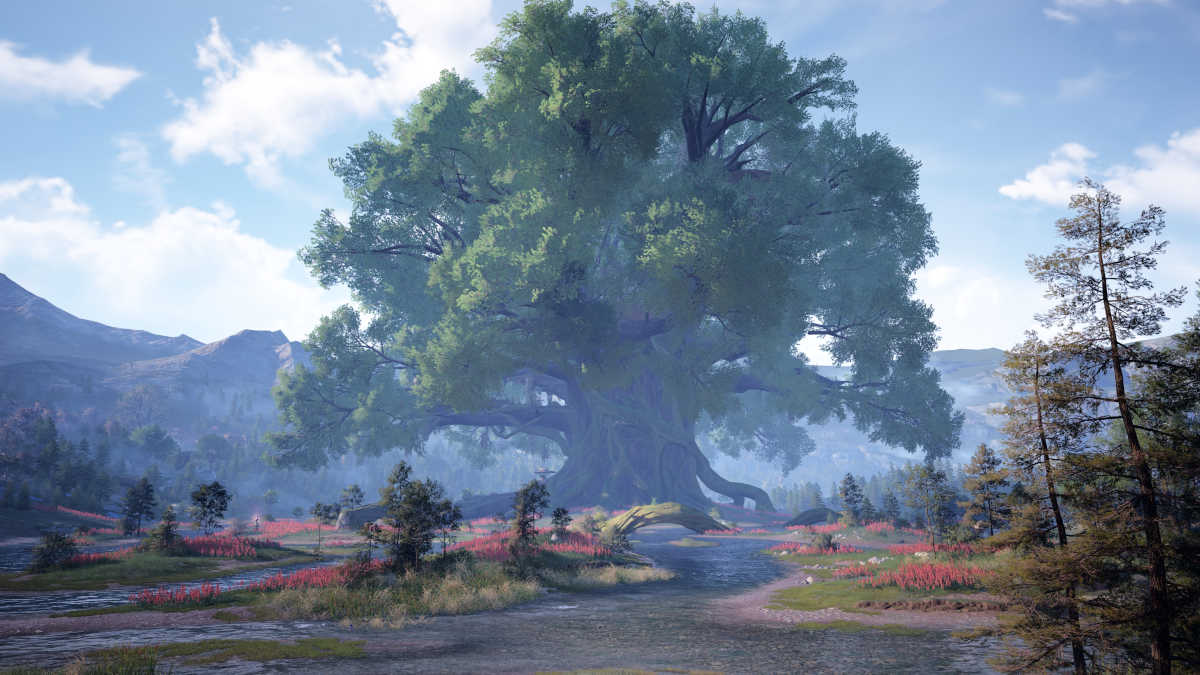
When you’ve bought your shot from beneath the cover of the tree, head west and stand simply north of the Shoal Slope Warp Spire to get a shot of the tree itself.
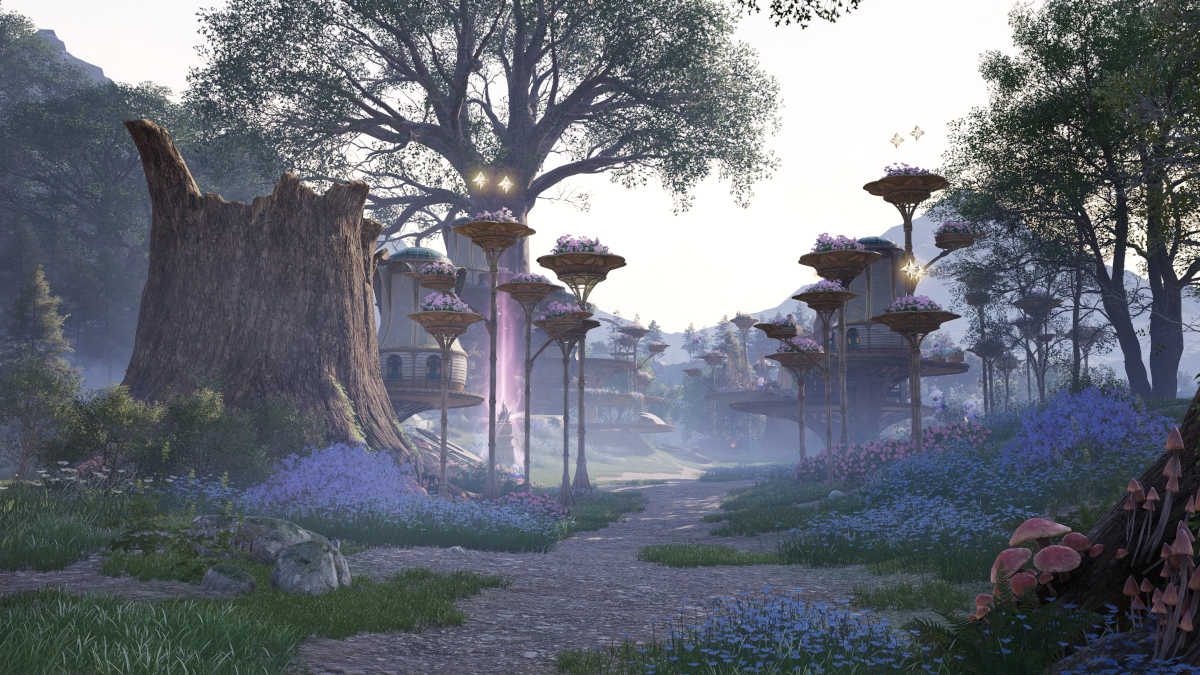
40. Timis’s Magnificence Lab

Timis’s Lab seems like one thing straight out of Lord of the Rings, and also you’ll go to as a part of Chapter 6’s fundamental story.
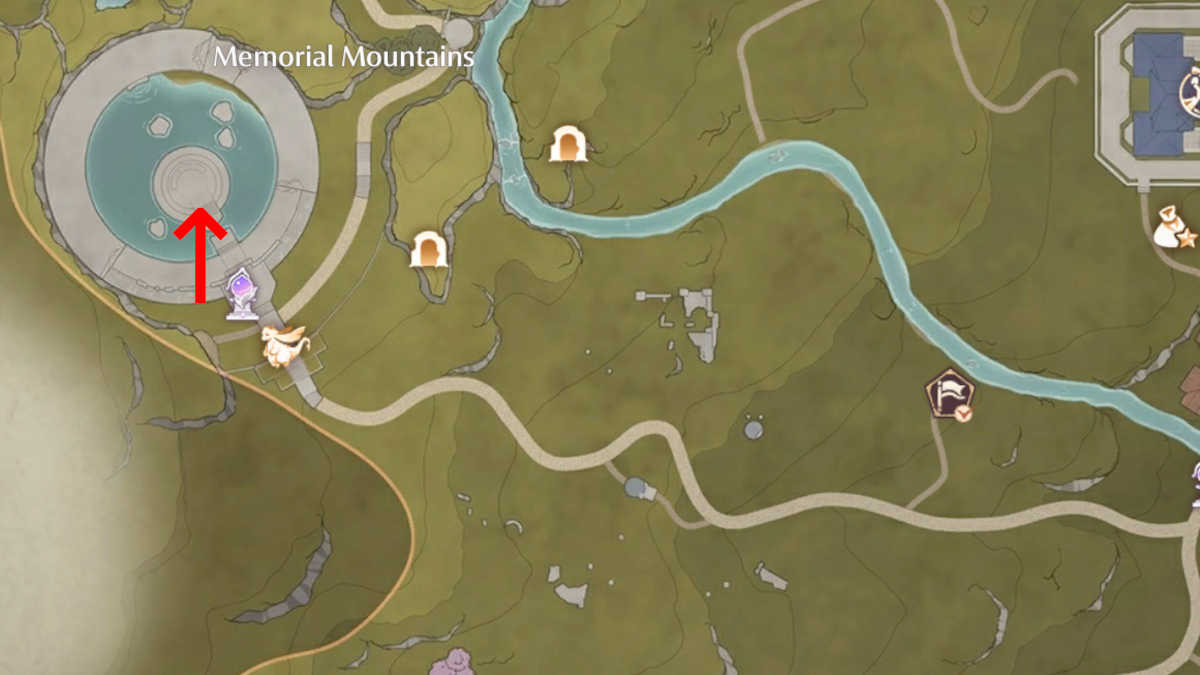
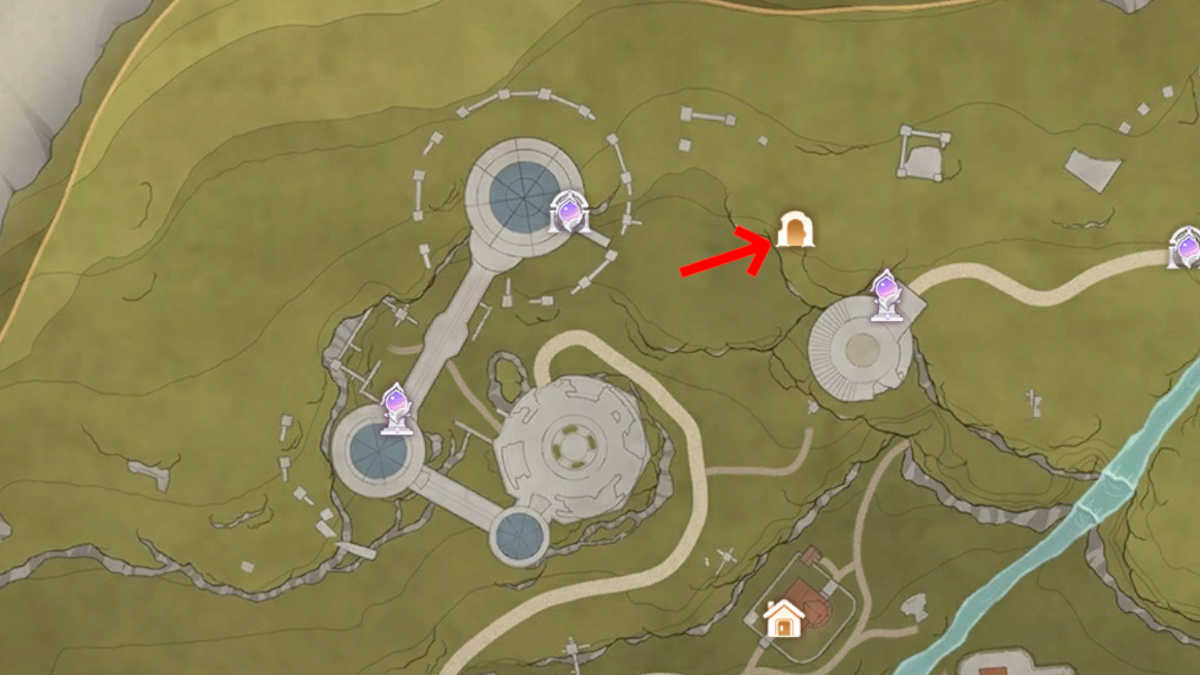
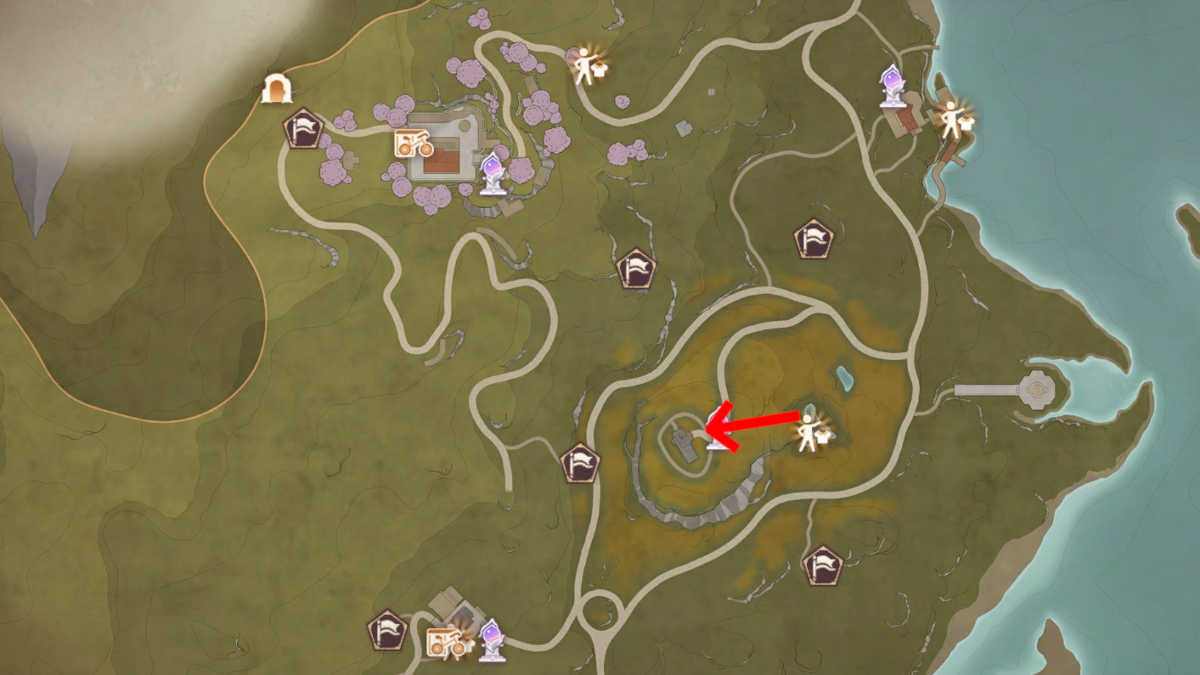
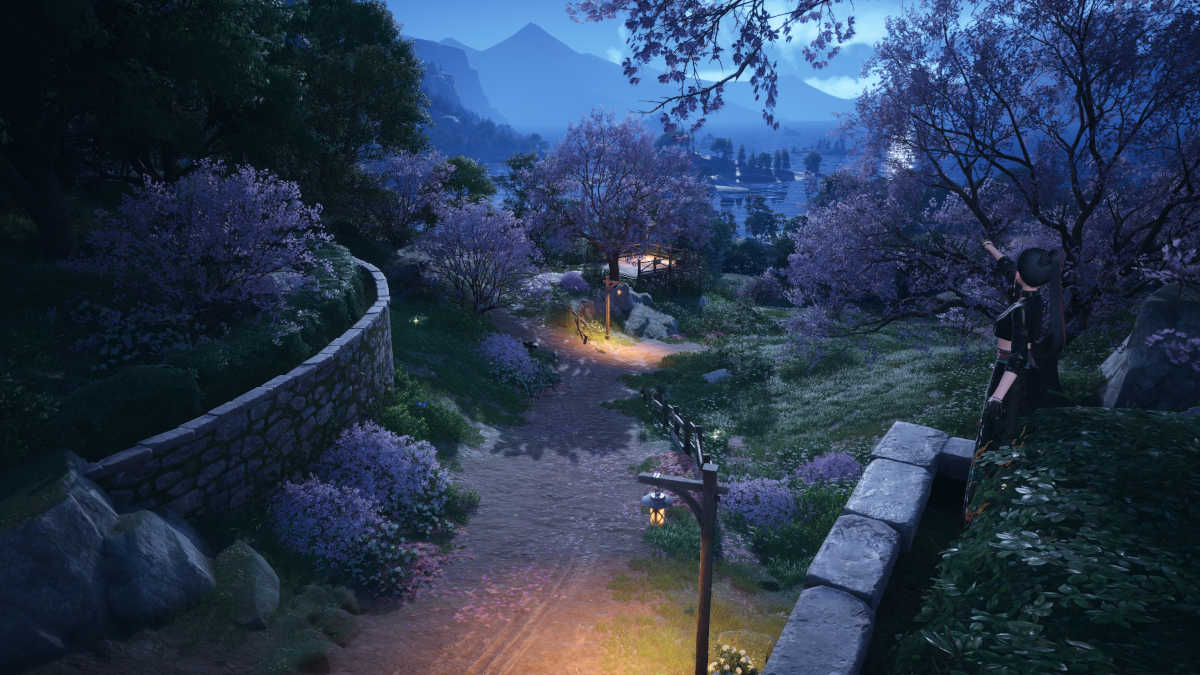
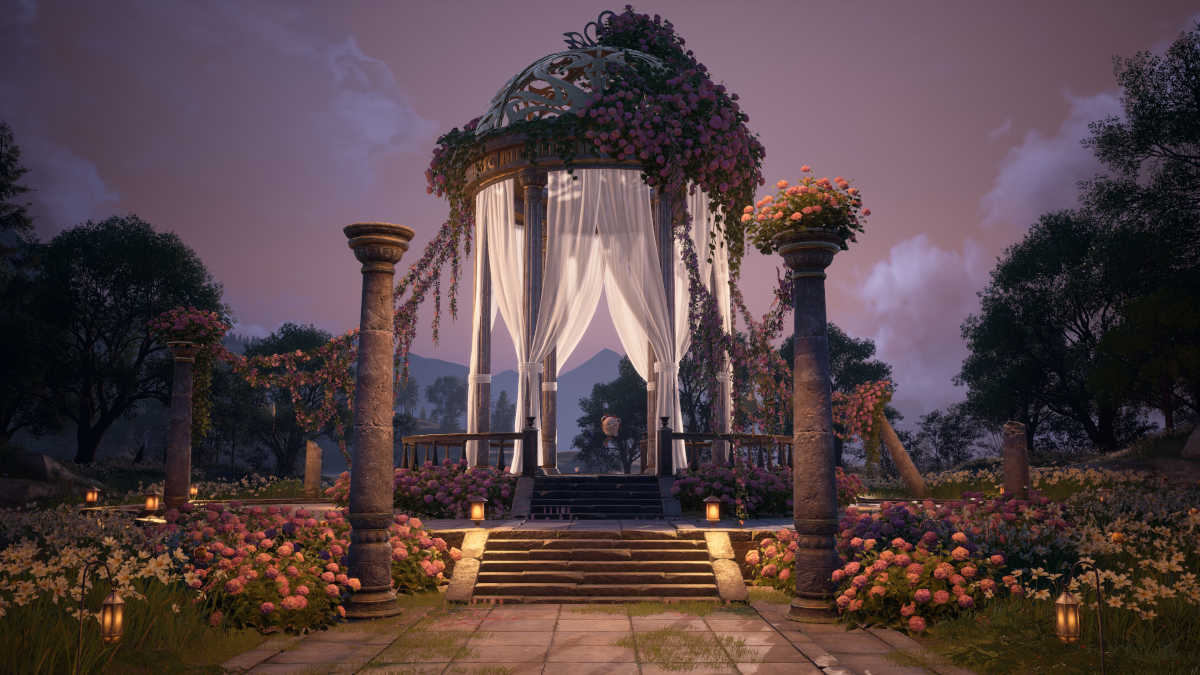
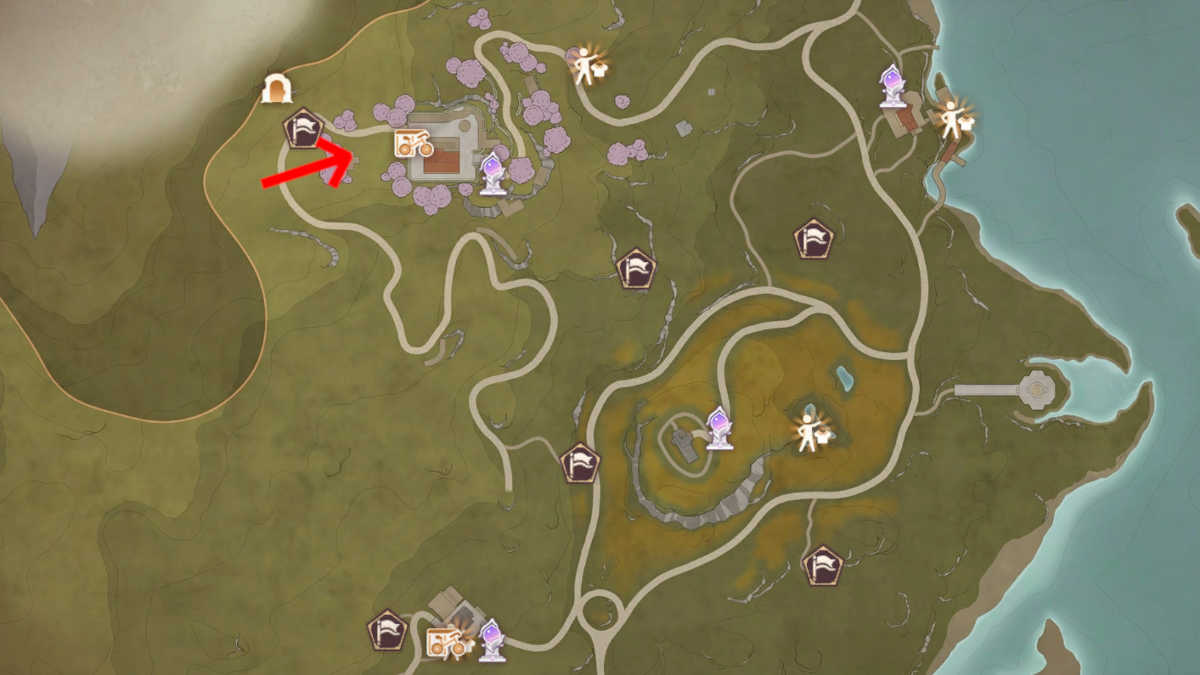
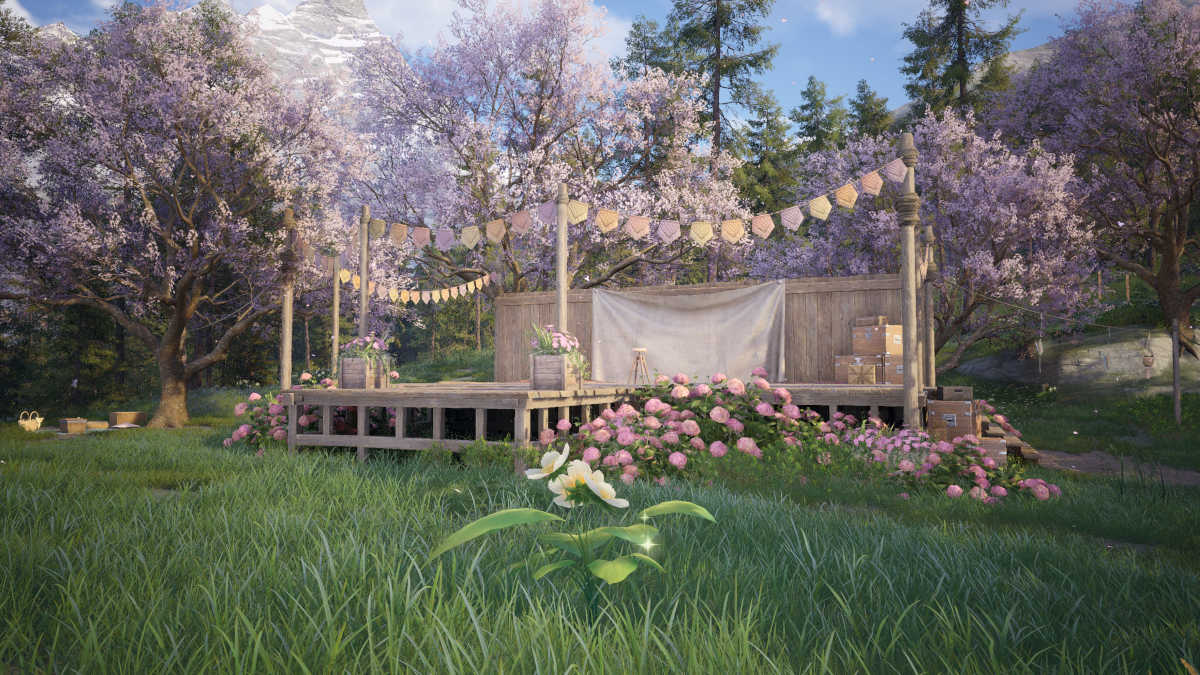
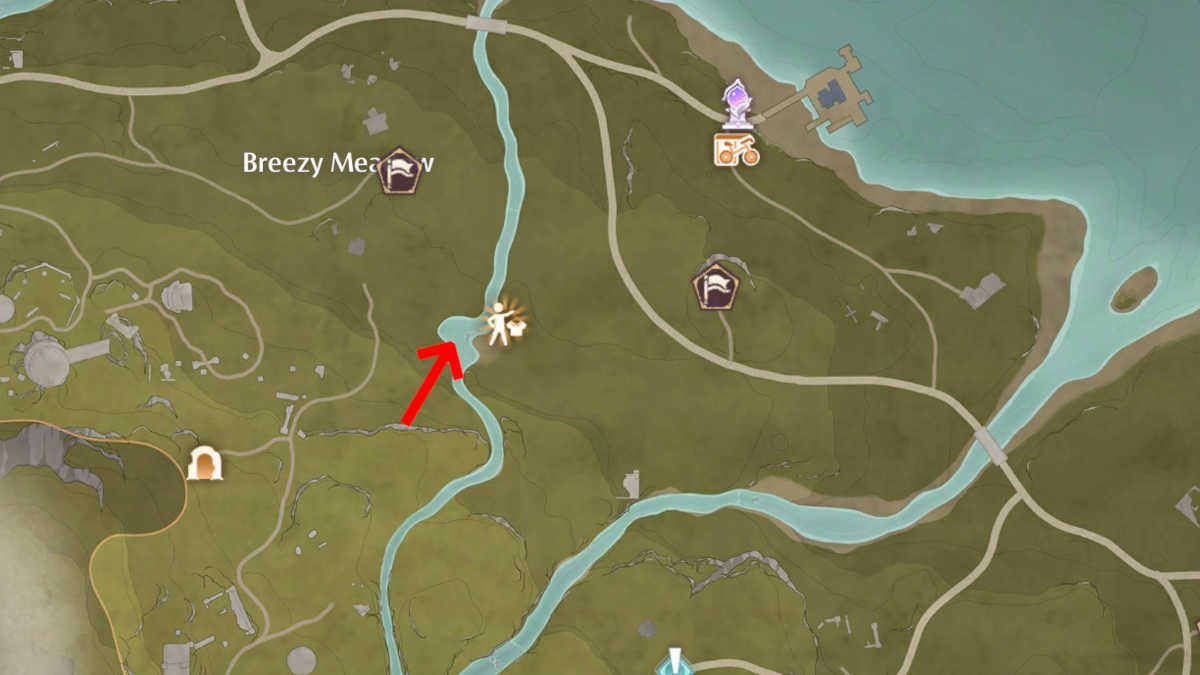
Expedition Handbook Secret Location
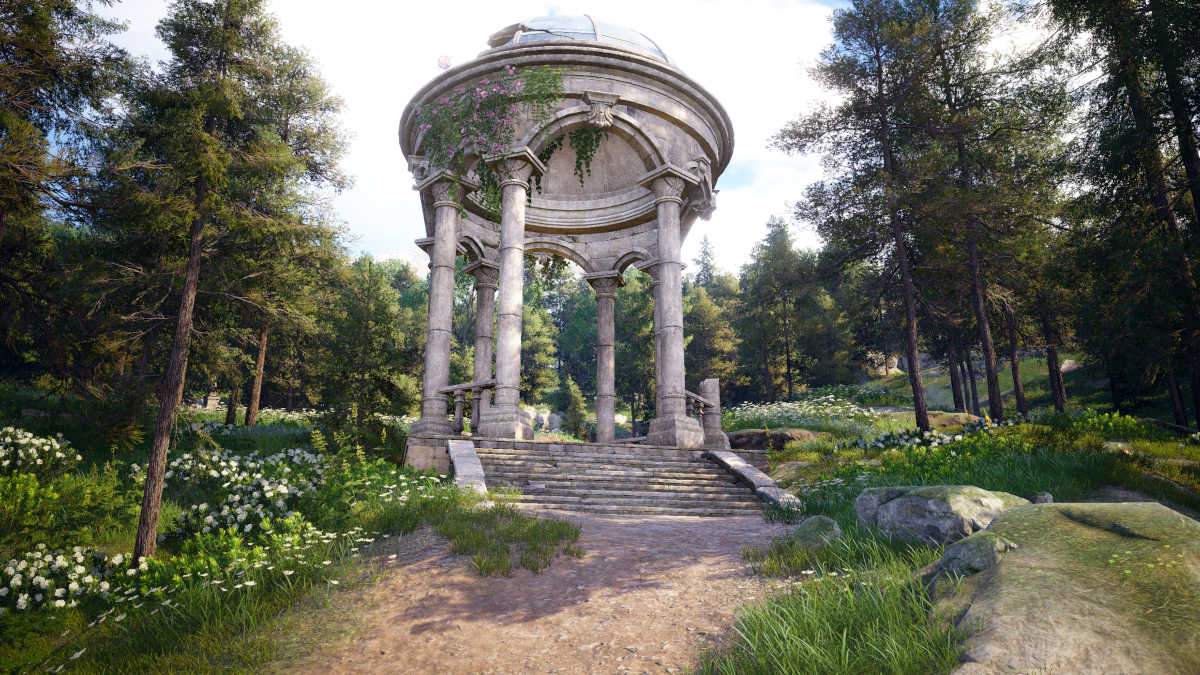
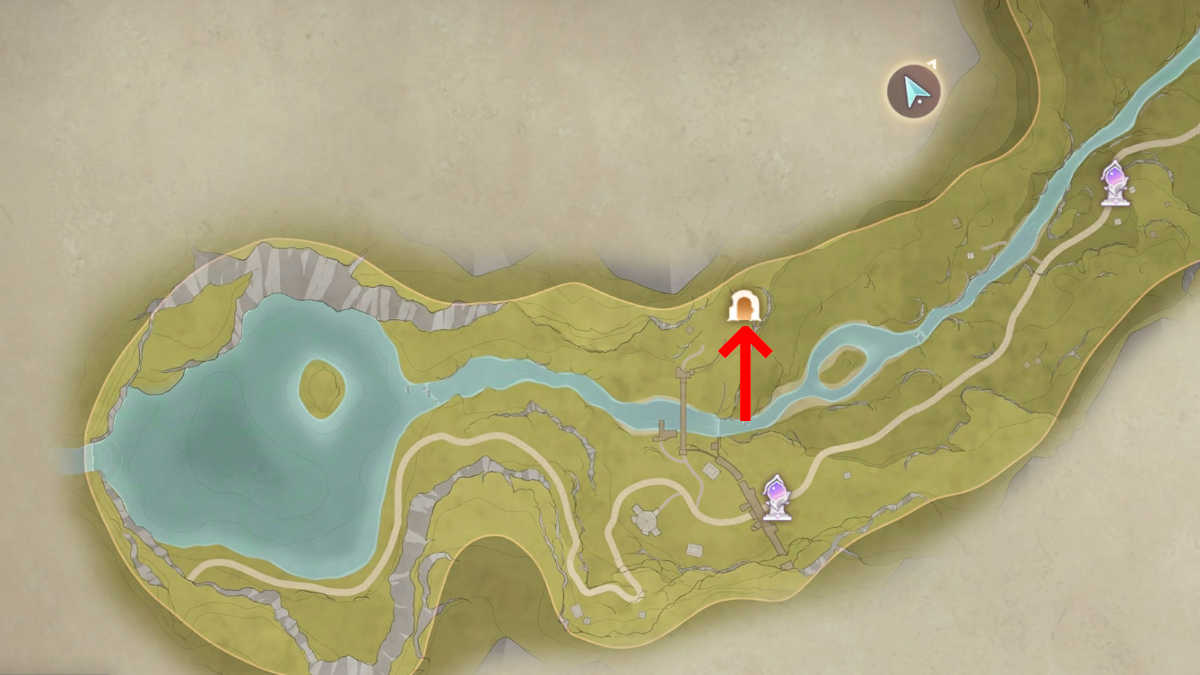
After capturing all 40 of the opposite images, you’ll be capable to go and seize this “secret” location. You’ve probably seen it earlier than, it’s the gazebo on the small path close to Memorial Mountains:

Sadly, this ultimate photograph seems to be damaged as no person has been in a position to seize it as a way to log it within the Expedition Handbook. On the plus facet, it’s not tough to seek out, so when a repair is carried out we will all get our ultimate shot.


